
With a few well-chosen steps, you can bring it back spectacularly.
Many houseplant enthusiasts know the situation: winter has ended and the light is getting stronger, yet the usually hardy spider plant has brown tips, dull leaves and an overall tired appearance. Rather than a dense head of fresh green foliage, there is only a sad-looking tuft in its hanging basket. Between March and May is precisely when it is decided whether it enters summer looking bushy or more like a plant in need of care.
Why spring is the key season for the spider plant
The spider plant, botanically known as Chlorophytum comosum, slows its metabolism considerably over winter. As the days lengthen, its activity noticeably increases: sap flows more strongly, fresh leaves emerge and roots resume active growth. At this point, the plant copes with minor interventions far better than it would during a dark January.
This is where the opportunity lies: anyone who takes a thorough look at positioning, roots, compost and care once in spring lays the foundations for a dense, rich-green “waterfall of leaves” that remains attractive well into summer. Doing nothing can result in yellow foliage, sun scorch and dried-out roots – often only becoming obvious once the heatwave is already under way.
A brief spring check takes ten minutes – and determines for months whether the spider plant looks magnificent or simply hangs there miserably.
Checklist: six spring tips for a truly healthy spider plant
Rather than doing “something” every week, it pays to follow a clear routine. These six measures will get almost any spider plant back into shape – no green fingers required.
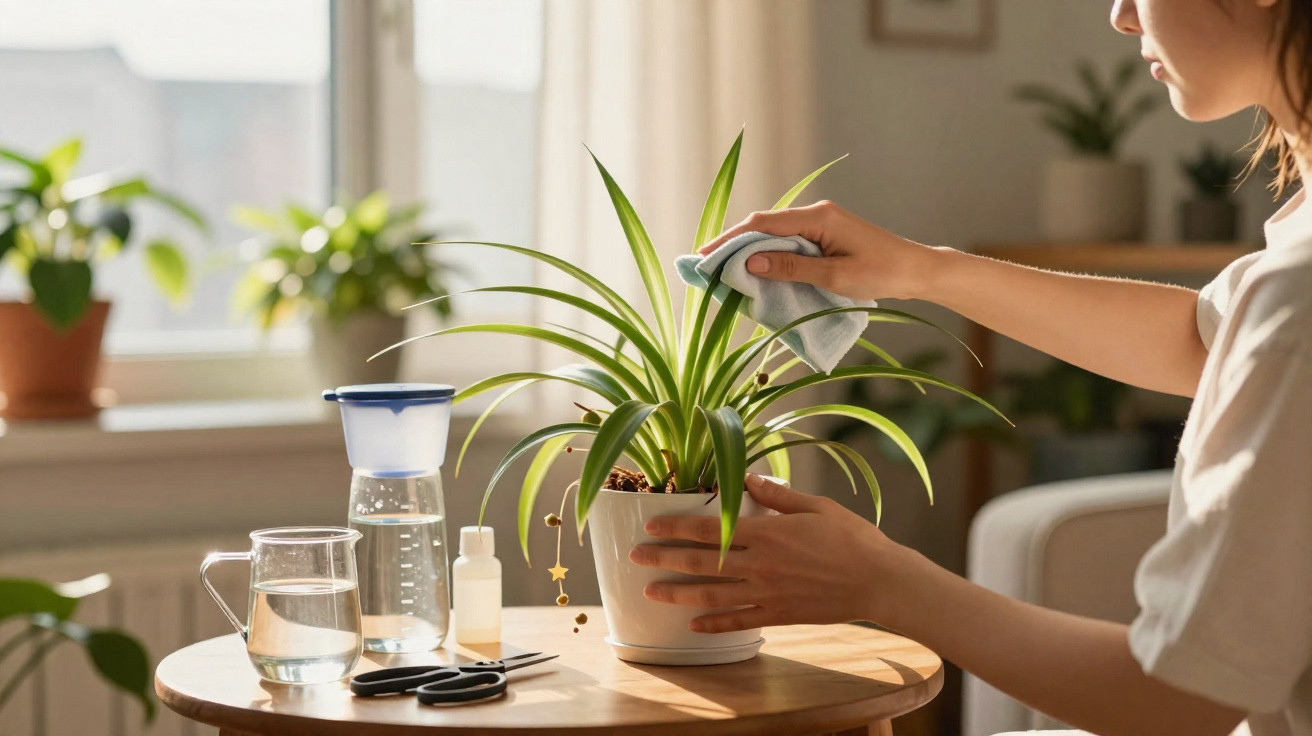
1. Remove dust from the leaves thoroughly
Dust blocks light, and without light there can be no vigorous growth. Carefully wipe every leaf from base to tip with a soft, slightly damp cloth. Do not overlook the undersides, as they often collect more particles than the upper surfaces.
Avoid leaf-shine sprays. They leave a coating on the foliage that may interfere with the plant’s ability to breathe. Lukewarm water is entirely sufficient.
2. Neatly cut away brown tips and dead leaves
Brown leaf tips are not merely unattractive; they also use up the plant’s energy unnecessarily. Using sharp scissors, trim them at a slight angle so the leaf keeps its natural shape. Remove leaves that have died completely at their base.
Important: do not cut into healthy green tissue. Every cut is a small wound that the plant needs to seal.
3. Water correctly rather than relying on instinct
A spider plant likes a drink but does not tolerate wet feet. Allow the compost surface to dry slightly before watering again. As a check, push a finger around two centimetres into the compost: if it still feels damp, it is better to wait.
- Water little and often rather than using large amounts
- Never leave the saucer permanently full
- Tip away any remaining water after a few minutes
A root ball that stays constantly wet can quickly cause root rot: despite damp compost, the plant may suddenly collapse. This simple finger test helps prevent exactly that.
4. Improve water quality to prevent brown tips
Many spider plants are sensitive to hard tap water. The familiar brown edges can be the result, even when you appear to be doing everything “correctly”. Better options include:
- Rainwater collected in a water butt
- Alternatively, tap water that has been left to stand for at least 24 hours
- Lukewarm water instead of ice-cold water
If rainwater is not available, use soft bottled water for two or three watering sessions to gradually flush heavily calcareous compost.
5. Begin feeding gently
After winter, the nutrients in the pot are usually depleted. From March onwards, the spider plant benefits from a mild nutrient boost. Choose a liquid fertiliser for green plants and use half the quantity recommended on the bottle. Once a month is generally enough.
Too much fertiliser shows up as dry leaf tips, white crusts on the compost and, eventually, weakened roots. Underfeeding is preferable to overdoing it.
6. Inspect the plant for pests
Even a hardy spider plant is not necessarily safe from pests. In spring, make sure you examine the leaf axils and undersides of the leaves:
- Whitish, cotton-like patches indicate mealybugs
- Fine webbing between leaves points to spider mites
- Sticky deposits may be a sign of aphids
With a light infestation, it is often enough to shower the plant with lukewarm water and regularly wipe affected areas using a cloth dampened with soapy water. When spotted early, most problems can be dealt with without harsh chemicals.
Light, position and pot: creating the perfect curtain of spider plant leaves
The ideal place indoors
The spider plant thrives in bright, indirect light. An east- or west-facing window is close to ideal. At a south-facing window, keep it at least one metre away from the glass or place it behind a thin curtain to stop the leaves from scorching.
Typical warning signs of an unsuitable position:
| Symptom | Possible cause |
|---|---|
| Leaves become pale | Too much direct sun |
| Long, soft shoots and little volume | Too dark, too far from the window |
| Dry, brown patches in the middle of the leaf | Sun scorch caused by strong midday sun |
Moving your spider plant a little closer to the window in spring encourages significantly stronger growth. Do this gradually, however, so it can adjust to the more intense light.
When a new pot makes sense
Once roots are growing from the drainage hole or the entire root ball feels like a solid block, it is time to move the plant into a larger pot. Spring is the best season to do this.
When repotting, proceed as follows:
- Ease the plant carefully out of its pot.
- Loosen tangled roots slightly and cut away any rotten sections.
- Select a new pot only one size larger than the current one.
- Add fresh compost for green plants, optionally mixed with a little sand or perlite.
- Set the plant at exactly the same depth as before.
- Water until it runs out of the bottom, then empty the saucer.
An oversized pot may seem tempting (“then I will not have to deal with it for longer”), but it leaves the roots sitting in continually damp compost. That holds the plant back rather than helping it.
Spider plant babies: use offsets without weakening the mother plant
Long, trailing stems with small “babies” at the ends are typical of the spider plant. These offsets look attractive, but over time they require a great deal of energy from the mother plant. Taking action in spring brings two benefits at once: a denser main plant and plenty of new plants for other rooms.
This is an especially easy way to root offsets:
- Pick strong young plants that already show small roots.
- Fill a small pot with light, loose compost.
- Leave the offset attached to the mother plant at first and press it into the compost.
- Keep it slightly moist, but never waterlog it.
- After two or three weeks, check whether the offset is firmly rooted – only then separate it from the mother plant.
If you remove many offsets, you may give the mother plant a little more fertiliser in return to strengthen growth of the main clump.
Background: why the spider plant is considered ideal for beginners
The spider plant originally comes from the warm regions of South Africa. It is well suited to homes because it copes relatively well with dry central-heating air and generally forgives short-lived care mistakes. Even if you forget to water it, you will rarely find a completely dried-out plant a few days later.
At the same time, it responds remarkably clearly to good care: more light, clean leaves and the right amount of water can produce denser, fresher growth within only a few weeks. This effect is particularly easy to observe in spring.
Its ability to absorb pollutants from indoor air is also interesting. Studies show that spider plants can bind certain substances released by furniture or carpets over time. They are not a miracle cure for poor air, but in a well-ventilated room they can contribute to a more pleasant environment.
Practical combinations: where the spider plant works particularly well every day
Its trailing growth habit makes it especially suitable for:
- Hanging baskets in the living room
- Shelves above a desk
- Bathroom windows with daylight
- Kitchen windows that do not become too hot
In the bathroom, the plant benefits from higher humidity, provided the room is not too dark. In the kitchen, avoid hanging it directly above the hob or sink so that grease and steam do not leave the leaves sticky.
For households with cats or dogs, it has another advantage: compared with many other houseplants, the spider plant is considered relatively unproblematic if a leaf is nibbled. Pet owners should still seek individual advice if in doubt, as animals can react differently.
Anyone who follows these six spring tips just once will often see their spider plant in a completely different light: instead of being a grey dust collector, it becomes a lively, densely leafy plant that acts like a green curtain throughout summer – while continuously producing new offsets for family, friends or the office.
Comments
No comments yet. Be the first to comment!
Leave a Comment