
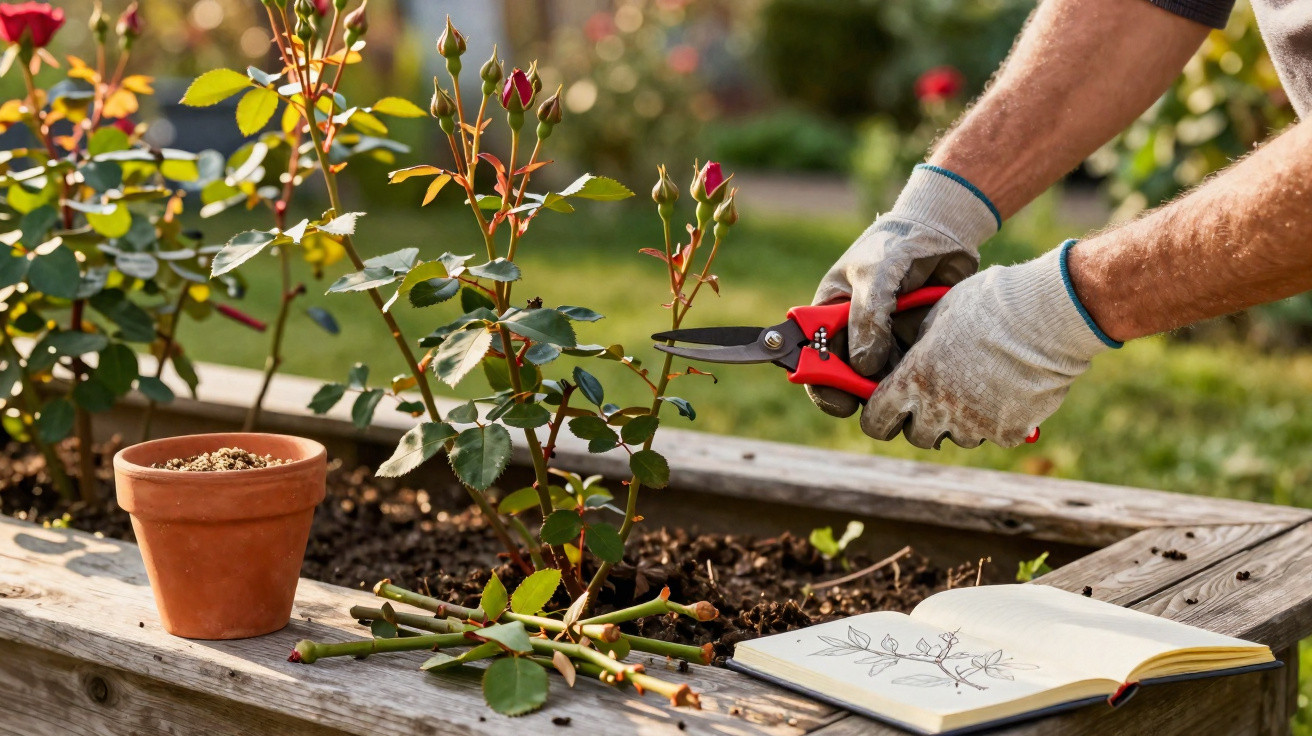
Many amateur gardeners damage their roses with well‑intentioned pruning - yet one straightforward professional trick in spring makes all the difference.
It plays out the same every year: winter finally loosens its grip, the secateurs come out, and when in doubt people cut back hard. A few weeks later comes the disappointment - fewer flowers, weak growth, lopsided shrubs. A seasoned nursery grower approaches spring care very differently, showing how a considered routine makes roses sturdier, healthier and far more free‑flowering.
Why the usual rose pruning so often disappoints
A lot of gardeners prune on autopilot: take a shoot here, shorten another there, and aim for something that looks tidy. The plant’s response is often unexpected - and rarely beneficial.
"Pruning a rose bush too harshly or without a clear plan drains its energy, weakens its framework and noticeably reduces flowering."
If you cut too low, you force the rose into an extreme restart. It will often survive, but it can take a long time to regain shape. With weaker or older plants, that commonly results in sparse, feeble new growth.
The opposite mistake is being overly cautious because you fear removing “too much”. That leaves lots of thin, underpowered shoots that carry few blooms and crowd the centre of the shrub. Moisture then lingers, fungal diseases spread more easily, and the rose looks messy and congested.
The outcome is typically fewer flowers, more leaf problems and a shape that looks neither graceful nor robust. This is exactly where a professional nursery grower’s method comes in.
The professional method: observe first, then prune
The key difference is not a “secret pruning schedule”, but how you look at the plant. A nursery grower doesn’t start with the secateurs - they start with a few calm seconds of observation.
They check:
- Which stems are vigorous, strong and well positioned?
- Where is there dead wood, and where are there blackened or dried‑out sections?
- Which branches are rubbing together or crossing awkwardly?
- How open - or how “blocked” - is the centre of the shrub?
The aim is not “remove as much as possible”, but to create a balanced structure. The rose should get air and light into the middle, and its growth should be guided outwards rather than pushing and tangling in on itself.
"The core rule of the professional method: keep strong wood; remove weak, dead and disruptive wood - and make every cut with a clear plan."
In practical terms:
- Strong, well‑placed main stems stay.
- Wood that appears dead or is clearly damaged is removed completely.
- Very thin shoots that would hardly flower are taken out too.
- Any branches that cross or rub must go, usually the weaker one.
- Each remaining stem is shortened above an outward‑facing bud.
This encourages the shrub to open outwards. Light reaches the centre, rain dries faster, and the plant puts its energy into stable, load‑bearing stems instead of a tangled web of twigs.
The right time in spring
Technique matters, but timing does too. Prune too early and a late frost can damage tender new growth. Leave it too late and you remove growth the rose has already spent energy producing.
Buds provide a reliable guide. When they are clearly swelling and taking on a slight green tint - and hard frosts are no longer expected - the ideal window has arrived. In many areas, that falls between late winter and early spring.
If soft, small shoots have already appeared on the branches, it is not a disaster. In that case, use a gentler prune and leave a little more length. Roses are more forgiving than most people think - provided the cuts are deliberate.
Step by step: how to prune roses
Before you make a single cut, it helps to walk around each shrub. Seeing it from every angle makes it easier to spot what truly interferes with the structure and what forms the plant’s backbone.
Specific pruning steps for healthy roses
- First, remove all dead, blackened or clearly diseased twigs right down at the base.
- Take out very thin shoots - matchstick thickness or less - without hesitation.
- Inside the shrub, remove crossing stems so the centre stays open.
- For shrub roses, keep three to five strong, well‑spaced main stems.
- Shorten each of these stems just above an outward‑facing bud.
A clean cut with sharp secateurs is essential. The cut surface should slope slightly so water runs off; there is no need for an extreme angle. Leave roughly 1 cm between the bud and the cut edge as a safety margin, so the bud does not dry out.
The right height depends on the plant’s vigour
A strongly growing shrub can cope with a bolder cutback. Depending on variety and habit, you can reduce the height to around 20–30 cm. Weaker roses or newly planted ones should be left a bit longer, so they can build enough leaf area to support themselves.
"Every rose has its own character - if you cut them all to the same height, you take away their natural shape."
Many professional gardeners describe it as a “conversation” with the plant. Rather than forcing a rigid formula, you read the structure and support the growth instead of breaking it.
These spring mistakes you should stop making
Three common errors keep appearing in home gardens. Avoid them and the improvement is immediate.
- Random shortening: cutting stems “somewhere” without considering buds, direction and structure leads to chaotic growth.
- Leaving old wood in place: fearing drastic cuts, people keep tired, ageing stems that barely perform.
- Cutting too close to the bud: if you cut right against the bud, it can dry out and fail to grow reliably.
Blunt or dirty tools also do more harm than many realise. Ragged cuts seal over more slowly, and pathogens can enter more easily. Sharpening and cleaning properly before the season prevents a lot of trouble.
What roses urgently need after pruning
Pruning is a small stress test for the plant. After that comes the rebuild phase - and you can support it on purpose.
- In dry weather, water the root area thoroughly.
- A thin layer of well‑rotted compost or a dedicated rose fertiliser supplies nutrients.
- A light mulch of bark humus or other organic material helps the soil stay moist for longer.
"The combination of considered pruning, a nutrient boost and a light mulch often produces a visible growth leap within just a few weeks."
Afterwards, keep an attentive eye on new shoots. If they emerge strong, even and directed outwards, it is a good sign the pruning was right. Any weak water shoots can still be removed later or lightly shortened so energy is channelled into the strongest parts.
What this method changes in your garden
When you move from quick “cutting down” to an observant, targeted approach, your whole view of roses tends to shift. The shrub no longer feels like a high‑maintenance problem, but like a predictable, rewarding ornamental.
In practical terms, this means:
- less stress on the plant thanks to measured interventions,
- sturdier stems that hold flowers better,
- a more open crown where fungal spores have poorer chances,
- and often noticeably more buds in early summer.
If you are new to growing roses, you can apply the method from the start. In particular, young plants develop a stable foundation with a good formative prune in the first few years - something you benefit from for a long time. With old, overgrown shrubs, it is worth spreading the process over two to three years so the rose is not overwhelmed all at once.
For beginners, one practical exercise is to treat one or two shrubs differently in spring: prune one as you usually would, and prune another using the professional method described here. The side‑by‑side comparison in summer usually makes it very clear which approach gives better blooms, a calmer shape and a healthier overall look.




Comments
No comments yet. Be the first to comment!
Leave a Comment