
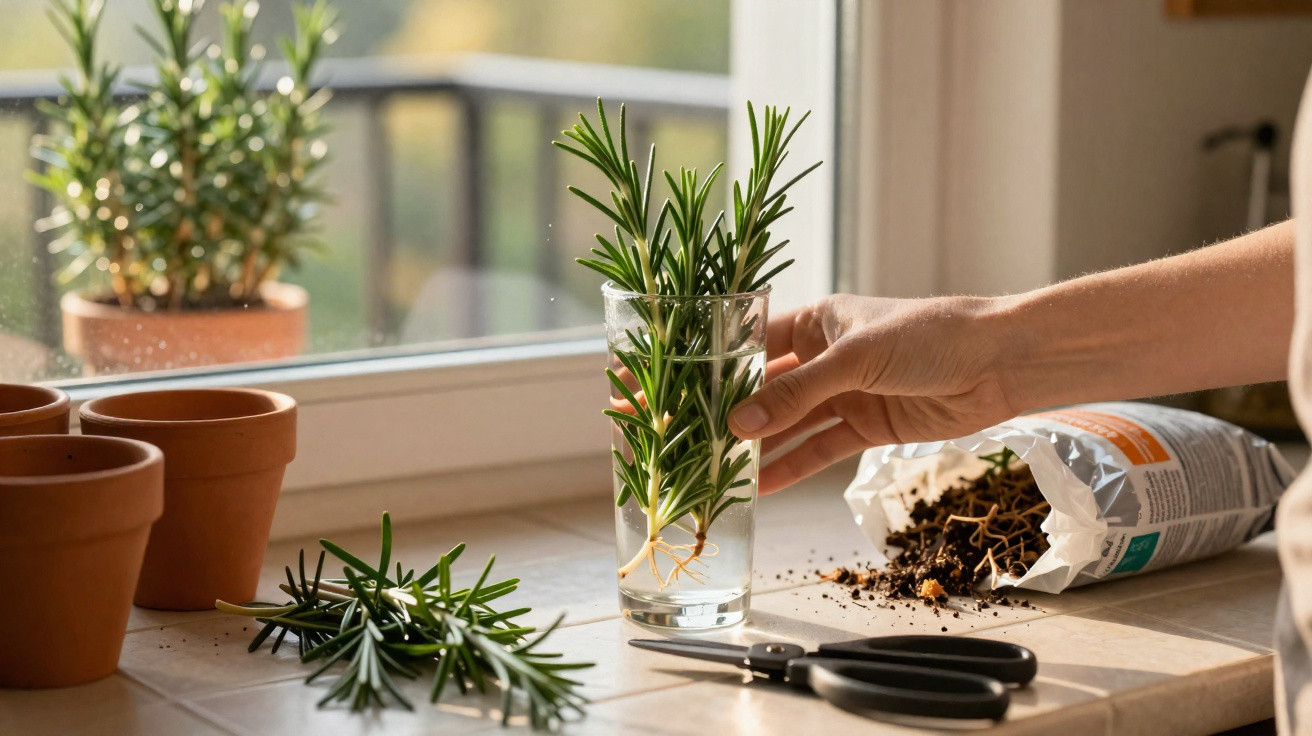
A modest rosemary plant on a windowsill can, with the right treatment of its shoots, quietly turn into a whole miniature plantation.
Garden centres may prefer you to buy fresh pots every spring, yet patient home gardeners are using a glass of water, sharp scissors and a little sunshine to do something quite different.
Why propagating your own rosemary is worthwhile
Rosemary, or Salvia rosmarinus, is an herb that vanishes quickly when you make full use of it. Entire sprigs go into roasting tins, sauces, marinades and even cocktails. Regularly buying fresh bunches becomes expensive, while supermarket pots seldom last long on a kitchen worktop.
Growing new plants from your own rosemary changes the picture. A healthy parent plant can provide a continuing supply of replacements for virtually no cost. You retain a flavour you know and enjoy, while avoiding the frustration of sparse, unremarkable supermarket herbs that fade away after a fortnight indoors.
By turning a single mature rosemary into several younger copies, you lock in the exact aroma you enjoy while cutting future costs to almost zero.
There is an environmental benefit too. Propagating at home involves less plastic, reduced transport and fewer spur-of-the-moment purchases destined for the compost heap. For balcony growers or anyone with only a sunny window, knowing how to multiply one hardy herb can make a modest but meaningful difference to how often they cook with truly fresh ingredients.
The basic rosemary method: water first, soil later
The approach becoming popular with amateur gardeners is remarkably straightforward. It does not begin with seeds or conventional cuttings placed immediately into compost. Instead, shoots are first allowed to develop roots in plain water, before being transferred to gritty compost once they show growth.
Selecting suitable shoots
The first step towards success is choosing the correct part of the plant. Look for shoots that are firm yet green and pliable, rather than the old woody stems towards the base.
- Length: roughly 10–15 cm (4–6 inches) for each shoot
- Texture: fresh and green, rather than rigid or bark-like
- Health: free from yellow needles, dark marks and mould
With clean, sharp scissors or secateurs, cut just above a leaf node so the parent plant can produce another branch. This helps the original rosemary stay bushy, promotes fresh growth and supplies material for future “baby plants”.
Getting the shoots ready to root
After cutting, remove the needles from the lower part of every shoot. This exposed area is where roots will emerge.
Remove all the needles on the bottom third of the shoot so bare stem sits in the water and future roots have space to grow.
Pour lukewarm water into a clean glass or small jar. Cold tap water is unlikely to stop rooting altogether, but beginning with slightly warm water limits shock to the plant tissue.
Put the prepared shoots into the glass, ensuring that only the bare stem sits below the waterline. Keep the leafy tips dry and above the rim. Place the glass somewhere bright but shaded, such as behind a curtain or on a shelf out of the direct midday sun. Strong sunshine at this point can dry the needles and warm the water too fast.
Moving from a glass of water to a rooted plant
This is the stage that gardeners either enjoy or dislike: the wait. The stems may remain in the water for weeks with very little visible change at the beginning.
Replacing the water and finding the first roots
Empty and replace the water every two days. This easy routine controls algae and bacteria, while ensuring the developing roots have sufficient oxygen.
Fine white roots generally begin to show between the fourth and eighth week, emerging along the underwater part of the stem. Initially, they can be difficult to spot, resembling delicate threads against the bark.
As soon as several roots are at least 1–2 cm long, the shoot is ready to move into soil and behave like a normal young plant.
When there has been no sign of rooting after eight weeks, the cutting was probably not vigorous enough from the outset. It is normally faster to take another, fresher cutting from the parent plant than to continue waiting.
Potting on: the soil rosemary really needs
When roots have formed, the glass has fulfilled its purpose. The young plants now require airflow around their roots and effective drainage. Ordinary bagged compost on its own is often overly dense and remains wet for too long.
Creating a free-draining growing mix
This uncomplicated blend is effective:
- 1 part garden soil or all-purpose compost
- 1 part coarse sand or fine grit
The mixture holds enough moisture for the roots while allowing surplus water to drain away rapidly. Select pots at least 15 cm (6 inches) deep and ensure they have a drainage hole. As rosemary develops into a small shrub, it benefits from this additional depth from the outset.
| Step | What to do | Why it matters |
|---|---|---|
| 1 | Put a drainage layer of pebbles or broken pot in the base | Stops water from gathering around the roots |
| 2 | Fill the pot with the sand–soil mixture, leaving a small hollow | Creates room for the rooted stem |
| 3 | Set the rooted stem in the hollow with its roots spread out | Allows the plant to establish itself quickly |
| 4 | Refill gently and lightly firm the soil | Eliminates air pockets around the roots |
| 5 | Water once, then allow the surface to dry slightly | Encourages the roots to grow deeper |
Position the pot where it will receive six to eight hours of light daily. A south-facing windowsill, sunny balcony or sheltered terrace will all work well, provided the container is not left standing in water after rain.
Helping new rosemary plants flourish
Once planted, young rosemary has needs much like those of its parent: plenty of sun, no waterlogged roots and thoughtful trimming rather than severe cutting.
Pruning and feeding without putting the plant under strain
- Do not take away more than around one third of the foliage in a single session. Heavy pruning slows growth and puts the plant under stress.
- Use the trimmed sprigs in cooking, then allow the rosemary to recover before another substantial harvest.
- During the growing season, feed sparingly with an organic fertiliser such as compost or a gentle liquid feed.
Treat the needles as an early alert. Yellowing or large-scale needle drop can mean the plant has not established itself. This is often caused by saturated soil or root damage during transplanting.
Yellowing or falling needles usually mean the young rosemary has not settled; starting again with a fresh, vigorous shoot is often faster than trying to rescue a failing one.
Why gardeners return to this method
People who follow the “water glass first, pot later” approach commonly continue using it for several reasons.
- Lower cost: A single original plant can provide herbs and replacement plants for years, eliminating repeated purchases.
- Stable flavour: As the plants are clones, they preserve the aroma of the original rosemary bush you enjoyed.
- Faster harvest: Shoots rooted in water generally reach a useful size sooner than seedlings raised in seed trays.
- Flexible location: The technique suits a kitchen shelf, a student balcony or a full-sized garden equally well.
- Lower waste: It means fewer plastic pots and less packaging than continually purchasing replacement herbs.
Frequent mistakes and ways to prevent them
The technique is fairly forgiving, although beginners regularly encounter a few avoidable problems.
Excess sun and excess water
Leaving the glass in direct sunshine during the water stage is a common error. The water soon heats up, algae develop and the delicate stems effectively cook instead of forming roots. Bright, indirect light is the safer choice.
After potting, problems also arise when rosemary is treated like basil. Rosemary can cope with brief dry periods, but persistent damp is far more damaging. Wait until the upper layer of compost has dried before watering again.
When “woody” is already too old
Gardeners sometimes select thick, impressive-looking stems for propagation. These mature woody stems seldom produce roots in water. Their role is to bear the plant’s weight, not begin a new plant. Choosing younger green growth greatly improves the success rate.
Extra context: useful terms and techniques
Two phrases occur regularly in gardening instructions but are not often properly explained to new growers. “Well-drained soil” simply describes compost that allows water to pass through rapidly rather than retaining it like a sponge. In a pot, mixing sand or grit into standard compost is an easy way to create it.
“Hardening off” is another useful term. When new rosemary has spent several weeks indoors, introduce it to outdoor conditions gradually across a week: begin with a few hours in shade, extend the time outside, then expose it to some direct sun. Moving it immediately from a still kitchen to a breezy balcony can scorch its needles.
Cooks may also find one practical possibility worth considering. One parent plant, trimmed regularly for 10–15 cm shoots, can yield several rooted young plants each year. Within two seasons, you may have a small line of rosemary along a balcony rail, providing enough for roasts, focaccia, infused oils and salt blends without needing to browse the supermarket herb shelves again.
For anyone who likes easy experiments, the technique also works surprisingly well with certain other woody Mediterranean herbs, including lavender and sage. Every species has particular requirements, but the central idea remains unchanged: a fresh green shoot, time in water, a gritty potting mixture and plenty of sunshine can turn one small purchase into a long-lasting, fragrant habit.




Comments
No comments yet. Be the first to comment!
Leave a Comment