
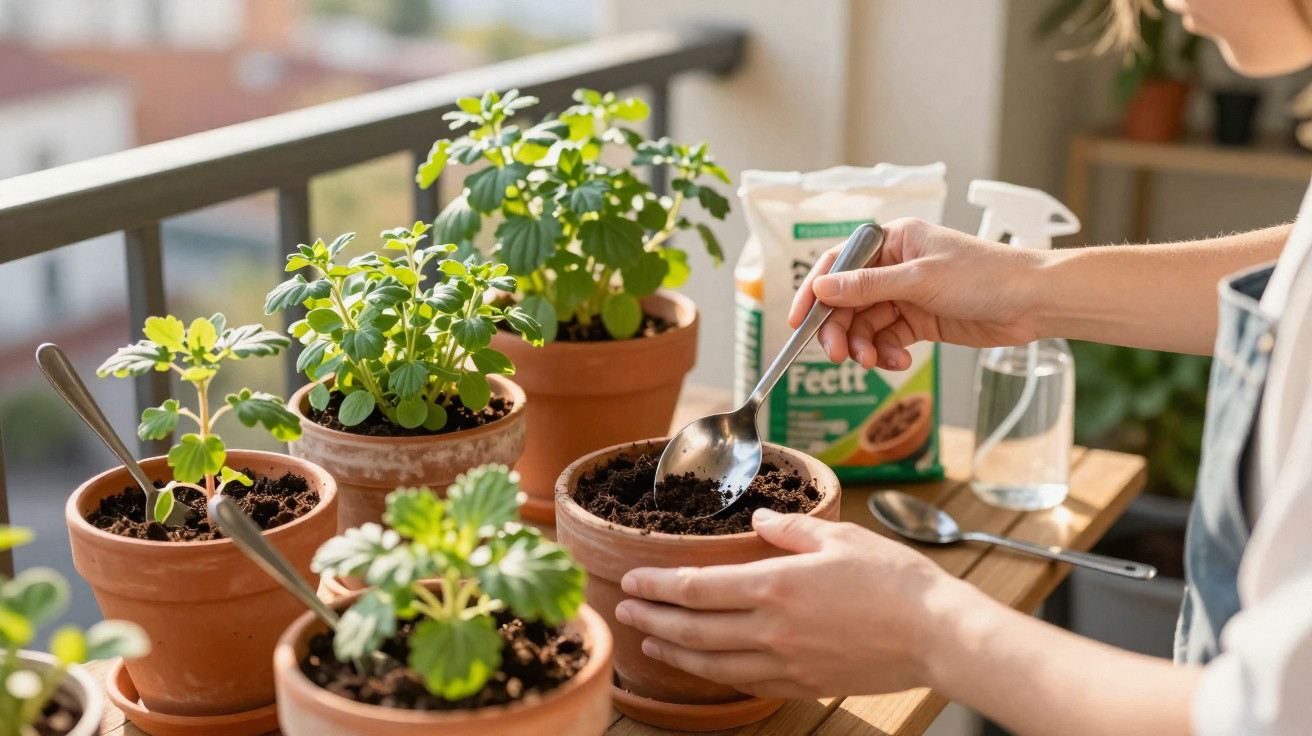
What looks like a quirky decoration trend actually has a practical backstory. Plenty of hobby gardeners swear that a simple metal spoon in a plant pot makes plants grow more strongly and helps keep unwanted crawling pests away. It feels far too basic to be taken seriously - which is exactly why so many people find it intriguing.
Where the idea of a spoon in a plant pot comes from
Using metal in the garden is hardly a new concept. Some people place copper coins at the bottom of a pot, while others use metal coils to deter slugs. The spoon-in-the-pot approach is essentially the next step: a familiar household item that sits tucked away in the compost and is meant to influence the soil and small creatures.
The basic premise is simple: instead of buying specialist products, you use a spare spoon you no longer need. You push it into the soil so the metal is bare - no varnish, no paint. Depending on the pot size, the handle might stick out slightly or disappear completely into the compost.
"The spoon is meant to influence the soil in the pot over the long term - with minimal effort and virtually no extra cost."
These days the method is discussed a lot in internet forums, balcony-gardening blogs and hobby groups. Some people report that their plants seem subjectively “fitter”, while others see it as a fun experiment but notice no major change. There’s no scientific proof so far - the spoon idea sits much more in the realm of folk knowledge and a willingness to experiment.
What a metal spoon is supposedly doing for your plants
A slight mineral boost from the metal
Potting compost is a closed, limited system. Nutrients break down, get leached out, or are completely taken up by the roots. The thinking behind the spoon is that, with moisture and time, tiny amounts of metal ions may dissolve out of the alloy and enter the soil.
Many hobby gardeners follow this line of reasoning:
- The spoon is usually made from stainless steel or another metal mix.
- Moisture, fertiliser and slightly acidic compost can dissolve the metal very slightly.
- That could release trace minerals into the growing medium.
- Over time, the plant may receive a very small extra supply of micronutrients.
In reality, the effect is likely to be weak, because stainless steel and many modern alloys are quite resistant to corrosion. So the spoon shouldn’t be seen as a replacement for fertiliser or a decent growing medium. Still, for some people the notion of a gentle, passive “micro-boost” is enough to make it worth a try.
A physical barrier and light reflections against crawling pests
The second commonly cited benefit is more straightforward: the spoon creates an obstacle near the sensitive root zone and at the base of the stem. Small crawlers run into a smooth, hard surface that they have to go around.
There’s also a visual factor. Metal reflects light, particularly before the spoon becomes fully dull. Some insects and soil pests avoid bright or reflective surfaces. The assumption is that the spoon confuses them and keeps them away from the plant stem.
"Many see the spoon as a small, chemical-free extra barrier - not perfect, but often welcome in the limited space of a balcony."
That doesn’t make it a miracle cure - it’s more of one element in a broader set of preventative habits, such as healthy compost, correct watering and good air circulation.
How to use a spoon in a plant pot properly
What kind of spoon is suitable?
The best option is an old, clean metal spoon without any coating. These points matter:
- Material: stainless steel or traditional metal cutlery, not enamelled.
- No paint: no varnish, no decorative coating, no gold-coloured “token” layer from a homeware shop.
- Condition: clean, rust-free, with no sharp edges.
- Size: a teaspoon for small pots, a tablespoon for larger containers.
If you’re not sure, plain stainless-steel cutlery from the kitchen is the safer choice. Coated or decorative spoons can release substances that don’t belong in potting compost.
The right position in the pot
A common beginner’s mistake is to force the spoon in right next to the stem. That can damage roots, especially in sensitive species. A gentler approach looks like this:
- Clean the spoon thoroughly and dry it before inserting.
- Start about 2–3 centimetres in from the pot rim, rather than straight into the root ball.
- Press it in slowly, without levering or twisting.
- Insert it deep enough that the spoon bowl sits in the moist compost.
For a medium-sized pot, one spoon is usually enough. In very small containers - for example mini succulents or delicate bonsai - the experiment is hardly worthwhile because the spoon takes up too much space.
Which plants are suitable - and which are better left alone
Many balcony and indoor gardeners begin with sturdy ornamental plants - the kind that cope well if something slightly unusual happens in the pot.
| Suitable for a test | Better to be cautious |
|---|---|
| Ficus, rubber plant | Delicate ferns |
| Geraniums, petunias | Sensitive orchids |
| Spider plant, peace lily | Mini herbs in very small pots |
| Robust indoor palms | Very young seedlings |
A lot of hobby gardeners try the spoon first with ornamental plants only. With herbs and edible crops such as tomatoes or peppers, some people hesitate because they don’t want unknown metals anywhere near food later on - even if the real exposure would probably remain low.
How to test whether the spoon actually helps in your home
If you’re curious, you can run a small DIY test. The key is keeping the comparison reasonably fair:
- Pick two plants that are as similar as possible in identical pots.
- Use the same compost, the same light conditions and the same watering routine.
- Put a spoon in one pot and leave the other without.
- Observe growth, leaf colour and pest activity over several weeks.
That way you’ll see whether the difference is meaningful in your own conditions. Many people describe subtle effects: slightly stronger shoots, a touch fewer fungus gnats, fewer visits from slugs on outdoor pots. Others notice nothing at all - which is entirely normal with such a simple measure.
What the spoon can’t do - and what you still need
Anyone treating the spoon as a miracle solution is bound to be disappointed. It won’t replace:
- high-quality potting compost,
- regular, appropriate feeding,
- correct watering with drainage,
- or sufficient light.
Fungus gnats and other pot pests, in particular, react strongly to waterlogging, dead roots and over-fertilised compost. If you don’t address those factors, a metal spoon won’t make much difference. At best, it’s a small component within a wider toolkit of minor tricks.
Risks worth a brief thought
One detail many people only realise later: metal can corrode in soil, even if slowly. A very old, already rusty spoon will change faster than modern stainless steel. Rust itself is mostly iron oxide, but some metal mixes contain additional elements that nobody wants in salad or tea.
If you’re growing edible plants, it’s sensible to weigh up whether a decorative experiment in the pot is really necessary. For purely decorative leafy plants in the living room or on a windowsill, the risk tends to feel much smaller.
There’s also this: in very dense root balls, the spoon can cause breakage when you repot. When you lift the plant out, it can snag easily and tear roots with it. If you already know you’ll be moving the plant on soon, it’s better not to insert a spoon at all - or at least make a note of exactly where you put it.
What the spoon method says about the trend for experimenting
Whether the spoon in a plant pot turns out to be more placebo than miracle is, for many hobby gardeners, almost beside the point. The trick represents something else: trying to get more out of a few square metres of balcony or a windowsill using simple tools and everyday objects.
If you enjoy harmless little hacks, you can certainly try the spoon trick - ideally with a comparison pot and realistic expectations. If you prefer the classic approach of fertiliser, good compost and tidy pot hygiene, you may miss out on a nice talking point, but you won’t be missing a revolution in plant care.
Comments
No comments yet. Be the first to comment!
Leave a Comment