
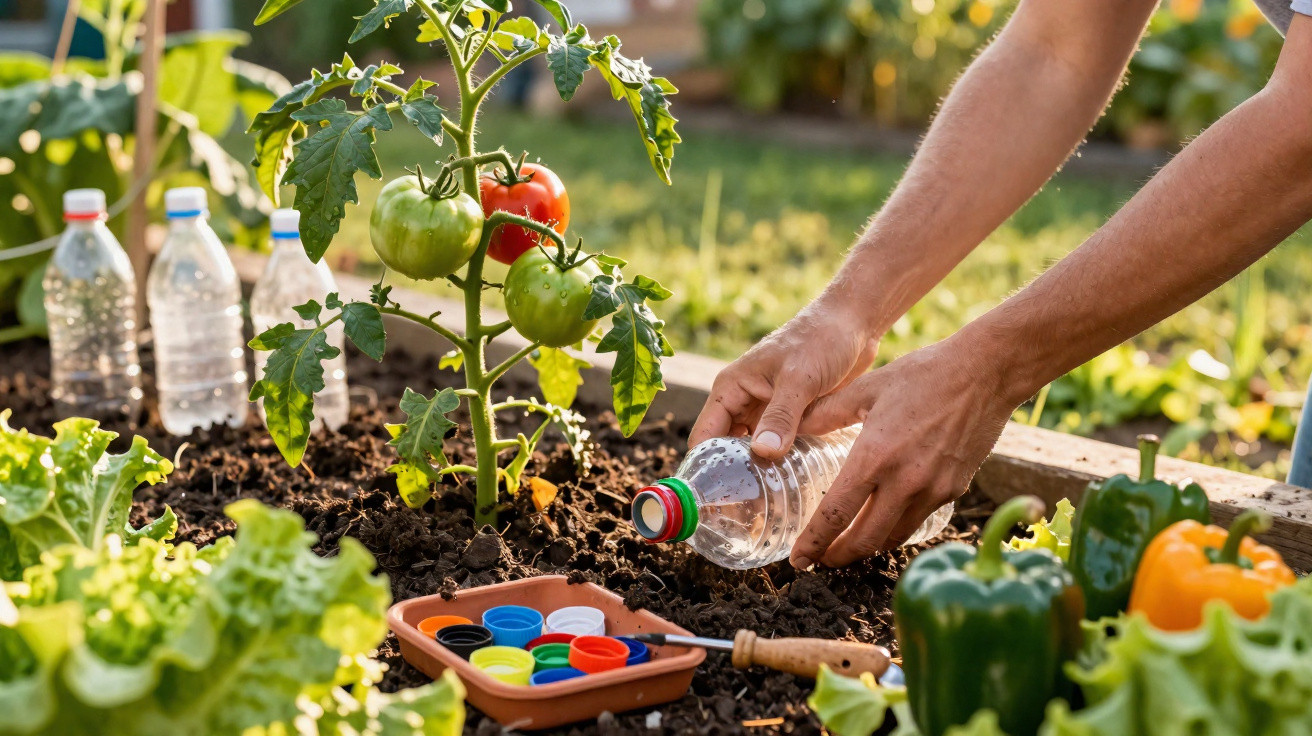
An unexpected helper lies dormant in the garden – one that many people casually throw away, even though it can save vegetables and conserve water.
When preparing beds in spring, most people think about soil, seeds and a watering can – but rarely about the small plastic caps from the kitchen. Yet these inconspicuous items are surprisingly useful for making a vegetable garden more resilient to heat, drought and pests. With one simple trick, waste can become an effective irrigation system, with no high-tech equipment or costly devices required.
Why bottle caps suddenly matter in the vegetable garden
Empty water and juice bottles usually go straight into the recycling bin in the kitchen. Their screw caps are removed and discarded too. In a garden bed, however, these sturdy plastic pieces can be put to good use. They withstand the weather, barely lose their shape and can last for several seasons.
“Anyone who saves caps already has the most important component for simple, slow irrigation at home.”
Young seedlings can quickly suffer from a lack of water, particularly during hot summers. Water applied to the surface either evaporates or runs away before it reaches deep into the soil. Directing water towards the root zone helps the ground retain moisture for longer – and that is where these small plastic caps come in.
The upside-down bottle: a simple system with a big impact
What materials you need
A small collection of everyday items is all that is needed to make your own irrigation system:
- empty bottles (1.5 litres are ideal, though 0.5-litre bottles work well for pots)
- matching caps
- a sturdy needle, thin nail or awl
- a lighter or matches to heat the tip
- a craft knife or sharp knife
Within minutes, packaging waste becomes a form of miniature drip irrigation that works directly beside the plants and significantly cuts water use.
The crucial step: making the perfect hole in the cap
The performance of the system depends almost entirely on one detail: the tiny hole in the cap. It controls how quickly or slowly water seeps from the bottle.
Follow these steps:
- Briefly heat the needle or nail with a lighter.
- Push the tip through the centre of the cap.
- Allow the cap to cool for a moment.
- Fill the bottle with water and screw on the cap.
- Test it over the sink: the aim is roughly one drop every two to three seconds.
If the flow is too strong, the bottle will empty very quickly. If no water comes out, the hole is either too small or blocked. Simply repeat the process and enlarge the hole very slightly. It soon becomes clear how precisely the flow rate can be adjusted.
The base of the bottle also needs an opening. Use the craft knife to cut off the bottom cleanly, creating a wide opening. This upper opening will later act as a filling funnel, so there is no need to remove the entire setup from the soil.
How to place the irrigation bottle correctly in the bed
The best position for tomatoes, peppers and more
The best time to install the bottle is when planting out young plants in spring. This allows it to be incorporated into the bed layout from the outset.
In a garden bed or raised bed, proceed as follows:
- mark a planting position
- dig a hole 10–15 centimetres deep beside the plant
- place the bottle neck-down so that the cap disappears into the soil
- firm the soil around it well so that nothing moves
The bottle should be close enough for the roots to grow towards its neck, but not so close that they are damaged directly. A small spade or hand trowel is entirely sufficient. Take care not to tear off any young roots.
How often to refill it
Once the bottle is firmly set into the ground, day-to-day watering becomes remarkably straightforward. The opening at the top replaces a funnel and makes refilling easier. Water goes directly into the bottle without being wasted, then reaches the soil through the hole in the cap.
The following is a useful general guide:
| Season | Suggested refill interval |
|---|---|
| Early spring | around once a week |
| Late spring / early summer | every 4–5 days |
| High summer in hot weather | every 2–3 days |
Naturally, soil type, location and plant species all make a difference. Sandy soils dry out faster than heavy clay soils. If in doubt, check the soil regularly with a finger. If it still feels cool and slightly damp at a depth of 5–10 centimetres, the system is working properly.
“Because water is released slowly, the soil stays evenly moist without becoming waterlogged or drying into cracked ground.”
Recycling in the bed: more uses for bottles and caps
Small caps can become slug traps
Colourful plastic caps can do more than provide irrigation. Used as shallow dishes, they can be turned into simple traps for slugs, which are particularly fond of tender lettuce leaves.
Slightly larger caps from milk or juice cartons are especially suitable. Here is how to use them:
- Press the caps into the soil as small bowls, leaving their rim just above ground level.
- Fill them with a little leftover beer or sweet syrup.
- Put them in the vegetable bed during the evening, particularly near lettuces and young plants.
The smell attracts the animals, which end up in the miniature traps. This reduces feeding damage without scattering poisonous bait.
A safe cover for pointed canes and plant supports
In densely planted beds, canes protrude from the ground everywhere: bamboo canes, metal rods and trellis supports. Anyone who has nearly poked themselves in the eye while weeding will know how unpleasant this can be. Ordinary plastic caps provide a useful solution as protective covers.
It is very simple to do:
- Push a cap onto the tip of the cane.
- Secure it with a little tape if the cane is particularly smooth.
- Sort caps by colour to mark rows or varieties.
This makes the canes easier to see and less hazardous. In family gardens with children or in cramped balcony beds, it can greatly reduce the risk of injury.
What changes in the soil when water reaches the roots directly
Stronger plants through consistent moisture
Anyone using upside-down bottles for a few weeks will soon notice changes. Tomatoes, peppers and cucumbers grow more evenly, leaves wilt less quickly, and the soil no longer dries into hard slabs. Roots orient themselves towards the bottle neck and make intensive use of the moist area.
There is another advantage: leaves stay dry while watering. Many fungal diseases thrive on moisture at the surface. Because the water reaches the soil directly, the risk is significantly lower. Tomatoes in particular benefit, showing brown patches or split fruit less often after heavy rain followed by sunshine.
Less water use, less waste
Anyone keeping an eye on the water meter will quickly find that watering becomes more efficient. Instead of watering the entire area every day, a shorter visit to the bottles is enough. The drip irrigation works out of sight while the surface remains undisturbed.
“Every bottle that is reused saves money, time and waste – while also easing the burden on local waste collection.”
This becomes increasingly relevant in areas with watering restrictions or rising water prices. A disposable item turns into a lasting part of the garden that can withstand several summers.
Practical tips, common mistakes and clever combinations
Common beginner mistakes and how to avoid them
People trying this method for the first time often encounter the same issues:
- Hole too large: The bottle is empty after an hour. Solution: use a new cap and make the hole with a smaller point.
- Hole blocked: In very clay-heavy soils, earth can clog the outlet. A small layer of gravel directly around the bottle neck can help.
- Bottle is unstable: Bury it deeper or press down the surrounding soil firmly.
- Too far from the plant: The root zone should be close to the bottle neck, otherwise only weeds will benefit.
It is worth checking during the first few days. Does the bottle really drip as it did during the sink test? Does the soil remain evenly moist without becoming muddy? Small adjustments can make a remarkable difference.
Which plants benefit most from the method
Crops with high water requirements and deep-reaching roots are particularly suitable:
- tomatoes, peppers and chillies
- cucumbers and courgettes
- squash and melons
- large herb plants such as basil or rosemary in containers
Smaller bottles work just as well in pots or balcony planters. Here, 0.5-litre containers are often enough and can be tucked more discreetly between the plants.
The system can also be combined with mulch: a thin layer of grass clippings, straw or shredded prunings around the plant provides extra protection against evaporation. One filling will often last longer, while soil temperature remains more stable.
There is also an interesting learning effect. Over time, many amateur gardeners develop a better sense of what their plants need. How quickly does the bottle empty on hot days? How do the vegetables respond to longer dry spells? This improvised DIY solution becomes a kind of natural measuring tool for the water balance in their own garden.
Comments
No comments yet. Be the first to comment!
Leave a Comment