
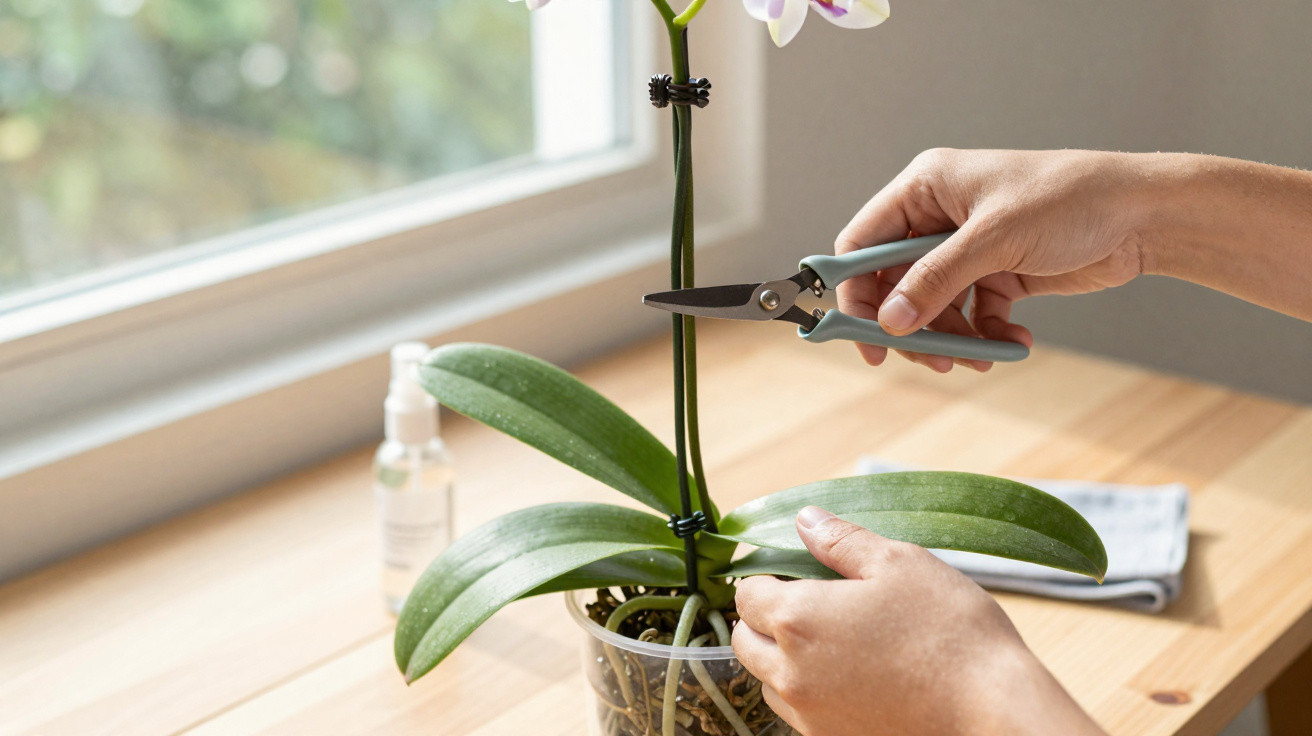
Many owners of Phalaenopsis orchids give up at exactly this stage and throw the plant away in frustration. Yet a very precise cut in the right place is often enough to bring the so‑called moth orchid back into bloom - sometimes in a truly striking way. A few millimetres matter, and so does focusing on the third node on the flower spike.
Why a Phalaenopsis isn’t “finished” after flowering
The typical indoor orchid from a garden centre is almost always a Phalaenopsis. It’s considered hardy, but once the last flower drops it does need a little know-how. A common misconception is that the plant is then “used up”. It isn’t.
"A Phalaenopsis has dormant buds along its green flower spikes - with the right cut, you can deliberately wake them up."
These buds sit at small thickened points on the spike, known as nodes or “eyes”. From there, a fresh side branch can develop and later carry new flowers. However, this tends to happen only when the upper part of the spike loses its “control function”.
The crucial cut: precisely above the third node
The key is a simple rule of thumb used by orchid growers worldwide: cut above the third node. What you do depends on the colour and condition of the flower spike.
How to find the right spot on a still-green flower spike
As long as the spike remains green and flexible, it still has the capacity to flower again. Proceed step by step:
- Place the plant at eye level and trace the spike upwards from where it emerges near the leaves.
- Identify the small swellings on the spike - these are the nodes.
- Count from the bottom: first node, second node, third node.
- Using very sharp, disinfected scissors, cut about 1 cm above the third node.
- Make the cut at a slight angle so water cannot sit on the cut surface.
This location isn’t chosen at random. Cutting above the third node interrupts the flow that previously supplied the tip of the spike.
What if the spikes are already brown and dry?
If the flower spike is completely brown, rigid and straw-like, it has died back fully. In that situation, the third-node method won’t help.
A different rule applies instead:
- Cut the spike right down low, just above where it starts at the base near the leaves.
- Don’t leave dry stubs that could later rot.
- Be patient: over the coming months, the plant will form a new flower spike from the base.
If your orchid has two flower spikes, treat each one separately. One spike may still be green while the other is already dry - and they therefore need different cuts.
What’s really happening behind the “miracle cut” at the third node
The effect is easy to explain botanically. Plants follow the principle of apical dominance: the tip of a shoot suppresses the growth of side buds.
"When the shoot tip is removed, pressure in the sap flow shifts and awakens the dormant bud below the cut."
That is exactly what occurs in Phalaenopsis. If you cut just above the third node, the plant stops supplying the now-removed tip of the spike. The flow of sap builds and feeds the node directly below more strongly. That node often responds by producing a new side spike, which later develops flowers.
Timing matters too. This technique tends to work particularly well from late winter onwards, when the days begin to lengthen and a steadier indoor climate encourages the plant back into growth. From the “woken” node, a new flowering side shoot can form within a few weeks to a few months.
Preparation: tools, hygiene and the right moment
It’s worth preparing before making the first cut, as many problems come from blunt or dirty tools.
To do it properly:
- Choose a fine, very sharp cutting tool (nail scissors, orchid scissors, small secateurs).
- Clean the blades with alcohol or briefly flame them, then let them cool completely.
- Carefully remove support stakes and clips so the spike is unobstructed.
- Stand the pot securely on a table and work in good light.
- Count nodes from the base, identify the cutting point, then cut cleanly and promptly.
Afterwards, you can dust the cut surface lightly with ground cinnamon from the kitchen. Cinnamon has a mild disinfecting effect and helps dry the wound, which can reduce the risk of fungal problems.
Care after cutting: light, water and temperature
Once you’ve cut, the plant’s real rebuilding work begins. Your Phalaenopsis now needs a position where it can gather energy.
These conditions are considered ideal:
- Bright, indirect light - no harsh midday sun on the leaves.
- A room temperature between 18 and 22 °C, with no cold draughts.
- Even but very cautious watering.
- Let the growing medium dry out well between soaking.
"The biggest danger after cutting is waterlogging in the pot - it weakens the plant and encourages root rot."
Soak the pot less often and always allow excess water to drain away completely. If you have several Phalaenopsis, disinfect the cutting tool again between plants, otherwise bacteria and viruses can spread from one orchid to the next.
Common mistakes that stop a new flush of flowers
Many setbacks are avoidable once you know what to watch for. Orchid growers repeatedly point to three major traps:
- Cutting too close to the node: if you damage the node itself, it may no longer be able to form a new side spike.
- Leaving partly dead spike sections: partially withered pieces quickly become an entry point for rot.
- Cutting green spikes right down at the base: if you want a quicker re-bloom, cut green spikes specifically above the third node rather than removing everything.
A special case is the so-called keiki - a small plantlet that forms directly on the spike. If one appears, patience pays off. Only when it has developed several roots of its own should you cut below it and pot it up separately.
How long until it flowers again - and when is patience worth it?
Many hobby growers get uneasy if nothing happens after a few weeks. In reality, a wide range of response times is normal. Depending on root health, light levels and temperature, a new side spike may appear within five weeks - or only after twelve weeks or more.
A positive sign is nodes below the cut beginning to swell slightly. If they remain completely unchanged for months, it’s worth reviewing your growing conditions: is the plant too shaded? Is the air too dry? Are you watering with water that’s too cold? Small adjustments to location or watering rhythm often make the difference.
Background knowledge: why Phalaenopsis reacts so strongly to small changes
The moth orchid comes from tropical regions, where it grows as an epiphyte on trees. Its roots hang freely in the air, and rainwater runs off quickly. That is exactly why it reacts badly to constantly wet compost in a pot. Cutting above the third node suits this lifestyle: it doesn’t force unnatural growth, but redirects the plant’s existing energy.
If you gradually get used to closely observing nodes, roots and leaf colour, you’ll quickly develop a feel for the right timing and the right care. Then what looked like a “spent” flower spike can turn into a fresh, lush display again - triggered by a single, targeted cut just a few millimetres above the third node.

Comments
No comments yet. Be the first to comment!
Leave a Comment