
This need not be the case.
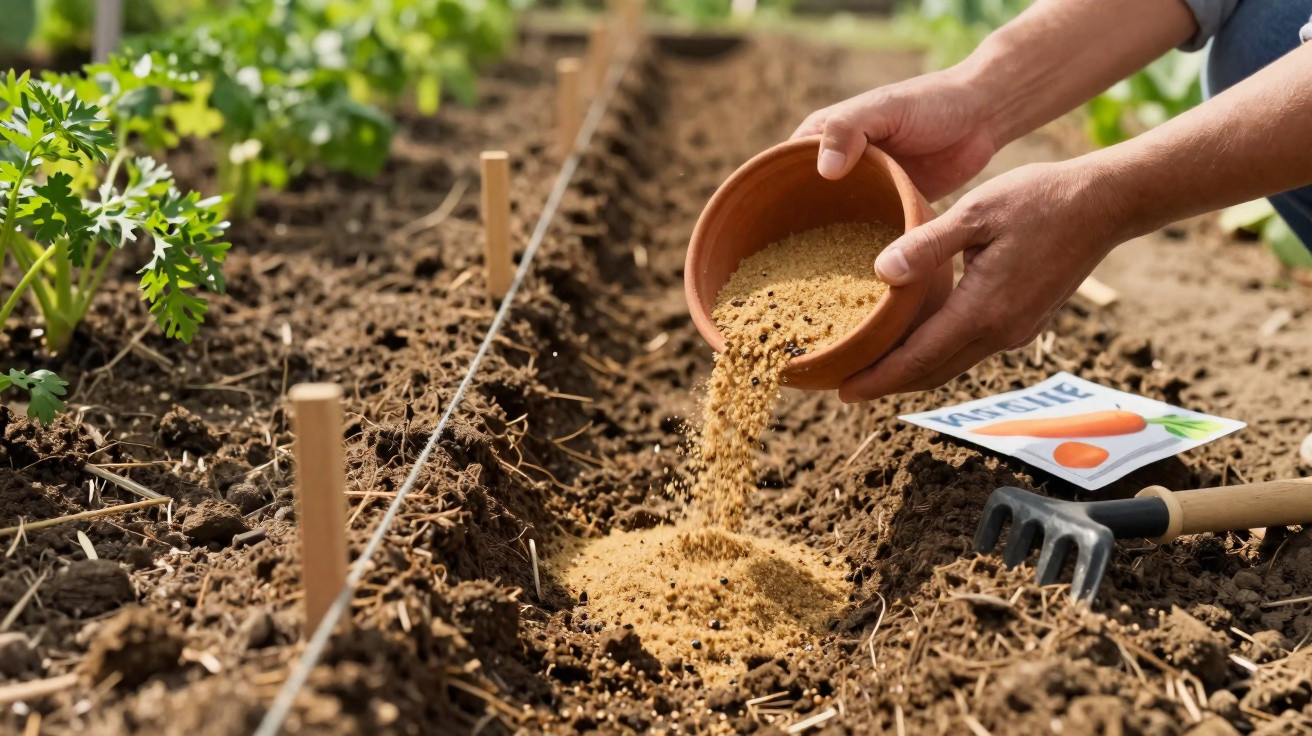
A straightforward technique using sand, a little patience and several clear rules makes sowing so even that you can avoid both crooked roots and hours of thinning young plants. Start in March or April and, by summer, you can lift impressively straight, crisp carrots from the bed.
Why carrots so often fail in the home garden
Carrots are often considered an easy vegetable, yet they regularly frustrate many home gardeners. The reasons tend to be the same:
- The tiny seeds drop into the drill in clumps.
- Plants are positioned too closely, so their roots compete for room.
- As they develop, the roots push against one another and fork.
- Later, the rows have to be laboriously thinned by hand.
The outcome is forked carrots, twisted roots and plenty of wasted time. This is exactly where the sand method comes in.
“Diluting carrot seeds heavily with dry sand prevents overcrowding in the soil from the outset – and therefore crooked roots too.”
The key to success: seed and sand in the right ratio
Good seed provides the foundation
Before using the main trick, you need suitable seed. Early or mid-early varieties are worthwhile from March onwards, as they can cope with cooler soil. There are many choices available in shops, including plenty of organic options.
Choosing high-quality seed, preferably organically produced, can often save trouble with diseases later on while also helping to create an environmentally sound vegetable garden. More important than the marketing name on the packet is a clear variety description: straight roots, good flavour and suitability for early sowing.
The magic ratio: 1 part seed, 10 parts sand
The central idea is remarkably simple but highly effective. Rather than scattering the minute carrot seeds on their own, mix them thoroughly with dry sand.
- 1 part carrot seed
- 10 parts dry, fine sand
The sand must not be damp or lumpy, otherwise the seeds will stick together again. Sieved play sand or washed building sand is ideal. Make sure it contains no large stones.
“This heavy dilution automatically leaves space between individual seeds as you sow them – without tedious tweezer work in the bed.”
How to mix carrot seed correctly
Combine the sand and seeds thoroughly
Put the sand and seed into a container with enough room, such as an old bowl or a cut-down plastic bottle. Then mix everything well.
It is vital that the seeds are distributed evenly through the sand. Stirring for a few minutes with a spoon, or gently shaking the container, works wonders. The aim is a uniform mixture that can be scattered loosely and evenly between your fingers.
In effect, this creates a kind of “natural seed tape”, but at a much lower cost than ready-made versions from the garden centre.
Why this helps prevent forked roots
Carrots are sensitive to competition below ground. When too many plants grow close together, their roots meet early, divert sideways and branch. That is when unattractive, forked carrots develop.
Diluting the seed strongly with sand means there is some spacing between seeds in the drill from the very beginning. The plants can grow freely without forcing one another aside.
“Creating space from the start saves the painful task of thinning later – and lets plants develop straight roots more comfortably.”
Sowing carrots with the sand method: shallow drills and clear rows
Sow only 1 centimetre deep
Carrot seeds should not be buried too deeply. A useful guide is around 1 centimetre. Use a handle, a hoe or simply your hand to draw a shallow drill in loosened soil.
The soil should be crumbly, fine and free of stones. Compacted patches slow root growth and can also cause deformities. If you have heavy soil, loosen it thoroughly before sowing and, where needed, incorporate some sand or fine compost.
Now comes the crucial stage: scatter the sand-and-seed mixture along the drill as a thin line, as evenly as possible rather than in little heaps. Pale sand stands out clearly against dark soil, so you can immediately see whether the line has gaps or overly dense sections.
Allow generous spacing between rows
Leave around 25 centimetres between carrot rows. It may seem generous at first, but it makes later care considerably easier.
- You can hoe comfortably between the rows.
- Air circulates more freely, helping to limit fungal diseases.
- Rows remain easy to identify and weed precisely.
Once sown, carefully draw soil back over the drill and firm it lightly, for example with the back of a rake. This gives good seed-to-soil contact without burying the seeds too deeply.
Water, patience and germination: the critical stage
Keep the soil moist without waterlogging it
Immediately after sowing comes a period in which gardeners can easily make mistakes. Carrots are light germinators and are also very sensitive to surface crusting.
For this reason, water with a very fine rose, ideally creating gentle spray like light rain. Strong jets can wash the sand-and-seed mixture out of the drill or move it around. The goal is an evenly moist, loose surface. The soil must neither dry out nor become muddy.
“It is better to water little and often than rarely and too heavily – consistent moisture encourages even germination.”
Germination time: between ten and twenty days
Carrot seeds take their time. Depending on soil temperature, the first fine leaves appear after roughly 10 to 20 days. If nothing is visible after a week, do not immediately sow again.
During this stage, persistence with watering matters most. If the top layer of soil repeatedly dries out, seeds germinate unevenly. Keep it consistently lightly moist and you will get a dense, even row – precisely the aim of this method.
Once the foliage appears: less work and a better harvest
No more laborious thinning
When the first delicate carrot seedlings stand in orderly rows, the great advantage of the sand trick becomes clear: the usual punishment of thinning is largely unnecessary.
Because adequate spacing was created during sowing, you may only need to remove the occasional plant that is obviously too close to another. In most cases, the widespread task of “pulling out every other plant” disappears completely. You can devote this saved time to other garden projects – or simply enjoy it on the patio.
Straight, healthy roots at harvest time
Several months later comes the best moment: pulling the mature carrots. Anyone who has followed the method consistently will notice, when first grasping the foliage, that the roots come out of the ground surprisingly easily and have a clear, straight shape.
No strange forks, far fewer splits and hardly any damaged carrots. Without competitive pressure in the soil, the plants develop strong, long roots of even thickness. This not only looks good but also makes them easier to prepare in the kitchen.
Practical additional tips for perfect carrot rows
Suitable soils and common pitfalls
Carrots grow best in loose, fairly sandy soil. They quickly encounter problems in heavy clay and become misshapen. If you only have dense soil, raised beds or deeply loosened strips can help.
A few things should be avoided:
- Fresh manure shortly before sowing – it encourages branching.
- Stones or large clods of earth in the seed drill.
- Overcrowded companion planting directly in the carrot row.
A light application of compost in autumn on the future sowing area is usually entirely sufficient to provide enough nutrients for the following season.
What terms such as “seed tape” and “light germinator” mean
Anyone browsing a garden centre will soon come across ready-made seed tapes. These contain seeds positioned at set intervals within paper strips. Although the tapes make sowing easier, they cost considerably more – and essentially only imitate what the sand trick achieves with simpler materials.
The term light germinator describes seeds that should not lie deep in darkness when they begin to germinate. Carrot seeds respond sensitively to overly thick layers of soil. This is why they should be covered by only about 1 centimetre and the drill should not be pressed down firmly.
The method described here applies this knowledge consistently: shallow sowing, gentle firming, steady moisture – and, thanks to the sand, orderly spacing from the outset.
Why the sand method is genuinely worthwhile
Combining one part seed with ten parts sand costs almost nothing, yet avoids several common frustrations in the vegetable garden: no endless thinning, far fewer deformities, a more usable harvest and neatly structured beds.
Once you have seen how evenly carrot rows sown this way emerge, and how relaxed their care becomes, it is hard to return to conventional sowing that is far too dense. The trick is also suitable for other fine seeds, such as parsley or dill – wherever uneven rows and overcrowded seedlings have previously caused annoyance.



Comments
No comments yet. Be the first to comment!
Leave a Comment