
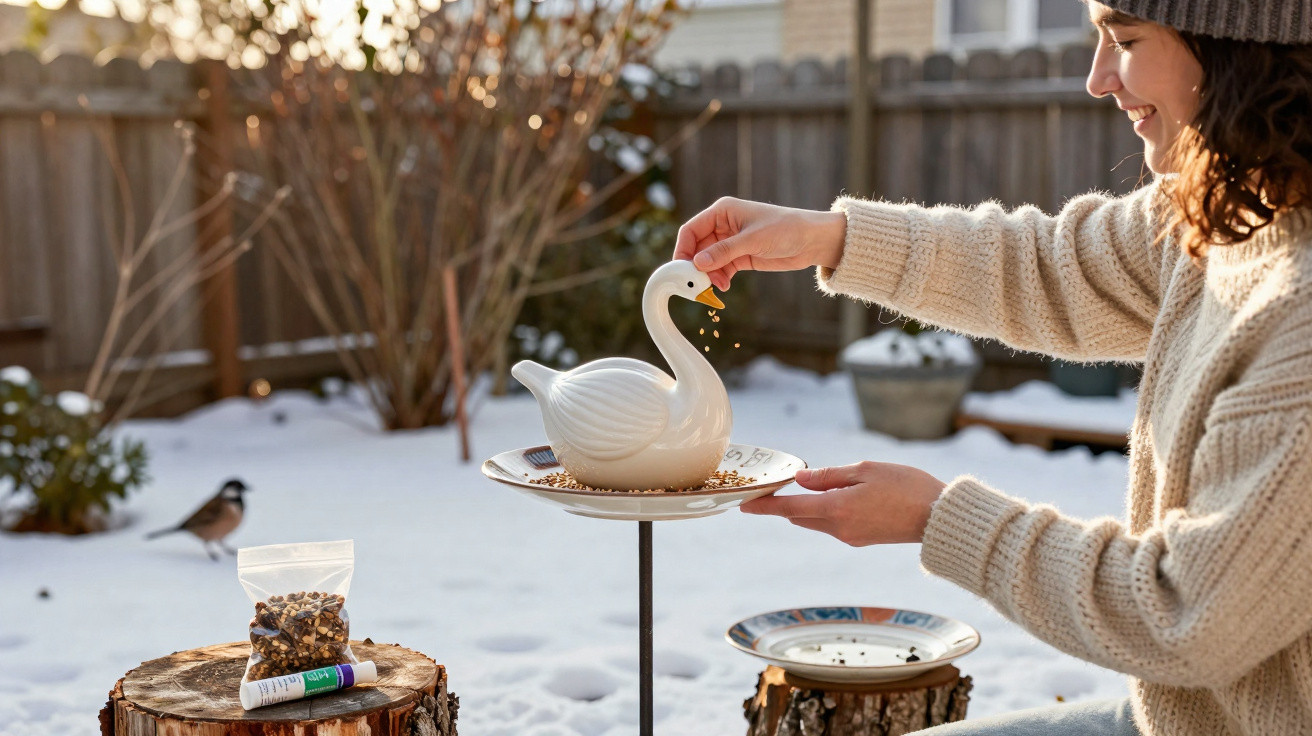
People often walk straight past old swan vases because they look out of place in a modern living room. Out in the garden, however, those dusty decorative cast-offs can be reborn as a sturdy, eye-catching and genuinely practical bird feeding station for winter-exactly when birds need support most.
From junk to rescue: why the swan vase deserves a second chance
Among mismatched crockery, scratched vinyl records and yellowed picture frames, you’ll find them in almost every second-hand barn: swan-shaped vases, usually white-glazed or shimmering in bright colours-heavy, chunky and a little over the top. Those very traits are what make them surprisingly useful outdoors.
"What’s seen as tacky in the living room becomes a robust feeding station with character in the garden-and helps songbirds through the toughest time of the year."
A typical swan vase brings several built-in benefits:
- Weight and stability: the heavy material won’t topple with every gust of wind.
- Deep cavity: ideal for holding bird seed so it doesn’t spill out immediately.
- Striking shape: a real focal point in a bare winter garden that catches the eye.
- Hard-wearing material: ceramic or thick porcelain generally copes well with rain, cold and sun.
Feeding birds does more than help a handful of tits. Songbirds eat pest insects, spread seeds and contribute to a more resilient, lively garden ecosystem. In densely built-up areas with few hedges and wild plants, that support can make a noticeable difference.
What you need for a bird feeding station made from a swan vase
This small upcycling job needs only a manageable set of materials-many of which you may already have in the cellar or garage, or can pick up cheaply in a charity shop.
| Material | What it’s for |
|---|---|
| Swan vase (ceramic/porcelain) | Main body of the feeding station; container for seed |
| Flat, sturdy plate or cake stand | Base plate to catch seed and provide space for larger birds |
| Small, slim vase or cup | Connecting piece between the pole and the plate |
| Wooden or PVC pole (at least 1.5 m) | Ground support so the “swan” sits raised |
| Weatherproof ceramic or silicone adhesive | Secures the parts so nothing shifts |
Handy to know: a lot of this turns up at car boot sales, in charity furniture warehouses, or even in your own cupboard. That way, what starts as a decorative idea becomes a genuine recycling project.
Step by step: how to build the feeding station
1. Clean and prep
Before you glue anything, wash all ceramic pieces thoroughly with hot water and a little washing-up liquid. Old dust, grease and sticky label residue stop the adhesive from bonding properly. Then leave everything to dry completely-moisture trapped between glue and ceramic can weaken the joint later.
2. Glue the plate and the connecting vase
Place the plate upside down on a table. Add a generous blob of outdoor adhesive in the centre. Set the small vase or cup into the glue with its base down. Press gently, align it so it sits straight, and hold it in place for a few minutes.
Let the adhesive grip for at least half an hour-an hour is better. Many products don’t reach full strength until 24 to 48 hours have passed. If you can wait, you’ll end up with a far more stable feeding station.
3. Fix the swan vase to the plate
Once the first joint has cured, flip the assembly back over so the plate is the right way up again. Apply adhesive to the underside of the swan vase’s base, then position the swan in the middle of the plate. Press lightly and check again that everything is level.
Allow it to dry for several hours up to two days. During this time, don’t move the piece-leave it to cure indoors rather than carrying it outside too soon.
4. Anchor the pole in the ground
While the glue is drying, prepare the installation spot. Drive or dig the wooden or PVC pole about 30 cm into the ground. A rubber mallet helps you do this without damaging the pole. It needs to be solid and steady; if it wobbles now, the feeding station may tip later.
The small vase or cup already glued beneath the plate now acts as a guide: later, you simply slide it over the pole. This also means you can lift the feeding station off again, for example when it needs cleaning.
5. Assemble and do a first test
When all glued joints are truly hard, slide the cup over the pole, carefully set the swan and plate on top, and check that it sits securely. Then add feed-don’t overfill at first, so you can see how the structure behaves.
"Once it’s properly put together, the porcelain swan will usually stand outside for many winters-minimal effort, maximum benefit for birdlife."
Where the swan feeding station works best
Positioning determines whether birds will use the new feeding spot or avoid it. They need protection from predators as well as a clear view of what’s going on around them.
- A height of roughly 1.5 to 2 m
- Near shrubs or a tree for a quick escape route
- Far enough from dense bushes where cats could ambush
- Ideally sheltered from wind and not in the full force of driving rain
- Easy for birds to spot, but not right beside the patio if it’s a busy area
The main feeding period runs broadly from October to March. During these months there are far fewer insects, wild seeds and berries available. A feeding station that’s topped up regularly gives birds a reliable energy boost-especially on frosty days.
Which feed belongs in the swan-and what doesn’t
What you put in the swan vase helps determine which species you attract and how well they get through winter.
Suitable feed
- Black sunflower seeds: a staple for tits, finches and sparrows.
- Ready-made garden bird mixes: usually balanced seed blends.
- Fat balls or fat blocks: ideal for very cold spells; high in energy.
- Apple or pear pieces: popular with blackbirds and robins.
- Oats (unsweetened): mixed with a little plant fat, a useful extra.
Feed that’s better off in the bin
- Bread and bread rolls - they swell in the stomach and offer little nutrition.
- Salty or heavily seasoned leftovers.
- Sweets and baked treats.
- Rancid fat or mouldy seed.
If feed gets properly wet, it can spoil quickly. In that case, throw it away and replace it with fresh food rather than exposing birds to fungi and bacteria.
Hygiene: keeping the feeding station from becoming a source of disease
When many birds feed close together, the risk of transmitting illness increases. Luckily, a swan vase is fairly straightforward to keep clean.
- Rinse thoroughly with hot water about once a month.
- Avoid harsh cleaning products; plain water is usually enough.
- Clear away old scraps before adding new feed.
- If you find dead birds in the garden, pause feeding for a few days and clean everything.
In summer, the plate area can even double as a shallow bird pool. Swap seed for water, change it regularly, and remove any dirt. Birds will repay you with enthusiastic splashing among the garden flowers.
Getting more out of the project: variations and add-ons
If you enjoy the idea, you can quickly turn a simple swan into a small garden design feature. A subtle colour, a coat of weatherproof exterior paint, or a few embedded stones on the plate can completely change the look. The key point remains: the inner area where the food sits should be smooth and easy to clean.
It gets even more interesting if you set up several different feeding spots: one swan for seed-eaters, a shallower dish for fruit, plus a small water point nearby. That way you’ll attract a wider range of species-from tits and sparrows to blackbirds and robins. With a few notes in your calendar, you’ll quickly spot which mix gets the most visitors at different times.
If you have children at home, bring them into the process: a trip to a car boot sale, choosing a design, helping with the gluing, then later watching from the window to see which species appear. An old, supposedly “ugly” ornament becomes a hands-on way into biodiversity-no lecturing required, just real life unfolding beyond the patio door.
Comments
No comments yet. Be the first to comment!
Leave a Comment