
Many amateur gardeners know the post-holiday shock: a lemon tree that was lush and green before you left is suddenly standing in its pot like a skeleton. No leaves, rigid twigs, and bone-dry compost. At first glance it looks like a write-off. If you react by feeding heavily or watering non-stop, you often make things worse. With a clear rescue protocol that feels a bit like an old-fashioned household remedy, the plant can surprisingly often be brought back.
How can you tell whether the lemon tree is really dead?
Before you panic, take a calm, practical look. A lemon tree can drop every leaf and still be alive. In most cases the cause is severe lack of water, not irreversible damage.
- The pot feels very light and the compost is hard and cracked
- Leaves have all fallen, or what’s left is crisp and papery
- Branches look bare, but don’t feel crumbly
The quickest check is the bark test:
- Use a fingernail or a knife to gently scrape a thin twig tip.
- If there’s a greenish, moist layer underneath, the tissue is still alive.
- If everything is pale brown, dry and brittle, that section has died.
Check in more than one place, working from the tips back towards the trunk. Often only the finest shoots are lost, while the trunk remains viable.
"A bare lemon tree isn’t automatically a lost cause - as long as you can still see green under the bark, it’s worth trying to save it."
What’s really happening: stress from a dried-out pot
In containers, citrus plants are extremely sensitive to drought. When the compost dries out too far, it shrinks away from the pot sides. The next time you water, it can run straight down the gap between root ball and pot wall instead of soaking in. The fine root tips effectively get nothing.
The plant then switches to emergency mode: it drops leaves to cut water loss, and within a few days can look completely dead. In this condition, extra fertiliser only scorches already weakened roots further.
Day 1: rescue protocol for a dried-out lemon tree
1. Prune back to restart growth
Before the tree gets any serious water, the canopy should be reduced. The aim is simple: stressed roots must support less top growth.
- Remove all clearly dry, brittle branches right back.
- Shorten remaining growth slightly until the cut surface shows fresh, pale wood.
- Reduce the canopy by roughly one third overall.
- Snip out any thin dead shoots and wilted leaves that remain.
Use clean, sharp secateurs that have been disinfected to lower the risk of infection. On very thick cuts, you can apply a pruning sealant if you wish, but it isn’t essential.
2. The water-bath trick for a dried-out root ball
At this stage, watering from above is rarely enough. The root ball won’t readily absorb water, and it simply pours through. The key step is a long soak in a water bath.
- Fill a tub, large bowl or bath with lukewarm water (around 20 °C).
- Place the entire pot into the water so the rim sits just above the surface.
- Leave it for at least 15 to 20 minutes; if the compost is extremely dry, up to two hours.
- Wait until no more air bubbles rise - that’s when the root ball is fully rehydrated.
Then lift the pot out and let it drain thoroughly in a shaded spot. For the next 24 hours, don’t use a saucer or decorative outer pot, so excess water can escape freely.
3. A quarantine spot instead of a sunny patio
Straight after soaking, move the lemon tree to a sheltered recovery position:
- bright, but without direct midday sun
- temperatures around 15 to 18 °C
- no draughts and no radiator close by
For the first few days after the rescue, only water again very cautiously and sparingly. The root ball will still be well supplied; topping up constantly quickly leads to waterlogging.
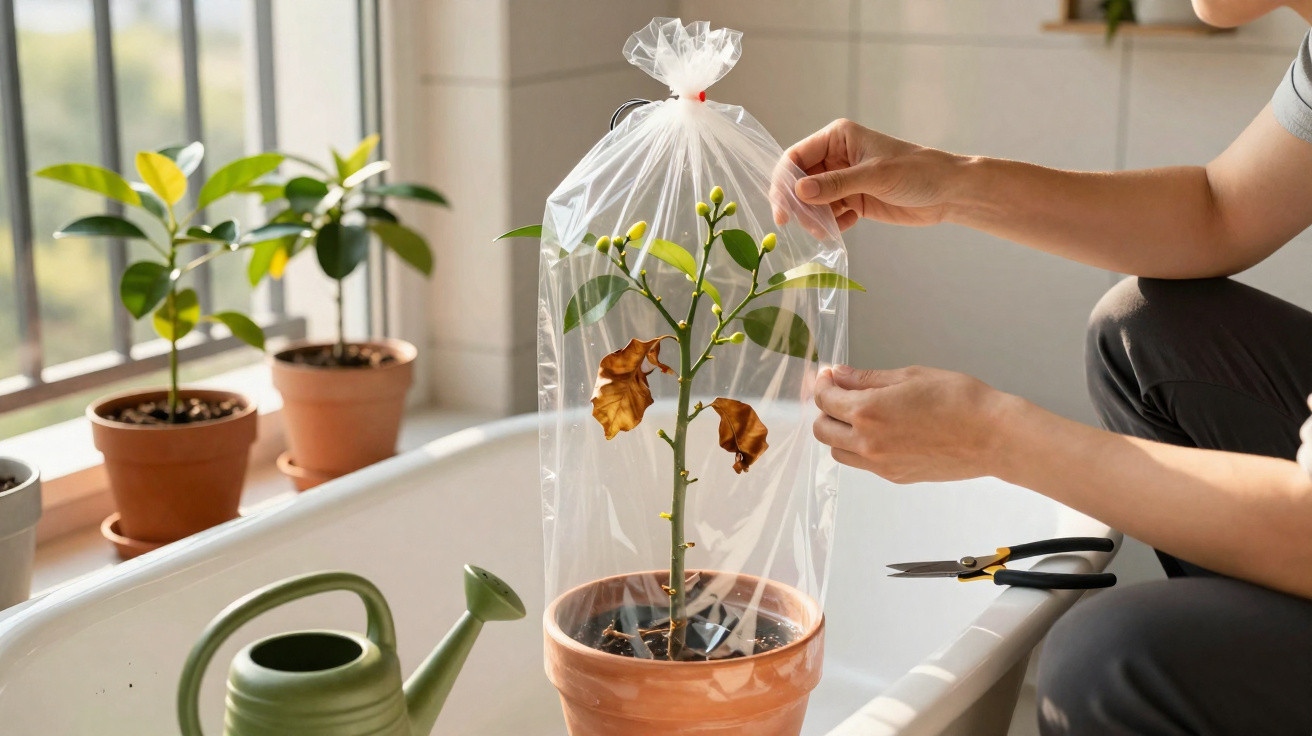
Moisture dome rather than a greenhouse: the plastic bag trick
A crucial part of helping the canopy recover is creating a small, artificial microclimate over the tree - and it’s surprisingly easy.
- Pull a clear plastic bag or a garment cover over the entire canopy.
- Fix it loosely around the pot with an elastic band or tie, without squeezing anything.
- Inside, very high humidity builds up, making it easier for the remaining shoots to get going again.
"Under the plastic cover it’s almost tropical - the tree loses less water through the twigs and can push new buds."
To prevent mould, the setup needs regular fresh air:
- every two days, open the top for about ten minutes or briefly remove the bag
- then reseal it until new leaves have formed and are growing steadily
With a bit of luck, the first buds can appear after around ten to fourteen days. The exact timing depends heavily on the variety, the location and how badly the plant was stressed.
The first 15 days: what’s allowed - and what isn’t
Days 2 to 7: rest, light, and monitoring
During the first week after the water-bath treatment, the rule is: less intervention, more observation.
- Keep the plastic cover on the tree.
- Use a finger to check how damp the compost is about three centimetres down.
- Only water once that layer feels clearly dry - but when you do, water properly rather than giving constant small sips.
- No repotting and no moving it outdoors.
Right now the tree needs consistency. Every extra stressor slows recovery.
Days 8 to 15: easing back into normal plant life
As soon as buds visibly swell or tiny leaf tips start to show, you can begin a gradual return to normal conditions.
- Make the opening in the plastic bag slightly larger each day.
- After a few days, remove the cover entirely.
- Temperatures can now rise to about 18 to 22 °C.
- Light levels may increase, but direct midday sun is still off-limits for the moment.
Only once several stable, fresh green leaves have developed should you think about feeding. After that, a heavily diluted dose of liquid fertiliser designed specifically for citrus plants is enough every three weeks.
What must still wait: fertiliser, repotting, and the patio
Many gardeners instinctively reach for feed first, or immediately plan a bigger pot. Both can overwhelm a weakened tree.
- Don’t fertilise until the canopy is visibly leafed up again.
- Repot only if the root ball is severely compacted or roots are circling along the pot wall.
- Choose a new pot only slightly larger, and use a loose, free-draining compost made for citrus species.
Putting it back outside should be the final step: not until the new foliage is fully developed, nights remain frost-free, and the tree no longer looks like a patient. Even then, acclimatise it to sunshine in stages, starting in bright shade.
Common watering mistakes - and how to avoid them
Citrus plants suffer more from incorrect watering than from too little attention. The mix of container growing, delicate roots and a warmth-loving canopy makes them vulnerable.
- Constantly wet compost leads to root rot and yellowing leaves.
- A completely dried-out root ball triggers leaf drop and the familiar “bare bones” look.
- Water left standing in saucers suffocates roots if it sits there for days.
The simplest check is still your finger: if the compost is slightly damp three centimetres down, hold off. If it’s clearly dry, water thoroughly until water runs out of the drainage holes - then empty the saucer.
Background: why citrus plants can seem so sensitive
Lemon trees originally come from areas with distinct wet and dry periods, but usually with deep soils. In a small pot they can’t draw on that natural buffer. As a result, they react far more sharply to swings than they would in open ground.
Leaf drop is also a protective response: by reducing the surface area for evaporation, the tree defends its internal water reserves. It looks dramatic to the owner, but biologically it’s an effective survival strategy.
If you understand this reaction, you’re less likely to make knee-jerk moves such as high-dose fertiliser or scorching summer sun. Much more effective is sensible water management, an airy substrate, and a position that’s bright but not harsh.
Using the emergency rescue protocol described above greatly improves the odds that the "dead" lemon tree will sprout again over the coming weeks. And if you keep a closer eye on watering in future, you can stop it getting that far in the first place.
Comments
No comments yet. Be the first to comment!
Leave a Comment