
Smart gravel paths, a driveway finished with pale chippings, a cosy seating area laid with decorative gravel: surfaces like these look modern and well cared for. After a season or two, though, it often looks very different - grasses and wild weeds start pushing up between the stones. Anyone who keeps pulling, cutting or spraying soon realises the cycle never really ends. That is why professional gardeners and landscapers use a method that tackles the cause rather than merely the symptoms.
Why weeds keep coming back in gravel
From above, a layer of gravel can look sealed and continuous. In reality, it is full of tiny gaps where seeds can lodge. One blustery autumn day is enough to blow thousands of fresh seeds into a driveway or gravel bed, and birds and other animals bring in extra organic material as well.
What matters most is the ground underneath. If the soil below is nutrient-rich and stays damp for long periods, wild plants thrive. Their roots spread in the loose substrate, while only the tips work their way up through the gravel. Even if you tear off what you can see, the plant remains alive and active below the surface.
"As long as the ground underneath is fertile and left open, any gravel layer will sooner or later become overgrown again."
A common mistake is simply tipping fresh gravel over an old surface. It hides the issue briefly, but does not solve it. The plants still find a route back to the top - often more vigorously than before, because the extra stone can even protect them better.
The professional solution: building gravel surfaces with a root barrier
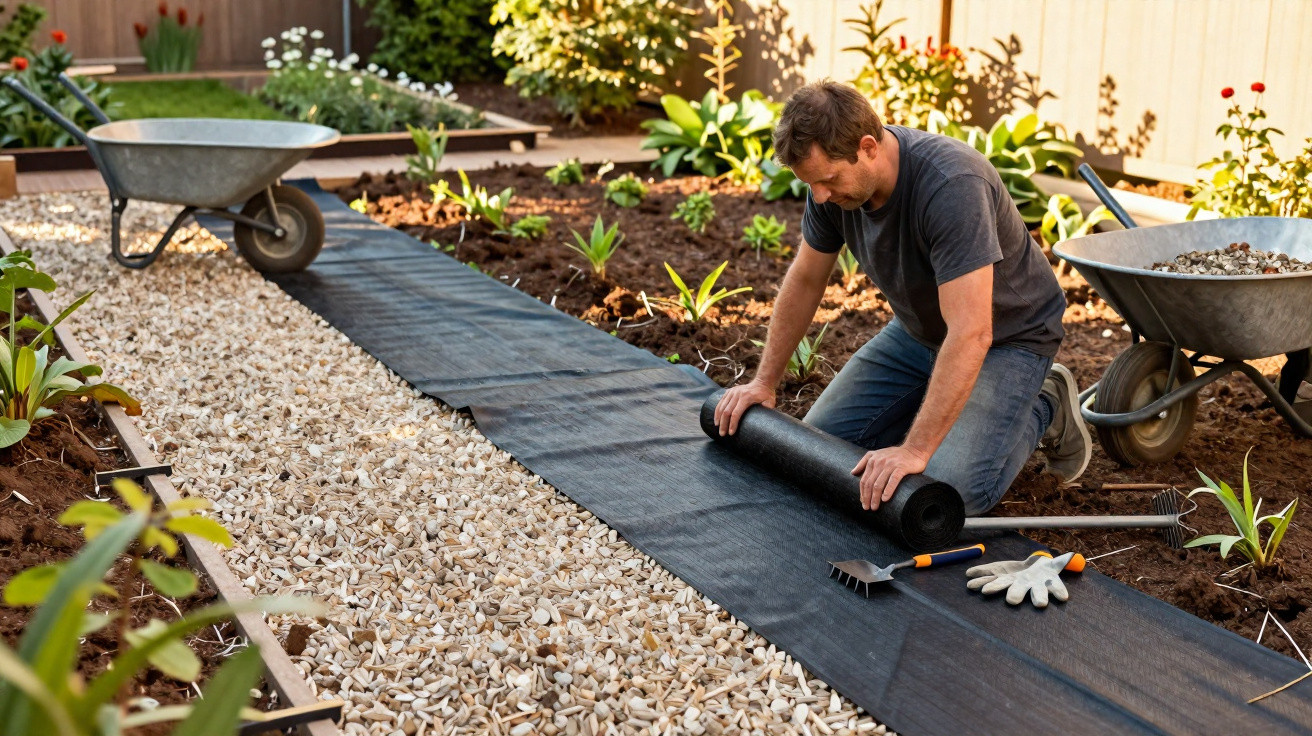
Garden professionals have long relied on a pairing of careful ground preparation and a specialist membrane, typically sold as geotextile or a weed membrane. This layer sits between the soil and the gravel and acts as a physical root barrier.
How the membrane works under gravel
The membrane is made from a tough, water-permeable synthetic fabric. Rainwater can drain through it, but plant roots cannot. As a result, seeds that germinate below tend to dry out before they can push upwards.
When installed properly, this barrier layer prevents weeds from growing up from the soil for many years. Any seeds that later settle in the gravel itself can usually be swept away or pulled out quickly.
Step-by-step instructions, as a landscaper would do it
- Clear the area thoroughly: Remove the old gravel, then dig out all greenery including the roots. The more meticulous you are here, the less trouble you will have later.
- Level and compact the ground: Rake and screed the soil flat, fill any dips, then compact with a hand tamper or plate compactor. This helps stop the gravel sinking over time.
- Lay the membrane: Roll out the sheets and overlap the edges by at least 10 cm. Do not leave joins open, as plants can exploit those gaps.
- Secure the edges: Pin the membrane down with ground pegs, stakes or stones, especially around the perimeter, so it cannot creep or shift.
- Add the gravel: Spread a layer at least 5 cm deep; for heavily used paths, aim for 8–10 cm. Distribute evenly and lightly rake through.
The initial build takes some effort and materials. In return, ongoing maintenance drops dramatically. Many homeowners report that after making this change they only need to pull the odd stray shoot now and again for years.
Gentle alternatives: natural methods for existing surfaces
Sometimes a full rebuild is not realistic in the short term. In that case, people often use smaller, more natural tactics to keep weeds under control. They do not fix the underlying cause, but they can make day-to-day upkeep easier.
Heat, acid, salt: what actually works - and the limits
- Boiling water: Poured directly onto plants, it damages leaves and roots. Useful for small areas or cracks between paving, but labour-intensive on large gravel surfaces because repeat treatments are often needed.
- Household vinegar: A mix of water and white vinegar dries plants out. It is convenient in a spray bottle, but should only be applied in dry weather. Avoid any contact with ornamental plants.
- Table salt: It can kill reliably, but it also harms the soil. Too much salt damages trees, shrubs and soil life, so use only extremely sparingly and in tiny spots - or better still, avoid it altogether.
"Natural treatments are a good way to keep an existing gravel surface looking tidy in the short term. For a lasting solution, nothing replaces a thorough rebuild with a barrier."
If you choose these methods, keep pets, children and neighbouring beds in mind. Spray drift spreads quickly, and run-off water can carry active substances into other parts of the garden.
Prevention: keeping gravel looking tidy in the long run
Once a surface has been built correctly, how you look after it determines how long it stays attractive. A few small habits help stop a proper carpet of wild growth from forming again.
Regular upkeep pays off
- Rake the gravel: Pulling a rake through the surface now and then loosens the top layer and tears out tiny seedlings before they establish.
- Remove leaves and soil: Autumn leaves, spent flowers and dust gradually create a thin film of compost-like material on top of the gravel. That layer is where seeds later germinate. A leaf blower or stiff broom keeps the surface clear.
- Watch the edges: Transitions to borders, lawns or walls are weak points. Roots often creep underneath gravel and membrane here. A clean edge made from metal, plastic or stone helps stop these runners.
For less-used edges, an alternative approach can work well: plant low ground cover that is allowed to spread intentionally. It competes with wild weeds by taking up light and space.
Practical tips for different uses
Not every gravel surface has the same demands. A parking space needs a different build-up from a small decorative path through a border. This quick guide offers a rough starting point:
| Area | Recommended gravel depth | Membrane sensible? |
|---|---|---|
| Driveway / parking space | 8–10 cm, preferably coarse gravel | Yes, almost essential |
| Garden path | 5–8 cm, medium grade | Strongly recommended |
| Decorative area around shrubs | 5–7 cm, decorative gravel | Yes, provided there are no deep-rooted perennials in between |
If you have larger trees or shrubs within a gravel area, it is usually better to keep the trunk and main root zone clear. In that space, bark mulch or an open soil circle is often preferable so sufficient water and air can reach the roots.
What many people underestimate: water management and microclimate
Gravel heats up strongly in summer and holds onto warmth. With a membrane underneath, more heat stays near the surface. That can be beneficial because many wild weeds do not cope well with drought stress. At the same time, the surrounding ground can suffer if very large areas give the impression of being fully sealed.
If you are planning a large driveway or terrace, drainage needs attention. A membrane holds back plants but still lets water through. In addition, a slight fall, channels or soakaways help ensure rainwater does not run towards the house, but instead drains away and percolates into the ground.
Some councils now discourage completely stone-covered front gardens. Rather than creating a pure gravel desert, you can build attractive mixed solutions: paths with membrane and gravel, plus beds in between with perennials, grasses and ground cover. That keeps upkeep manageable while the garden still feels alive.
If you construct gravel surfaces the way professionals do, you will have far less work over the long term. The combination of properly prepared ground, a well-planned root barrier and a little routine maintenance is what makes the difference - so the rake stays in the shed instead of living in the gravel every weekend.
Comments
No comments yet. Be the first to comment!
Leave a Comment