
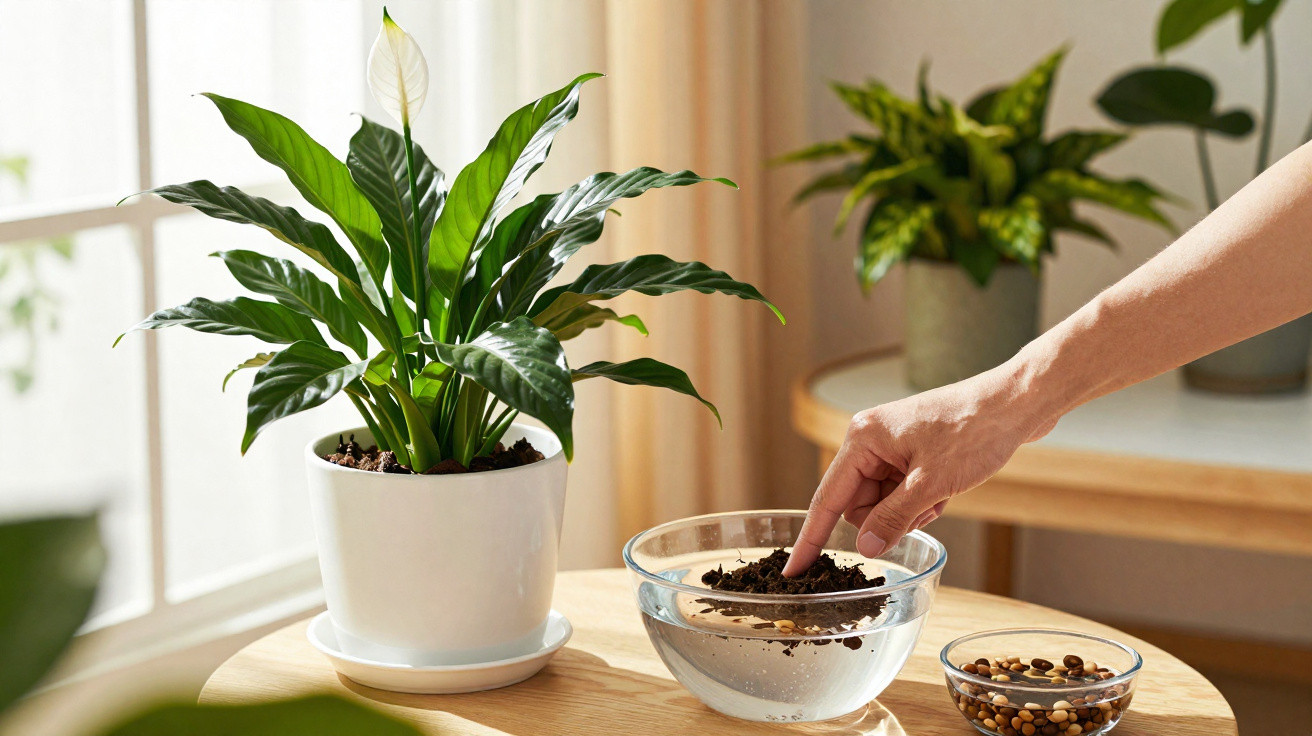
The peace lily is often seen as a low-fuss houseplant. It copes with the occasional missed watering and sits in countless living rooms. Yet the elegant white bracts often fail to appear. In most cases it isn’t down to fertiliser or repotting stress, but simply to how water gets into the pot - and how often it happens.
Why your peace lily produces leaves instead of flowers
In its natural habitat, the peace lily grows in shady tropical woodland. There, it sits in loose soil that stays evenly, lightly moist. Not waterlogged, not dust-dry - more like a “damp forest floor” recreated in a pot.
That’s the feel you need to replicate at home. The root ball should stay fresh and slightly moist inside, while the top 1–2 cm of compost is allowed to dry briefly before the next watering.
"If you keep a peace lily too wet or too dry for long, the plant switches into emergency mode - and it saves energy precisely on flowers."
When the following happens, flowering strength drops away:
- Watered too rarely: the plant goes into survival mode and stops producing flowers.
- Too much water: roots don’t get enough oxygen, some begin to rot, and the plant no longer has the reserves to form new blooms.
- Root ball always wet: the peace lily may still grow, but it looks limp and flowers sparsely - or not at all.
Many owners focus on specialist feeds or swapping pots. In reality, the right watering balance determines bloom potential far more often than any add-on from the garden centre.
The “finger test”: how to hit the perfect moment every time
A peace lily gives fairly obvious signs when it’s thirsty. The leaves droop and look tired. Once watered, they usually lift again within a few hours. However, you shouldn’t rely on that alone, because repeated droop-and-recover cycles stress the plant over time.
"A simple finger test in the compost is more reliable than any fixed watering schedule."
How the finger test works
- Push a finger 2–3 cm into the compost.
- If the surface feels dry but the compost underneath still feels slightly fresh and cool, it’s the ideal time to water.
- If it’s dry even deeper down, the plant urgently needs water.
- If it feels clearly damp at the top and below, wait a few more days.
A rigid routine such as “water every Tuesday” often misses the mark with a peace lily. The plant responds strongly to room temperature, light levels and the season:
| Season | Typical watering rhythm |
|---|---|
| Spring / summer | around 1–3 waterings per week, depending on warmth and light |
| Autumn | every 7–10 days, once the surface has dried noticeably |
| Winter | often only every 2–3 weeks, as long as the compost remains slightly moist inside |
Use this table only as a rough guide. Your finger in the compost makes the call - not the calendar.
Work like a pro: water your peace lily from below
For peace lilies, many experienced growers prefer watering from below. The logic is straightforward: the roots take up only the water they actually need. Excess doesn’t sit pointlessly around the root zone.
"Watering from below helps prevent root rot and delivers exactly the amount of water a peace lily can truly use."
Step-by-step: watering from below
- Fill a bowl, plant saucer or the kitchen sink with water.
- Place the pot in it so the drainage holes are sitting in the water.
- Leave it to soak for 10–15 minutes, allowing the root ball to draw water up.
- Lift the pot out and let all excess water drain away completely.
- Put the peace lily back in place only once no more water is dripping from the pot.
This stops water being left standing in the saucer, with roots effectively sitting in their own “bath”. That constant wetness leads to rot, unpleasant smells, and eventually brown, mushy roots.
Without the right light, even the best watering routine won’t help
Water alone won’t make a peace lily flower. Light conditions matter just as much. The plant likes it bright, but not in direct midday sun. Harsh sun scorches the leaves, while a dark hallway slows flowering to a crawl.
- Ideal: a bright spot, such as 1–2 metres away from an east- or west-facing window.
- Problematic: direct sun at an unshaded south-facing window, very dark corners, or shaded hallways with little to no daylight.
If your peace lily is permanently too dim, it tends to push out long, thin leaves and invests little in blooms. Moving it to a brighter position, combined with the right watering approach, usually gets it back on track within a few weeks.
Humidity: the often-overlooked bloom booster
Tropical forests have far higher humidity than most centrally heated homes. In winter especially, radiators dry the air out dramatically. Peace lilies often respond with brown leaf tips and fewer buds.
"A slightly humid microclimate around the peace lily strengthens the leaves and noticeably supports bud formation."
Easy ways to increase humidity around the plant
- Stand the pot on a saucer filled with expanded clay pellets and a little water. The base of the pot stays dry, while moisture rises around it.
- Mist the leaves lightly with low-limescale water when temperatures are above 20 °C.
- Group several houseplants together - they create a more favourable microclimate collectively.
These steps don’t replace good watering, but they amplify its benefits. With adequate light as well, the roots use water and nutrients far more efficiently.
How to tell you’re watering correctly
If you stick with the new routine for a few weeks, the plant will make it fairly obvious whether you’re doing the right thing. Typical positive signs include:
- Leaves stand upright and look a rich green.
- New leaves emerge regularly from the centre.
- After a few weeks, the first flower stalks appear and open into the familiar white bracts.
Critical warning signs of incorrect watering:
- Yellowing leaves and a soft root ball - a sign of too much water.
- Crispy leaf tips and drooping leaves that recover only slowly after watering - usually too dry.
- A musty smell from the pot - root rot is likely; reduce watering urgently and repot if necessary.
Fine adjustments for especially free-flowering plants
Once your watering method is consistent, a few extra tweaks can be worthwhile. A pot that’s too large can be counterproductive, for example, because the compost stays wet for too long. A slightly snug pot with free-draining compost is often better. You can prevent waterlogging by using a drainage hole and adding a drainage layer of expanded clay pellets or coarse gravel.
A gentle sheen to the leaves and a fresh, strong colour indicate the plant is well supplied. Occasional, moderate feeding during the growing season supports flower production - but it doesn’t replace a sensible watering routine. Overdoing it risks salt build-up that damages the roots.
If you internalise the basics - a lightly moist root ball, the finger test, watering from below, a bright position, and a bit of humidity - you’ll see your peace lily differently. Instead of acting as a purely green backdrop, it becomes a reliable bloomer that fills your living room with its white bracts several times a year.


Comments
No comments yet. Be the first to comment!
Leave a Comment