
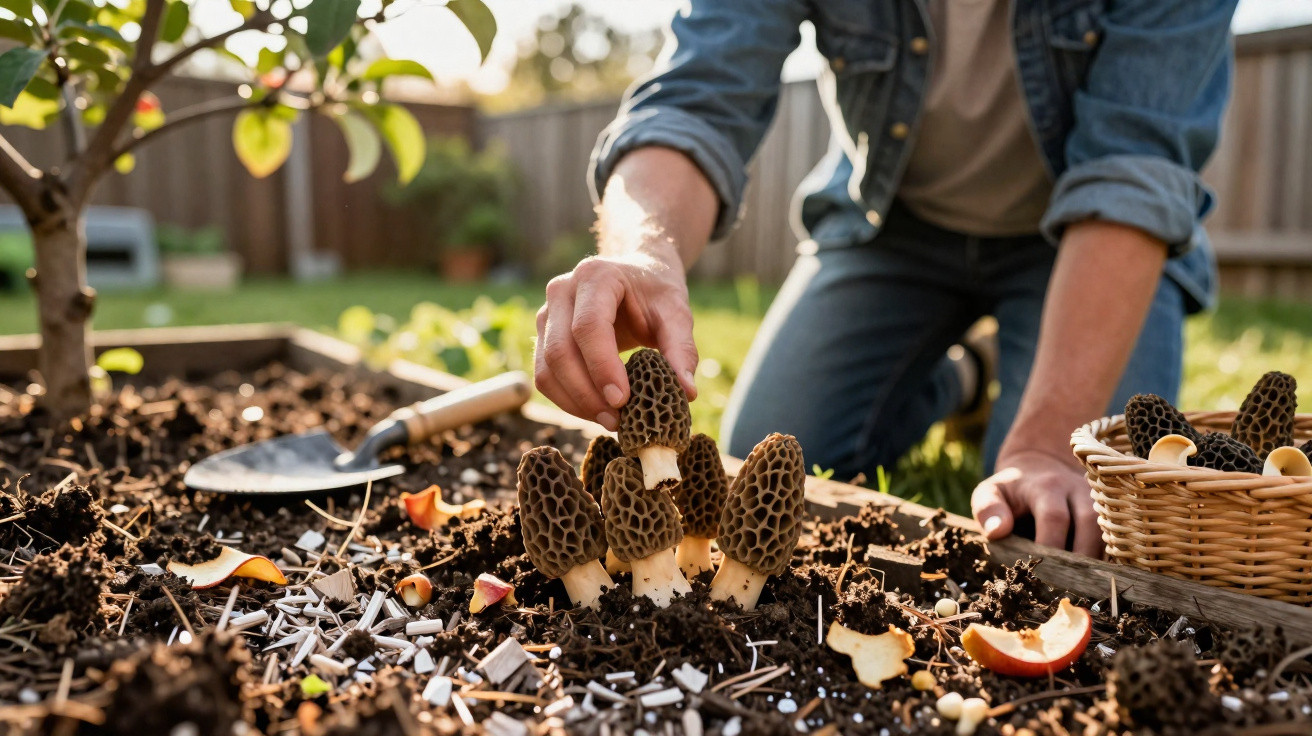
Morels are often seen as the holy grail for mushroom lovers: uncommon, pricey and notoriously difficult to track down. Each spring, plenty of people roam woodland paths and still come home empty-handed. What most don’t realise is that an everyday household leftover can create the exact garden conditions this fussy fungus needs to form.
Why morels are so coveted – and so scarce
In the kitchen, morels sit right at the top of the pecking order: a powerful aroma, a delicate texture, and a brilliant match for sauces, risottos, or as a side with meat and vegetables. At markets they command high prices because supply stays limited. In the wild they appear for only a few weeks in spring, and only where the site conditions are precisely right.
Many keen gardeners have tried to grow morels at home – and most have failed. Over time, that has fuelled the near-myth of the “impossible mushroom”. Reality is more nuanced: morels aren’t temperamental, they’re exacting. They need specific soil characteristics, reliable moisture, and a clear environmental cue that winter has genuinely ended.
"Morels aren’t magic, but a response to very specific environmental conditions – recreate those, and you have a real chance."
The basics: location, soil and light for morels
If you want to cultivate morels outdoors, begin by choosing the right spot. A partially shaded area in the garden is ideal, for example beneath an old apple tree or an ash. The ground there tends to stay cool and fresh for longer without becoming permanently waterlogged, and leaf litter builds up naturally – something morels generally appreciate.
The soil should be:
- rich in organic matter (leaf litter, leftover compost)
- slightly calcareous and free-draining
- not compacted and not prone to waterlogging
- as close as possible to neutral pH, or mildly alkaline
It’s best to prepare the patch in autumn. That gives the fungal network (the mycelium) time to spread through the ground. Moisture levels are usually steadier then too, without prolonged dry spells.
The surprising key: ash and apple leftovers
The real game-changer for growing morels in the garden is a pairing found in many households: cold wood ash and apple pomace (the pressings left over from juicing/cider-making). Together, they replicate conditions that morels often respond to in nature.
"Wood ash lifts the pH into the mildly alkaline range, while apple pomace provides sugar and pectin – the ideal combination for building up morel reserves in the soil."
Researchers in agricultural mycology, including teams at INRAE in France, have shown that in a relatively alkaline environment with plenty of organic energy, morels form so-called sclerotia. These are compact nutrient stores in the soil that later produce fruiting bodies in spring – the mushrooms you can actually see.
Step by step: creating your own morel corner in the garden
1. Choose a suitable location
Look for a site that is:
- beneath an older broadleaf tree (apple, pear, ash, maple)
- in partial shade, meaning only a few hours of direct sun a day
- in slightly calcareous, fairly loose garden soil
2. Build the substrate in autumn
Between October and November, make a “morel bed”. Apple pressings are particularly effective, though chopped windfall apples can also work, as long as you allow them to start fermenting slightly.
- Loosen the top layer of soil gently and remove any thick roots.
- Spread a layer of apple pomace or chopped apples mixed with leaf litter.
- Distribute 2–3 centimetres of cold, untreated wood ash evenly over the top.
| Component | Role in the morel bed |
|---|---|
| Apple pomace | supplies sugar, pectin and organic matter as an energy source |
| Leaf litter | maintains structure, holds moisture, and lightly covers the mycelium |
| Wood ash | raises the pH to around 7.5–8 and mimics post-fire ground |
3. Introduce morel mycelium
Next, the area needs contact with morel spores or live mycelium. Three approaches are suitable:
- Crumble overripe morels: Scatter old morels that are no longer good for cooking over the prepared bed and work them in lightly.
- Spore water: Rinse fresh morels in water, then pour the rinse water over the substrate.
- A ready-made mycelium kit: Apply a commercially available morel culture according to the instructions.
Finish with a thin mulch layer of leaf litter or fine chipped material. This shields the mycelium from frost, drying winds and direct sun.
Moisture, temperature and the “cold shock”
Over winter, the mycelium does its work out of sight. It colonises the apple-and-ash mix, forms sclerotia, and then waits for the right signals. If you want morels, you must avoid letting the bed dry out – but you also must not turn it into sludge.
The goal is steady soil moisture with no standing puddles. Water little and often rather than rarely and heavily. In late winter, one extra trick can be worthwhile: when temperatures begin to ease, often in early March, mimic snowmelt.
"A thorough watering with very cold water at the start of spring can provide the decisive trigger – an artificial ‘snowmelt effect’."
That abrupt temperature shift tells the fungus winter is over and it’s time to fruit. In favourable areas, the first morels can appear – depending on the weather – sometime between March and May.
How long does it take for morels to show up?
Growing morels requires patience. Even with ideal conditions, they don’t necessarily appear in the first year. Often the breakthrough comes in the second season, once the morel bed has properly established itself.
Key moments to watch for are mild spells following a cold snap. At those times, it’s worth checking carefully under the leaf mulch. The classic honeycomb-like caps often push through small gaps in the mulch or at exposed patches first.
When harvesting, cut the mushrooms just above the ground. Don’t dig or chop into the bed, as that can damage the delicate mycelium and the sclerotia beneath.
Site upkeep: keeping the morel bed productive for years
If you manage to establish a successful morel spot in the garden, treat it like a small, valuable crop. Once a year, again in autumn, “recharge” the area:
- add a thin layer of fresh apple pomace or chopped apples
- sprinkle on a light layer of cold wood ash
- cover with leaf litter or a light mulch
This approach suits home gardens with fruit trees, or calcareous woodland edges where water doesn’t sit. Permanently damp hollows or heavily compacted lawns are rarely suitable. When you understand the system, you can turn kitchen and stove by-products into a steady source of a genuine gourmet ingredient.
Risks, common mistakes and practical notes
The experiment isn’t entirely risk-free. Too much ash can push the soil strongly alkaline, which many plants won’t tolerate. Stick to the 2–3 centimetres, and use only untreated wood ash – for example from a fireplace or wood burner, with no varnished timber residues and no coal remnants.
Other frequent pitfalls include:
- Waterlogging: permanently wet ground encourages rot and competing fungi.
- Full sun: direct sunlight dries the morel bed too quickly.
- Impatience: digging too early disrupts the mycelium as it establishes.
If children or pets use the garden, it’s worth explaining that this corner isn’t for playing or digging. Poisonous lookalikes rarely appear in the same substrate as cultivated morels, but sound mushroom knowledge is always sensible. If you’re unsure, consult a local mushroom identification service.
When the effort pays off – and what morels are best for
Setting up a morel zone mainly costs two things: time and a bit of planning. Financially it’s usually modest, because apple leftovers and wood ash are common household by-products. In return, you improve your chances of enjoying your own morels in spring – something that would otherwise be expensive to buy.
In the kitchen, morels are impressively versatile: in creamy sauces for pasta, as a refined partner for asparagus, in cream with polenta, or simply fried in butter with a little garlic and salt. Dried morels keep well and develop an even more concentrated flavour once soaked before cooking.
Once you’ve got the hang of using ash and apple pomace, you can consider similar approaches for other mushrooms too, such as scalycaps or oyster mushrooms on logs. Morels remain the most demanding – and arguably the most intriguing – and they show how something as unremarkable as a kitchen leftover can become something genuinely valuable in the garden.
Comments
No comments yet. Be the first to comment!
Leave a Comment