
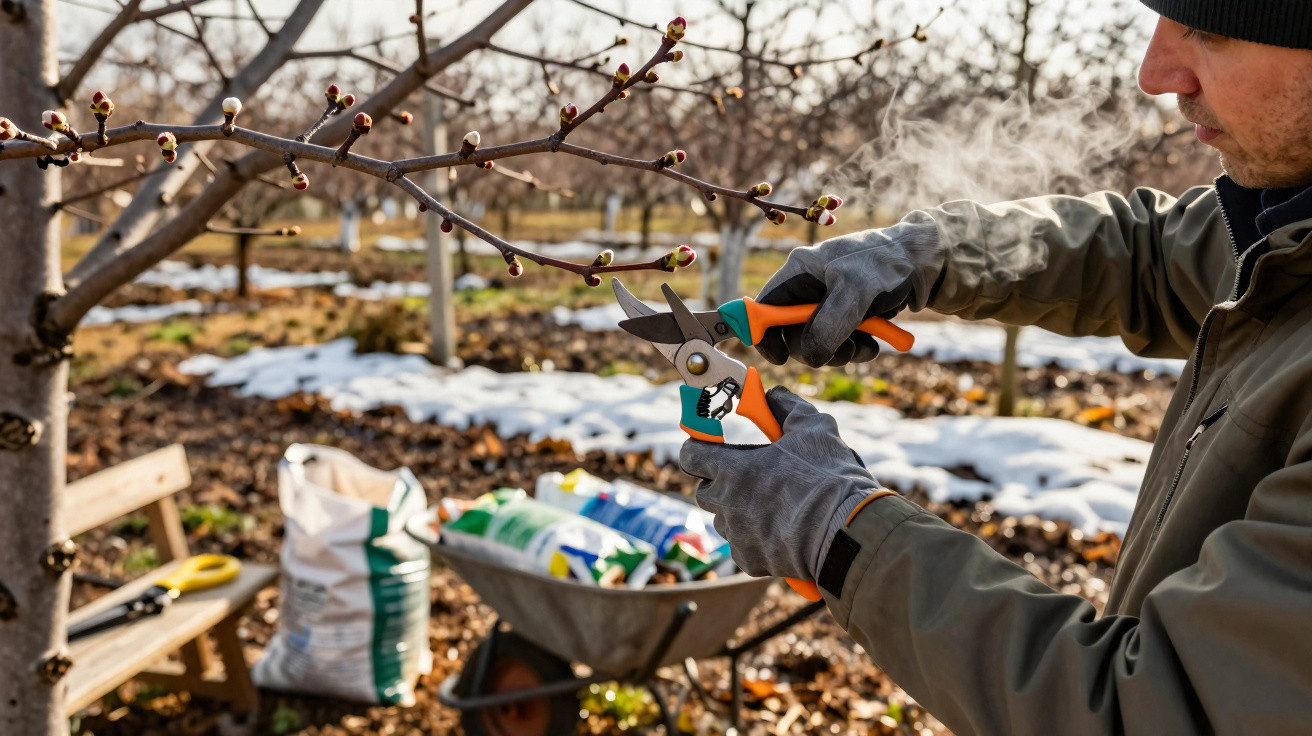
Many hobby gardeners barely glance at their apple tree in gloomy February. The beds look bare, the lawn is sodden, and everything appears to be sleeping through winter. Yet it’s precisely now that you influence whether your basket overflows in autumn or whether only a few miserable apples end up clinging to the branches. There’s one clear, deliberate job to do at this time so the tree carries heavily in late summer and autumn.
Why February is the secret success month in the apple garden
In February, the apple tree is in a kind of in-between state. From the outside it can look lifeless, but inside it is already preparing for its restart. The sap is held low in the roots, helping protect the crown from frost. That dormancy is exactly what makes this month so useful.
Because the tree is resting, it copes especially well with pruning. Cuts hardly “bleed”, cold is less likely to cause problems at the cut sites, and there is still plenty of time for wounds to close before bud break in spring. If you intervene with intent now, you steer the tree’s energy into blossom and fruit rather than into unnecessary woody growth.
"The crucial point: thoughtful winter care determines whether the apple tree later puts its strength into apples or only into branches."
At the heart of this work is what’s often called fruit-pruning care. It has one purpose: to guide sap flow so that as many flower buds as possible form-and are well supplied. If you make the cuts before sap begins moving in March, the tree directs its upcoming reserves exactly where you want them: into strong fruiting shoots.
Without good tools, nothing works
Before you remove the first branch, it’s worth checking your kit. Blunt or rusty tools leave crushed, ragged wounds where fungi and bacteria can take hold easily. Clean, smooth cuts close faster and help keep the tree stable.
- Sharp bypass secateurs for thinner shoots up to about thumb thickness
- Loppers for stronger growth you can’t manage with hand secateurs
- Pruning saw for thick branches that genuinely need to come out
- Alcohol or disinfectant to clean blades between different trees
A quick walk around the tree should always come first. From which side does the afternoon sun usually reach the crown? Where are branches crossing and rubbing? Which shoots are growing straight into the centre of the canopy? The aim is an airy, light-permeable structure so future fruit can develop well throughout the tree.
How the right cut directs sap towards apples
Pruning in February follows a straightforward principle: balance, don’t butcher. Overlong side branches may widen the crown, but they often produce mostly wood. By shortening with purpose, you bring fruiting areas closer to the main limbs, which are typically better supplied with nutrients.
The “three-bud rule” for beginners
A simple guide is the so-called three-bud rule. Here’s how to apply it:
- Choose a side shoot that looks too long or weakly branched.
- Count three buds from the base.
- Make a sloping cut about 0.5 cm above the third bud.
Important: the top bud should point outwards-away from the trunk. That way, the new growth later develops outwards too, opening the crown rather than crowding it.
"If you focus on a few well-placed buds, you concentrate the tree’s strength and encourage sturdy, fruit-bearing short shoots."
This approach produces compact, stable fruiting branches instead of long “whips” that cast lots of shade and carry little. The buds you keep receive more energy and are more likely to become flower buds-the foundation of every apple harvest.
Common mistakes that can ruin every apple-growing dream
Many garden owners avoid pruning because they fear taking “too much” off. Others do the opposite and cut back brutally. Both extremes reduce yield.
- Not pruning at all: the tree makes countless thin shoots that shade one another. Fruit stays small and scarce.
- Cutting back too hard: the tree switches to an emergency response, throwing up masses of long water shoots and funnelling energy into wood rather than blossom.
- Wrong cutting angle: flat cuts hold water. Moisture lingers, opening the door to fungi and rot.
Always cut on a slight slope, angled away from the bud. Rain then runs off instead of sitting on the bud. Keep the cut surface as small as possible so it seals quickly.
After pruning: wound care, hygiene and patience
Once the crown has been thinned and the shoots shortened, aftercare begins. Larger cuts-around 2–3 cm in diameter and above-benefit from protection. A layer of wound sealant, for example resin-based or made with clay minerals, can be suitable.
Applied with a brush or spatula, it closes the surface so neither fungal spores nor rot bacteria can get in, and the edges can callus over in an orderly way. Smaller cuts are usually handled well by a healthy apple tree without extra help.
After that, tidy up beneath the canopy. Pruned material-especially anything with spots, cracks or signs of fungal infection-shouldn’t be left lying around. Diseased branches should be disposed of separately with household waste or burned in a stove. Healthy prunings can be chipped and composted.
"A clean area around the trunk noticeably reduces disease pressure and gives the tree a strong start to spring."
How to recognise good fruiting wood on an apple tree
If you prune in late winter, it helps to know what fruiting wood looks like. Only then can you encourage what will actually carry fruit later. Fruiting wood is usually short and stubby, with rounder, slightly thicker buds. Shoots that are very long, thin and smooth tend to indicate pure extension growth.
Over the years, it pays to keep an eye on the overall crown shape. Ideal is an open, tiered structure with a few strong scaffold limbs and plenty of short fruit spurs towards the outside. That way, sunlight reaches every apple, and wind dries leaves and fruit more quickly after rain.
Risks you should keep in mind
With badly damaged or very old trees, an overconfident cut can cause stress. In that case, it’s better to rejuvenate gradually over several years. Removing several large limbs at once weakens the tree and can lead to sunscald where parts are suddenly exposed.
If you’re unsure, start with younger shoots and leave the thick structural branches alone in the first year. Over time you’ll build a feel for how your own tree responds: how strongly it regrows, how many blossoms it produces after the work, and how fruit size changes.
Practical additions: using mulch, fertiliser and water correctly
Pruning alone won’t magically deliver record ripeness. A healthy apple tree needs a well-matched overall approach. A thin mulch layer of leaves or chipped branches around the trunk keeps the soil open and moist. In spring, a modest application of organic fertiliser can help growth get going without overloading the tree.
Young trees, in particular, appreciate deep watering during dry spells. Water less often but thoroughly, rather than applying frequent small amounts from a watering can. This encourages roots to grow deeper and draw nutrients from a wider area.
Combine those basics with targeted February pruning and you’ll build a stable, productive crown year after year. The payoff isn’t only fuller harvest crates, but also healthier, more resilient trees with fewer issues from apple scab, powdery mildew and other diseases-and, in autumn, crisp apples that taste of proper garden work.

Comments
No comments yet. Be the first to comment!
Leave a Comment