
Receiving a flowering orchid as a gift often means enjoying its burst of colour for just a few weeks - and then facing dreary months of green leaves and bare stems. Many people assume the plant is “finished” and throw it away. That’s a mistake. With a few straightforward steps based on its natural habitat, many orchids can be encouraged to bloom again and again for much of the year.
Why so many orchids are binned far too soon
In many homes, the pattern is always the same: the plant arrives from the garden centre looking spectacular, flowers in the living room for several weeks - and then gradually drops every bloom. What’s left is a pot of green leaves and a dried-out stem. If you’re not familiar with orchids, it’s easy to think, “It’s dead.”
In reality, for most common varieties - especially Phalaenopsis - this is exactly when things get interesting. The orchid enters a resting period, rebuilds its energy reserves and quietly prepares its next display. That pause can last several months. What matters is what happens during that time: the wrong care can hold the plant back, while the right routine can push it towards fresh flower spikes.
Orchids rarely die from “too little care”; far more often they suffer from well-intended but misguided measures.
Less fertiliser often means more flowers
As soon as the blooms fall, many hobby gardeners reach for fertiliser. The thinking is: more food = more flowers. With orchids, that equation rarely works.
How orchids live in the wild
Most house orchids are epiphytes. In tropical forests they cling to tree trunks rather than growing in soil. There, they receive:
- very few nutrients
- high humidity
- plenty of light, but filtered
- constant fresh air around the roots
Rain washes only small amounts of minerals over their roots - and that’s what they’re adapted to. A potting mix that’s been heavily fertilised can overwhelm this system.
The right fertilising strategy for the windowsill
Instead of strong, concentrated feeds every few weeks, orchids generally cope better with very gentle but consistent nutrition. Many professionals advise diluting liquid fertiliser far more than the bottle suggests.
- fertilise only during the growth and flowering period
- use a very weak feed every two weeks rather than a strong dose once a month
- occasionally flush the potting mix with plain water to remove salt build-up
Too much fertiliser causes salts to crystallise in the potting mix. Roots can effectively burn, turning brown and shrivelling. In that condition, the orchid stops forming flowers in order to survive.
Treating your orchid like a “starving artist” often comes closer to nature than a nutrient cure every fortnight.
A soak, not a watering can: how orchids drink properly
The second most common source of problems is watering. Orchids like moisture, but they don’t want wet feet. Waterlogging is fatal for their sensitive roots.
The “root soak” method
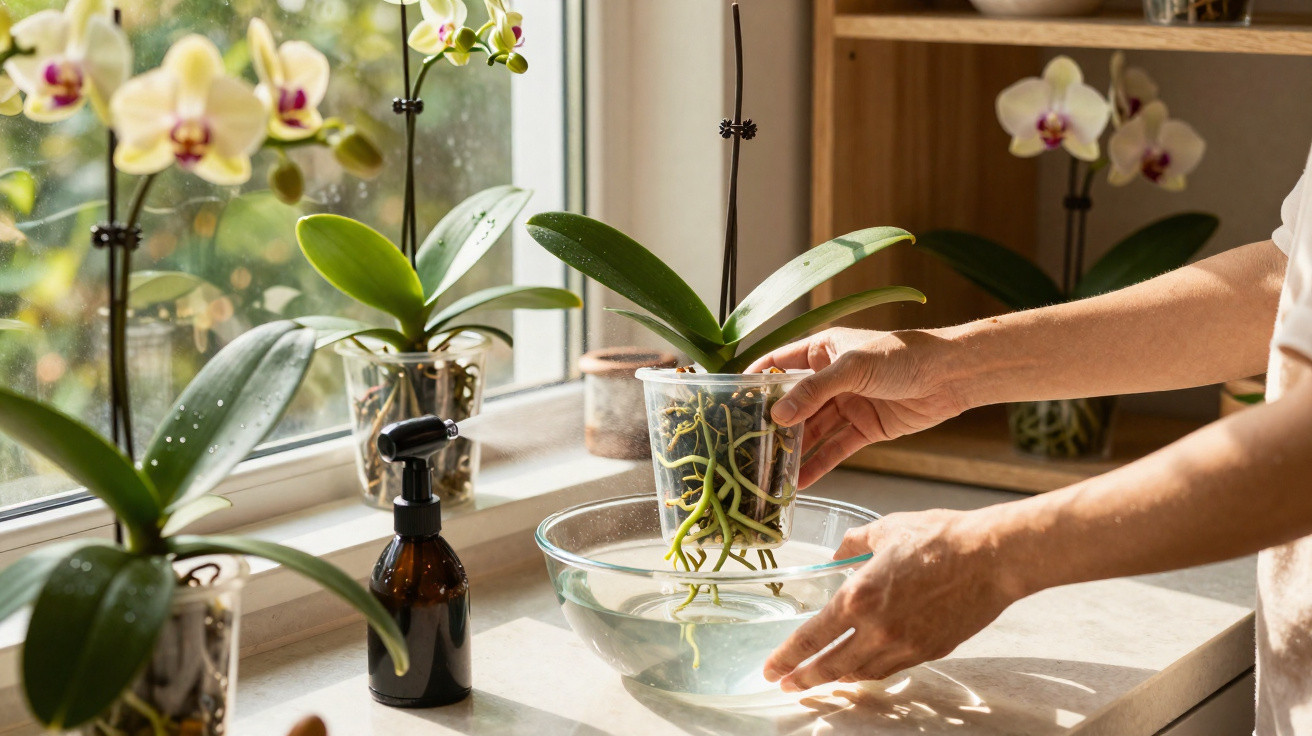
Rather than giving small amounts of water from above on a schedule, many experienced growers rely on a short soak:
- Take the clear inner pot out of the decorative outer pot.
- Fill a bucket or bowl with room-temperature water.
- Lower the pot in until the potting mix is fully moistened.
- Leave it for about five minutes so the roots can soak up what they need.
- Let the pot drain thoroughly, then return it to the outer pot.
This soak mimics a heavy but brief tropical downpour. The plant takes up what it needs without sitting in water. In most homes, a soak every seven to ten days is enough; in winter, often less frequently.
A fine mist as an optional extra
Some plant enthusiasts add a very weak, foliar spray feed, misting once a week onto leaves, aerial roots and older flower spikes. This can encourage new buds - but only if the basics are right: bright, indirect light and steady temperatures.
Dark period: the unusual trick borrowed from nature
Things get particularly interesting with orchids that “simply won’t” flower again. They’re in a bright spot, watered and fed carefully, and they produce leaves - but no blooms. This is where a lesser-known technique can help: a deliberate dark period.
Why a rest in darkness can work
In tropical regions, wet and dry seasons alternate. Many orchids respond with a clear rest phase. During that time they grow more slowly, then later produce flower spikes and blooms with renewed vigour. You can imitate that rhythm at home.
Often, it’s enough to do the following:
- Place the plant for two to three weeks in a cooler, rather darker room.
- Water very sparingly and do not fertilise.
- Ensure air circulation, but avoid draughts.
Some owners also loosely place an opaque paper bag over the plant so only minimal ambient light gets through. During this phase, avoid high humidity - otherwise mould can become a risk.
Often, a few weeks after the dark period the orchid produces a new flower spike - a clear sign that the artificial “change of seasons” has had an effect.
Learning to read orchids: what roots and leaves reveal
If you watch your plant closely, you can spot early what it’s missing. Orchids communicate clearly - just not with words.
| Observation | Likely cause | Possible action |
|---|---|---|
| Roots silvery grey | Plant is thirsty | Plan a soak |
| Roots mushy brown | Waterlogging, rot | Let the mix dry; repot if needed |
| Leaves very dark green | Too little light | Brighter position without direct midday sun |
| Leaves scorched, yellow patches | Direct sun, heat stress | Move back from the window; provide filtered light |
| Lots of leaves, no flowers | Too much fertiliser, too warm, no rest phase | Reduce feeding; create slight day/night temperature differences |
Responding to these signals prevents stress and steers the plant’s energy towards what you want: new flower spikes.
Getting as close as possible to the natural growing site
The skill in orchid care is copying life on a tree trunk. That starts with the potting medium: ordinary compost is unsuitable. Better are specialist orchid mixes made from chunks of bark, a little coconut material and coarse fibres, so air can reach the roots.
Placement matters too. An east- or west-facing window with bright, indirect light is ideal. Direct midday sunshine is harsh on their delicate leaves. At the same time, orchids need far more light than many people assume - a dim bookcase is only a limited long-term home.
Judging temperature and humidity correctly
Most common varieties are comfortable at typical indoor temperatures between 18 and 24 °C. A small difference between day and night temperatures can encourage flowering - in many homes this happens naturally if the heating is turned down slightly at night.
Humidity in tropical forests is much higher than in many homes. Lightly misting aerial roots or placing the pot on a tray of pebbles with water can help increase local humidity without saturating the potting mix.
More practical tips for long-lasting flowering
Once you’ve successfully guided an orchid into its second or third flowering, a routine quickly develops. A few extra tricks improve the odds noticeably:
- Don’t cut off faded flower spikes straight away - the plant often produces a side spike from a “node”.
- Every few years, repot carefully into fresh orchid mix when the bark has visibly broken down.
- When watering or misting, avoid leaving standing water in the leaf joints, as rot can develop easily there.
- Rotate plants regularly so they don’t grow only towards the window.
If you keep several orchids, you can place them around the room and stagger dark and rest phases. That way, there’s almost always one plant in full bloom while others are rebuilding their strength. Especially in smaller homes, this rotation brings colour accents throughout the year without constantly buying new plants.
Beginners should also look at variety names: Phalaenopsis is considered particularly robust and is more forgiving of minor care mistakes than more delicate species. Starting with this group helps you understand the interaction of light, water, nutrients and rest phases - and you’ll usually reach your first “flowering comeback moment” sooner.


Comments
No comments yet. Be the first to comment!
Leave a Comment