
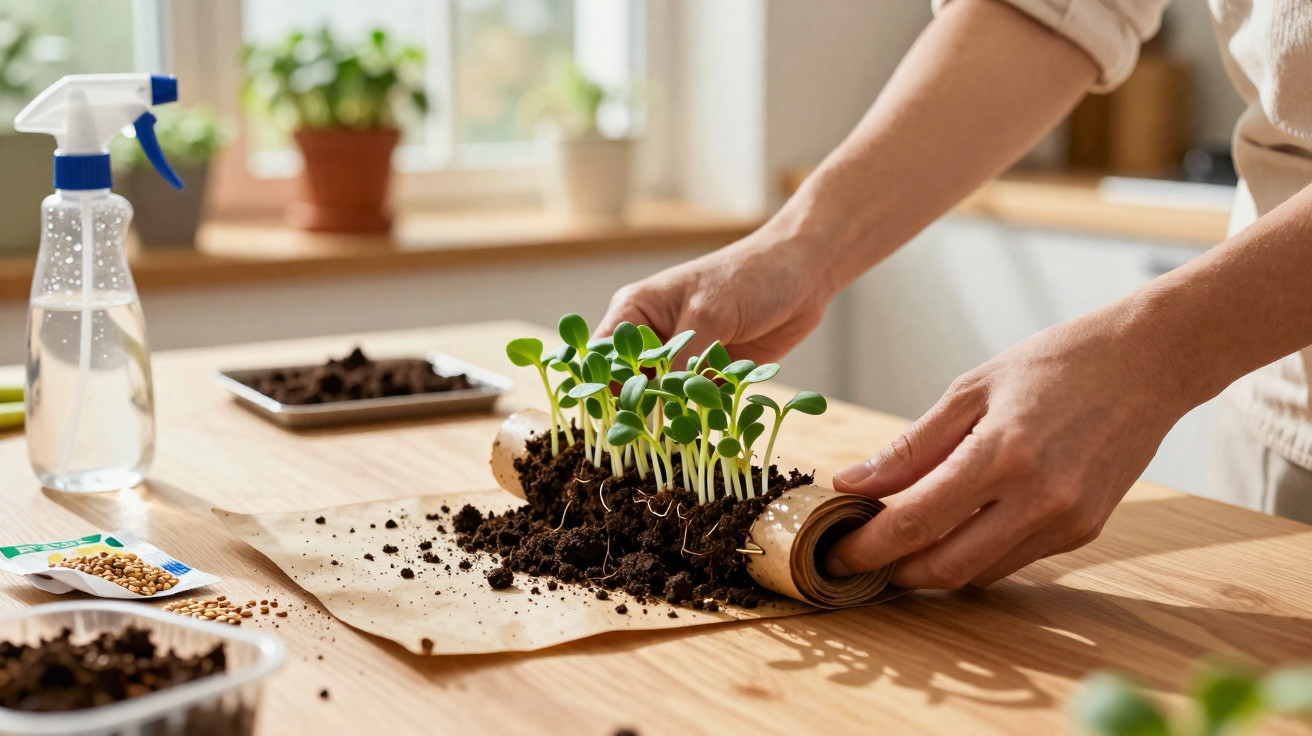
If you sow a lot, you’ll know the familiar issue: seed packets keep piling up, but you never seem to have enough propagation pots. The garden centre shelves are empty, and every spare corner at home is already taken. That’s exactly where a surprisingly simple approach comes in-currently going viral among gardening fans. Using an everyday household material, you make a tight, compact roll where dozens of young plants can germinate, without relying on traditional pots.
The Snail Method: lots of seedlings in the smallest space
Gardeners often call it the “snail method” because, once finished, it really does look like a rolled-up snail shell. The principle is simple: you take a flexible strip of paper or thin plastic, add moist compost, place the seeds, and then roll it up loosely.
"This creates a compact cylinder in which an astonishing number of plants can germinate-space-saving, inexpensive, and easy to unroll again."
The clever part is how it’s stored: you stand the roll upright in a shallow plate or dish. That way, a whole “mini garden” fits on a windowsill-even in a small flat. And when it’s time to pot on, you simply open the roll back up, one plant at a time.
Why more and more gardeners are switching to this technique
For many people, the method has become a secret weapon against lack of space and unnecessary plastic waste. It suits a generation of hobby gardeners who want to do things sustainably and don’t enjoy buying pricey accessories.
- Save space: Instead of 20 separate pots, you have one compact roll on the windowsill.
- Reduce waste: Old freezer bags, mailing sleeves, or newspaper can be reused.
- Pot on with less stress: You can open the strip gradually without tearing roots.
- Run several varieties at once: With a bit of planning, you can start different seeds in a single roll.
It’s especially appealing if you only have a balcony or a small terrace: you can start early without turning your home into a mess of pots and trays.
What you actually need
Most of what you need is usually already lying around at home. This isn’t about doing it perfectly-it’s about making it work.
Suitable materials for the strip
- thin plastic film, for instance from old bags or packaging
- multi-layer newspaper, rolled fairly firmly
- alternatively, a flexible, reusable plastic sheet
You’ll also need an absorbent layer-kitchen roll, an old cotton sheet, or another thin fabric-plus finely sieved seed compost. And, of course, your seeds, such as tomatoes, peppers, lettuces, or flowers.
Building the roll: step by step
- Cut the carrier film or paper into a long strip about 10–15 cm wide.
- Lay the strip flat and cover it with kitchen roll or a thin piece of fabric.
- Spread a shallow layer of lightly moistened seed compost on top-don’t make it too thick; about 0.5 cm is enough.
- Place the seeds in a line along the strip, leaving a little space between them.
- Starting at one end, roll the strip up gently into a loose roll until you have a compact “snail” cylinder.
The roll shouldn’t be too tight, otherwise the seedlings won’t get enough air. It’s better to roll it a little looser and then secure it with an elastic band or a piece of string.
How to keep the roll stable and evenly moist
Now for the everyday item that replaces pots: a simple plate, saucer, or shallow dish. Stand the roll upright inside it.
"A thin film of water at the bottom is enough for moisture to wick upwards through the paper and supply the entire strip."
Place the setup somewhere bright but not too cold-such as a windowsill above a radiator. Strong, direct midday sun can scorch young shoots, so provide a bit of shade if you have a south-facing window.
Care in the first few days
- Check the moisture level in the plate daily and top up with a little water if needed.
- Turn the roll slightly from time to time so all seedlings get an even amount of light.
- Avoid waterlogging, otherwise mould and rot can develop.
In many cases, the first shoots appear after just a few days. From then on, keep a close eye on things and step in early before the little plants start competing for space.
When it’s the right time to prick out
As soon as seedlings produce their first “true” leaves alongside the seed leaves, it’s time to think about moving them on. Depending on the variety and temperature, this is usually after two to three weeks.
At this stage, unroll the “snail” slowly and carefully. Many gardeners work from one side to the other, placing the unrolled section straight next to a prepared pot or bed.
"Each little tuft gets its own spot: either in a new pot or, if the weather is suitable, straight outside in the bed."
Lift the seedlings with the handle of a spoon or a dibber, keeping as much root as possible intact. Plant into loose compost, press gently, then water lightly. For the first few days after potting on, young plants benefit from protection from wind, harsh sun, and cold nights.
Which plants are particularly well suited to the method
This technique is best for fine seed and crops you want to start early in the year.
- tomatoes, peppers, and chilli
- aubergines and physalis
- leaf lettuces and spinach
- herbs such as basil, parsley, or chives
- summer flowers, for example zinnias, cosmos, or marigolds
Very large or chunky seeds-such as beans or peas-often do better in a conventional pot or straight in the ground, because they need more depth and space.
Typical mistakes-and how to avoid them
When you try the technique for the first time, the same issues tend to crop up. This quick overview helps prevent frustrating false starts.
| Problem | Likely cause | Solution |
|---|---|---|
| Mould forming | too much water, poor air circulation | water less, roll more loosely, air occasionally |
| long, thin shoots | too dark, too warm | move to a brighter spot, lower the temperature slightly |
| seedlings drying out | water level in the plate too low | check daily, top up with small amounts |
| roots tearing when potting on | unrolled too quickly, roll too tight | open the snail slowly, moisten compost slightly, work gently |
Why an everyday strip often beats plastic pots
The method doesn’t just save space and money-it also shifts how many people think about propagation. Instead of buying new plastic containers every year, the focus moves to what you already have. That saves resources and makes getting started easier for gardening beginners.
If you live in rented accommodation or don’t have a cellar full of gardening kit, you can begin with nothing more than a simple strip made from leftover packaging. Once the seedlings are bigger, you move them into sturdy, long-lasting containers or straight into the soil-depending on what suits your situation.
Practical tips for more experienced growers
More experienced hobby gardeners adapt the technique to suit their needs. Some place different varieties one after another on the same strip and separate them with small markers made from pieces of toothpick. Others mix a small amount of vermiculite or sand into the seed compost to keep the texture looser, helping roots push through more easily.
It’s also interesting to compare it with classic mini greenhouses: the snail method uses less material, can be set up faster, and takes up far less room. In return, it responds more strongly to fluctuations in light and watering, making the windowsill the decisive factor.
If you commit to it, you’ll learn a lot about germination conditions, moisture, and temperature. After one or two rounds, the handling usually becomes so intuitive that you start wondering why you ever bought dozens of plastic pots.
Comments
No comments yet. Be the first to comment!
Leave a Comment