
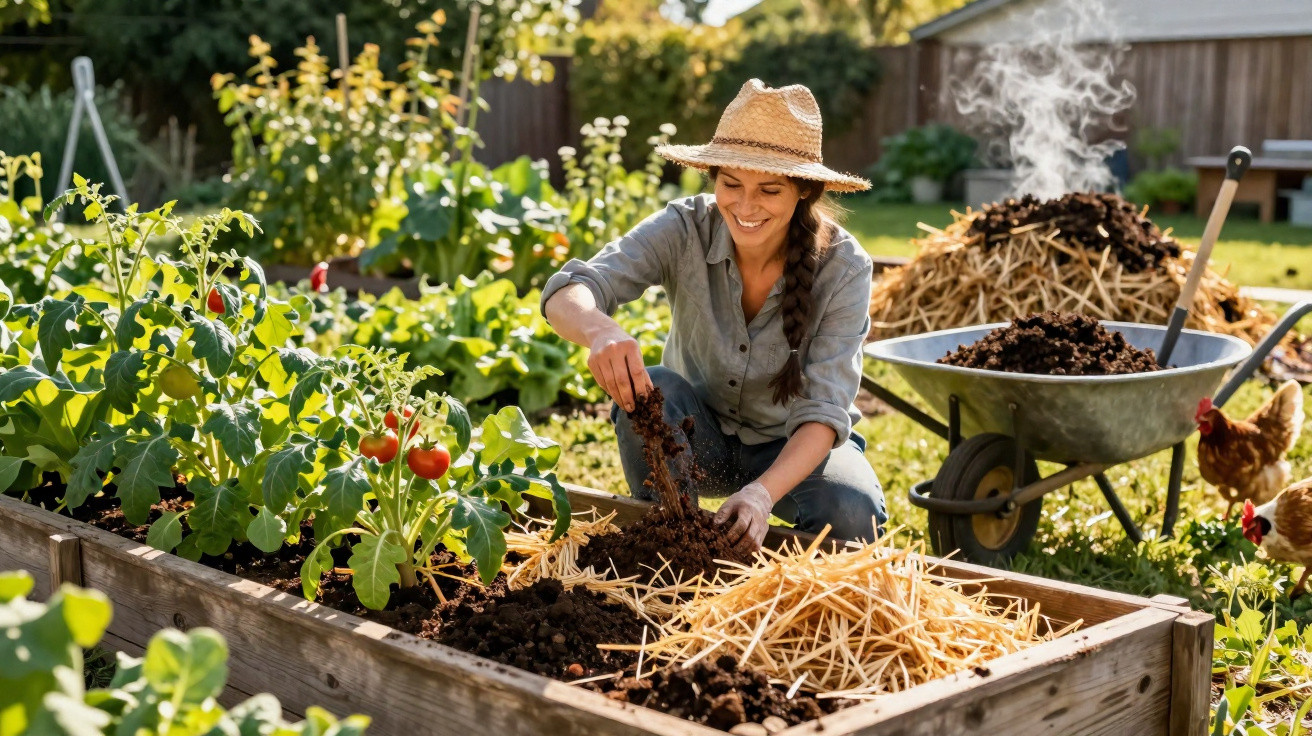
Keeping a few chickens in the garden usually brings fresh eggs to mind first, and maybe a bit of entertainment for the children. What many people overlook is that the real treasure ends up quietly in the bedding every day. Handled properly, this material can turn even tired beds into a garden buzzing with life - without chemicals and without expensive specialist fertilisers.
Chicken manure as fuel for the soil
Why chicken droppings do far more than ordinary farmyard manure
Chicken droppings are among the most nutrient-dense organic fertilisers you can use. They contain high levels of nitrogen, phosphorus and potassium - the three elements plants rely on for strong, healthy growth.
"Chicken manure is essentially a highly concentrated natural fertiliser that can give young plants a real push - if you use it correctly."
The high nitrogen content supports rich green leaves and vigorous shoots. Phosphorus helps with root development and flowering, while potassium strengthens the plant overall and improves resilience to stress, drought and disease. Compared with traditional cattle or horse manure, this fertiliser tends to work faster and more intensely.
That same strength is also where the danger lies: applied fresh, chicken manure can seriously harm plants. The key is proper preparation.
Why the mix of bedding and chicken droppings is so valuable
In a chicken coop you do not just collect droppings - you also end up with plenty of bedding: straw, hay, wood shavings or sawdust. What can look like waste at first glance is actually the ideal partner for nutrient-rich manure.
Dry, carbon-rich bedding balances out the extreme nutrient concentration in the droppings. Together they form a material that composts exceptionally well. While garden centres sell pricey bags of specialist compost or “soil improver”, many coops are effectively producing free raw material of comparable quality.
- Bedding adds structure, keeps soil open, and helps prevent compaction.
- Chicken droppings supply nutrients in a concentrated form.
- Combined, they become a highly productive natural fertiliser for the whole season.
Why fresh chicken manure can literally scorch plants
Typical beginner mistake: tipping it straight on to the beds
Many people new to keeping chickens make the same error: after mucking out, they dump the coop contents straight on the vegetable bed. The result can be yellowing leaves, stunted growth, or seedlings dying off entirely. It can look like the soil has been “poisoned”, when in reality the fertiliser was simply far too strong.
The nutrient concentration in fresh chicken droppings is so high that it can effectively burn delicate roots. On top of that, ammonia can form, which puts plants under stress. Young transplants and seedlings are particularly sensitive.
"Fresh chicken manure should never go directly on plants - it needs time to mature first."
Six months of patience: how the material matures into humus
To turn aggressive raw material into a gentle but powerful humus, time matters most. Around six months is a sensible rule of thumb. During this period, micro-organisms convert sharp, fresh manure into a crumbly, earthy compost.
How to do it in the garden:
- After mucking out, pile the full coop contents (bedding plus droppings) into a heap in the garden.
- Place the heap in a semi-shaded spot that is not too dry, but also not fully exposed to constant rain.
- In dry spells, keep it slightly moist; in heavy rain, loosely cover it with a tarpaulin if needed.
- Optionally turn it every few weeks so it rots down more evenly.
After a few months it should no longer smell strongly of the coop and instead smell like soil. The original stalks, shavings and clumps of manure will be barely recognisable. That is the point at which the compost is ready for the garden.
The right amount: a few centimetres is enough
How much chicken compost the soil can really handle
Because the material remains so nutrient-rich, you only need a thin layer. Two to three centimetres on the soil surface is plenty. Using more does not automatically increase yields - it can even throw soil life out of balance.
Application is straightforward:
- Spread the compost on the surface; do not bury it - just lightly rake it in.
- Work around plants without pushing it right up against stems.
- On beds that are already well-fed, stick to the lower end of the amount.
"With a thin layer of chicken compost, you feed the soil for months - without any synthetic fertilisers."
Where it pays off most
Some plants are far heavier feeders than others, and that is exactly where chicken fertiliser shines. It is particularly well suited to:
- tomatoes, peppers and aubergines
- pumpkin, courgettes and cucumbers
- brassicas such as white cabbage, Brussels sprouts or broccoli
- soft fruit bushes such as raspberries and blackcurrants
- fruit trees, for example apple or pear
Lighter feeders such as lettuce or herbs can benefit too, but they need much smaller amounts. Often it is enough to keep some distance from the plant, or apply a diluted addition around the edge of the bed.
The crucial step: add a protective mulch layer on top
Why mulch makes the fertiliser even more valuable
If you leave mature chicken compost exposed on the soil surface, you lose a large part of its potential. Sun and wind dry the top out, and a heavy downpour can wash nutrients away. It is better to cover the compost straight away with a mulch layer.
Suitable options include:
- dried grass clippings
- autumn leaves
- shredded hedge and shrub prunings
- straw or hay in a thin layer
Mulch keeps moisture in the soil, protects soil organisms from temperature extremes, and provides food for earthworms. Worms then move the fertiliser down into deeper layers bit by bit, mixing it into the soil.
"Mulch works like a lid on a pot: the ‘nutrient soup’ stays where it belongs - in the soil."
Long-lasting effect instead of a short nutrient burst
With a mulch layer in place, chicken compost releases nutrients more slowly and evenly. Rain and watering dissolve minerals gradually, while roots can take them up continuously. Plants stay well supplied for weeks, without constant top-ups.
As a bonus, the mulch suppresses unwanted weeds. If you are consistent, you will reduce how much you water, hoe less often, and gain more time to simply enjoy a lush garden.
Practical examples from the chicken garden
A typical yearly routine with chicken fertiliser
| Period | Action |
|---|---|
| Autumn | Muck out the coop thoroughly and collect the material on a compost heap. |
| Winter | Leave the heap to rest; check it occasionally and water lightly during dry spells. |
| Early spring | Check the compost is mature: crumbly, earthy, with hardly any coop smell. |
| Spring | Apply a thin layer to beds and beneath fruit trees, then add mulch. |
| Summer | Benefit from noticeably stronger plants and higher yields. |
Risks and what to watch out for
As effective as chicken manure is, care still matters. If you overdo it - or fertilise too early - you can do more harm than good. A few points deserve close attention:
- Do not work with bare hands; wear gloves.
- Do not get fresh droppings on edible parts of plants.
- On very sandy soils, use smaller amounts because nutrients leach out faster.
- Keep an eye on coop hygiene: damp, crusted bedding is a sign the coop management needs improving too.
If you stick to the basics - compost first, apply sparingly, then mulch - your chicken coop becomes an almost self-sufficient nutrient source. That not only saves money, it also reduces environmental impact.
Many people notice after a year or two that the soil becomes darker and more open, and holds water better. Earthworms suddenly appear in huge numbers. And harvests from vegetable beds and the orchard increase noticeably. That is when you see just how much potential can be hidden in an unremarkable heap of bedding.



Comments
No comments yet. Be the first to comment!
Leave a Comment