
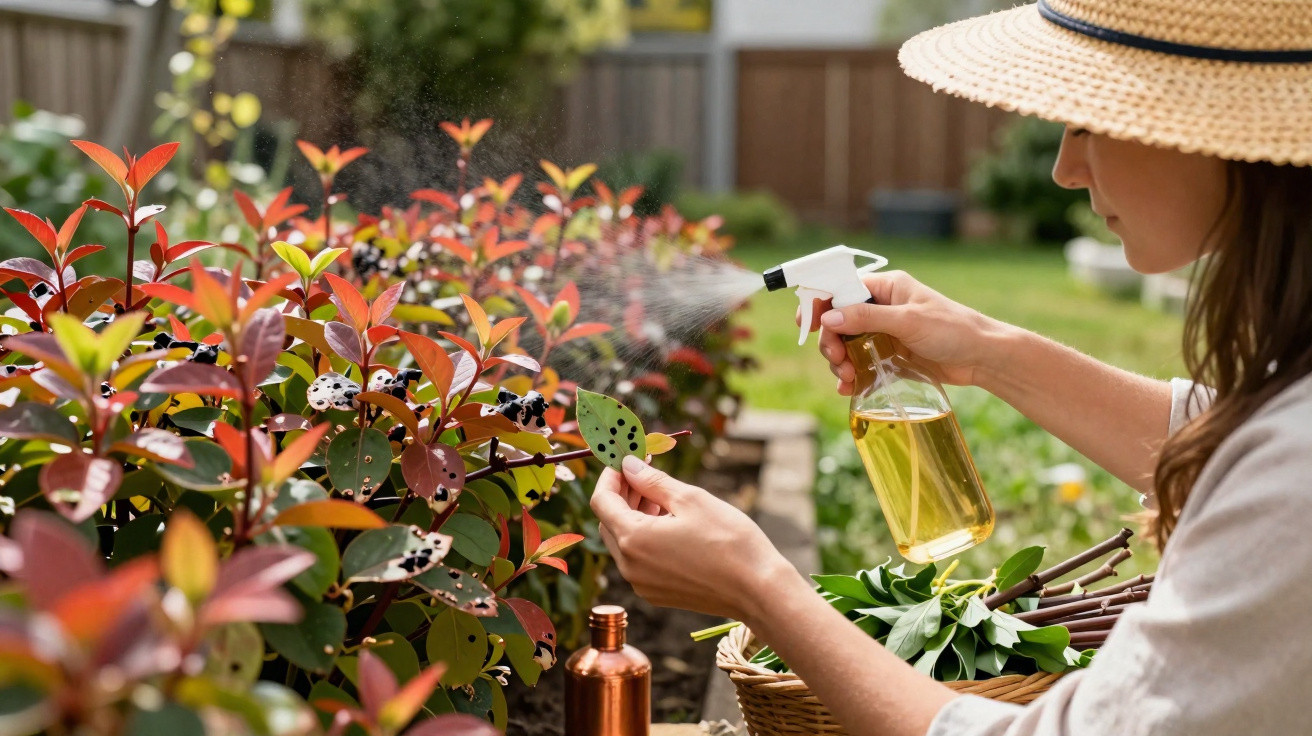
Many garden owners only realise something is wrong when there is already a proper carpet of colourful, speckled leaves under the hedge: Photinia-especially the much-loved variety ‘Red Robin’-develops black spots, starts dropping foliage and suddenly looks tired, full of holes and generally run-down. In most cases, the cause is a fungal disease that can surge during damp springs-and it can be brought under control with a surprisingly straightforward, completely natural step, as long as it’s done in time, before spring begins.
What really causes black spots on Photinia
In around 80% of cases, the culprit is what’s known as Entomosporium leaf spot (Entomosporiosis). The fungus responsible is Entomosporium maculatum, which thrives in mild, wet conditions. After particularly rainy winters, the risk rises markedly; studies mention increases of up to plus 45 percent.
A tell-tale sign is that it usually begins in the lower parts of the shrub. Small dots appear first, often brown to black, frequently outlined with a thin reddish margin. These spots enlarge, the centre turns a pale grey, then the whole leaf yellows and eventually drops. If you’re finding several handfuls of these speckled leaves at the base of the hedge, treat it as an unmistakable warning.
Normal leaf replacement looks quite different: leaves tend to turn an even yellowish colour and you won’t see neat, round, sharply defined dots. Thick, almost crusty, irregular coatings can point instead to other problems such as scab or sooty mould. A quick check helps:
- round, clearly defined spots
- lots of affected leaves, especially low down
- obvious patches of leaf drop beneath the hedge
If those points fit, Entomosporiosis-and its typical black Photinia spots-is a very likely diagnosis.
"If you correctly identify the black spots early on, you can prevent the whole hedge from suffering with a few simple actions."
Why the disease takes off in spring
The real engine of this fungal problem is easy to miss because it sits on the ground: the “carpet” of infected, dead leaves that often rots away throughout winter. Specialists estimate that up to 90 percent of the spores that strike again in spring overwinter in this fallen foliage.
The fungus does not spread through the roots; it spreads via splash water. When rain hits the layer of leaves, droplets flick spores up and onto fresh, young leaves-especially in the lower hedge area. Conditions there are ideal: tender new growth and, thanks to dense planting, leaves that stay wet for a long time.
On heavy soils and in very tightly planted hedges, a run of strong showers can be enough for black spots to spread rapidly again. Taking away this “launch pad” on the ground is exactly how gardeners can deprive the disease of its advantage.
The one natural step that can save your hedge
The most important measure is almost deceptively simple and costs only time: remove every infected leaf from the ground around the hedge-before spring properly gets going.
"If you remove the leaf carpet thoroughly, you take away the fungus’s main winter stronghold and noticeably slow down reinfection."
The best window is between late February and early March, on a dry day, before buds break. Proceed as follows:
- Put on gloves; if you’re sensitive, consider wearing a breathing mask.
- Use a rake and gently pull from the base of the shrub outwards, so leaves from the interior are brought out as well.
- Collect every visible speckled leaf-including any caught in the lower branches.
- Pack the material into sturdy sacks and take it to a green-waste collection site.
- Never dispose of it on your own compost heap, as the spores can happily survive there.
As a worthwhile “bonus”, lightly prune the hedge at the base: a few well-placed cuts with secateurs increase air and light in the lower section. Wet foliage then dries more quickly, which makes life harder for fungi.
A major mistake is leaving infected leaves in place-or even mulching them-while also watering the whole hedge from above with a fine sprinkler in spring. That combination spreads spores in almost perfect fashion.
Natural helpers: copper, plant brews and the right care
Once the spring clear-up is done properly, a gentle protective film on the young leaves can be useful. Many hobby gardeners use a traditional copper-based mixture, made up at 10 to 20 grams per litre of water and sprayed lightly over the plants. This is mainly aimed at higher-risk hedges-for example after very rainy winters or in areas with heavy fungal pressure.
If you prefer to lean even more towards nature-based options, you can also use plant-strengthening treatments:
- horsetail cold infusion or decoction, rich in silica to help build firmer leaf tissue
- nettle liquid feed as a mild, invigorating fertiliser and to support resilience
Neither should be applied too frequently; use them at wider intervals and ideally onto dry leaves. At the same time, review how you water: Photinia wants moisture at the base, not from overhead. If you must use a sprinkler, choose one that strikes the leaves as little as possible, or water only in the morning so the foliage can dry during the day.
Site, pruning and spacing: keeping the Photinia resilient long term
Beyond direct fungus control, the overall health of the hedge matters greatly. A well-nourished, vigorous Photinia copes far better with minor infection.
Points garden owners should watch
- Position: bright to semi-shaded, ideally an airy spot without persistent waterlogging.
- Soil: free-draining and humus-rich; improve with sand or compost if needed.
- Plant spacing: allow a little more distance between shrubs so air can circulate.
- Pruning: regular but moderate, aiming for a loose, slightly conical shape.
- Feeding: in spring, a restrained application of organic fertiliser or well-rotted compost.
Heavy nitrogen feeding can produce lush red new growth, but it also leaves tissues soft and more vulnerable to fungi-so moderation pays. If you’re planting from new, choose robust varieties, buy healthy, strong young plants and avoid bargain stock that already shows visible spots.
Giving badly damaged hedges another chance
In some gardens, damage is already so extensive that there are obvious gaps in the hedge. In that situation, a single raking session is often not enough. A staged approach over two to three years works better:
- Remove all fallen leaves every winter without fail.
- In the first year, cut back heavily affected branches to healthy wood.
- Support new shoots with plant-protection measures and good general care.
- Fill any gaps with new, healthy plants or alternative shrubs.
Gardeners who follow this plan often see a noticeably denser, more vigorous hedge by the second year. Completely lost sections can be replaced without having to dig out the entire row.
Background: what makes Entomosporium leaf spot so persistent
This fungus produces vast numbers of spores, which are quickly spread by splash water. Each fresh infection then creates new sources of spores. That is why one neglected autumn or winter can be enough to bring a heavy outbreak of black spots in spring.
The spores can persist not only in fallen leaves but, in some cases, also on less sensitive surfaces such as bark or wood. So a spring clean-up does not guarantee instant, total safety-but it does drastically reduce pressure. Combined with better airflow and adjusted watering, the infection can be pushed back step by step.
Many hobby gardeners also underestimate the impact of microclimate: a dense row of Thuja nearby, a sheltered courtyard, tall walls-any of these can hold dampness and extend wet periods. If you grow Photinia in such settings, it’s wise to be more generous with spacing from other shrubs and to prune with a stronger focus on letting in light.
With the right care, Photinia repays the effort with exactly what makes it so popular: vivid red new growth that brightens even grey days-without constant reliance on harsh chemicals, but instead a rake, a pair of secateurs and a little attention at the right moment.

Comments
No comments yet. Be the first to comment!
Leave a Comment