
Many hibiscus enthusiasts know the frustration: long, thin shoots that are bare at the bottom, with only a few scattered flowers right at the top. Especially after winter, an otherwise impressive shrub can look tired and a bit ragged. Yet a tiny action at exactly the right time can turn it into a compact, flower-filled bush - with no drastic pruning and no special tools.
Why hibiscus looks so scruffy after winter
Towards the end of winter, many hibiscus varieties stretch strongly towards the light. Whether it’s a Chinese hibiscus (Hibiscus rosa-sinensis) grown indoors in a pot, or a hardy hibiscus (Hibiscus syriacus) in a border, the pattern is similar: the plant produces long shoots, drops leaves near the base, and then flowers only at the very top. It takes effort from the plant, but delivers very little flowering surface.
This is where timing matters most: the window between early March and roughly mid-April. During this period hibiscus starts into new growth, sap flow picks up, and buds begin to wake. The plant has energy, but it is not yet coping with the full heat stress of summer.
“Between early March and mid-April, hibiscus responds especially strongly to small pruning signals - that’s when the year’s flower quantity is decided.”
A heavy prune at this stage feels too extreme - and too risky - for many gardeners. The good news is that it isn’t required. A precise mini-intervention at the tip of a shoot is enough to noticeably increase the number of flowers.
The 3-second move in March: how it works
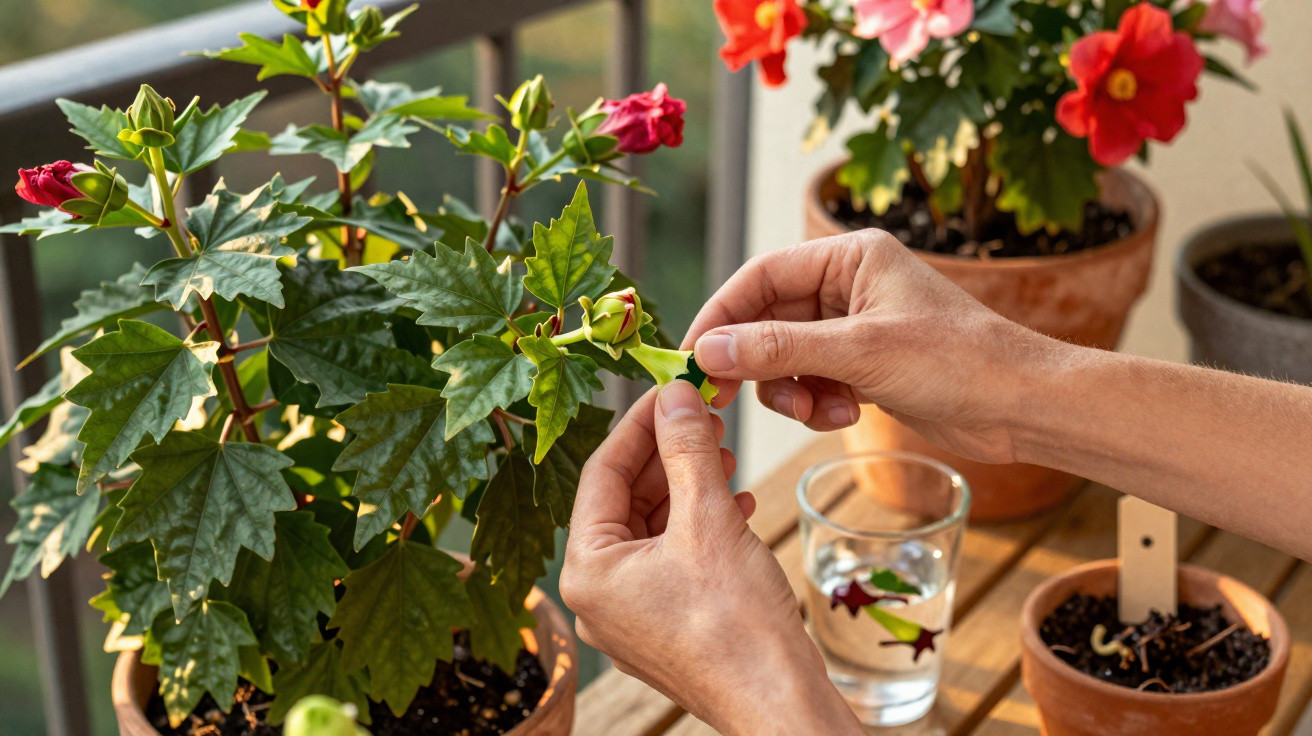
The effective technique is simply “pinching out the growing tip” (often called pinching out in gardening). In practical terms, it means removing the top bud area on young, still-soft shoots.
Step by step to a flower-packed bush
- Choose the right shoot: Pick a young, flexible tip with around 3 to 4 pairs of leaves.
- Work cleanly: Disinfect fingertips or secateurs with 70% alcohol to reduce the risk of infection.
- Remove the very top: Pinch out the shoot tip just above a leaf node, or snip it off with clean scissors.
- Stick to the timing: The ideal period is early March to mid-April, when you can clearly see fresh new growth.
Per shoot, it really does take only a few seconds. New side shoots often appear after 2 to 3 weeks - depending on light, temperature and general care.
“A single shortened shoot can split into two to three new branches - and each of those will later carry buds.”
What’s happening biologically: the dominance of the tip
Behind this small action is a straightforward plant mechanism. The tip of a shoot acts like a “control switch”. It produces hormones (including auxin) that stop side buds from breaking too early. This is known as apical dominance.
As long as the tip remains, a large share of the plant’s energy is directed there. Side shoots stay on hold, and growth focuses on height - the classic “flagpole” effect you see on a windowsill.
Once the tip is removed, that hormonal gradient collapses. The plant reallocates its sap flow, now feeding dormant buds lower down. The results are:
- more branching from each shoot,
- a more compact, bushier habit,
- far more potential flower sites.
If you recognise a “feather-duster hibiscus” by the patio door - long stems with a few blooms at the top - this approach helps you achieve the opposite: a rounded shape, dense foliage and a shrub that flowers far more generously.
Mistakes to avoid when pinching out
The action is simple, but it still has limits you should respect.
- Don’t pinch out old, woody shoots: Pinching makes little difference there. If anything is needed, those sections require a traditional shaping prune at a different time of year.
- Don’t remove buds right before flowering: If there is already a well-developed flower at the tip, it’s better to leave it - otherwise you’re simply sacrificing a bloom.
- Rotate the pot regularly: If the plant grows only towards the window, it will become lopsided. Turn it slightly every few days so new shoots develop more evenly.
“The younger and softer the shoot tip, the more strongly hibiscus reacts to pinching out.”
Growing new hibiscus plants from the removed tips
Those pinched-off tips are not waste. With very little effort, you can use them to raise new plants. Pieces from around 10 cm long are ideal.
Rooting in a pot
For classic cuttings, proceed as follows:
- Make an angled cut just below a leaf node.
- Remove all leaves from the lower section completely.
- Leave two to four leaves at the top and, if needed, cut them in half to reduce water loss.
- Dip the base in rooting powder or place it in homemade willow water.
- Insert into a loose, lightly moist seed compost mix.
- Keep it in a bright spot out of direct midday sun, at around 15 to 20 °C.
With a bit of patience, young roots form at the cut. The cutting can later be moved into a larger pot or planted out, where it develops into a self-sufficient shrub.
Cuttings in a glass of water
Rooting in water is even simpler:
- Stand the cutting in water only deep enough to cover the lower node.
- Change the water every few days to prevent rot and bacterial build-up.
- Keep it bright but not in full sun - an east- or west-facing window works well.
In good conditions, first root initials often appear after around two weeks. Once several strong roots have formed, the cutting can be potted up carefully into compost.
“The 3-second move doesn’t just produce more flowers - it can also provide free new hibiscus plants if you want them.”
Which hibiscus types benefit from the trick
Pinching out works well with several common types:
| Type | Location | Response to pinching out |
|---|---|---|
| Hibiscus rosa-sinensis | Indoors, conservatory | Stronger, bushier growth in a pot, more buds at the tips of side shoots |
| Hibiscus syriacus | Garden, outdoor container | Denser shrub, more flowers along the shoots in summer |
| Hibiscus moscheutos | Garden, damp site | More vigorous, branched new shoots with large flowers |
For plants grown outdoors, the timing depends on when growth starts: as soon as you see the first fresh, soft shoots, the window for this quick action begins. In more exposed or colder areas, that can be a little later than early March.
Care tips so the hibiscus copes well with the intervention
To help the plant convert the stimulus into fresh shoots quickly, a few simple measures make a difference:
- Even watering: The compost should neither dry out completely nor stay permanently waterlogged.
- Moderate feeding: From April, use a flowering-plant fertiliser every two weeks to support bud formation.
- Plenty of light: The brighter the position, the stronger the response to pinching out.
- Avoid draughts and cold nights: Container plants in particular prefer steady, mild temperatures.
If you’d rather take it cautiously, start with just a few shoots and watch how the plant responds. If growth develops well, you can pinch out additional tips.
What the 3-second trick means for balcony and garden
For balcony gardeners with limited space, this quick action is especially useful. A compact, full hibiscus looks far better than a tall, sparse plant with only a few blooms. At the same time, a handful of tips can easily be turned into extra plants for other pots.
In the garden, pinching out helps make a hibiscus hedge or row denser. More branching means more screening and more flowers at eye level. By treating a few shoots each year, you gradually shape a balanced, flower-rich stand of shrubs.
It’s also a friendly technique for beginners: no complicated pruning knowledge, no expensive equipment - just a quick pinch in the right place at the right time of year. The payoff arrives in summer, when noticeably more abundant flowers make the small March intervention worthwhile.
Comments
No comments yet. Be the first to comment!
Leave a Comment