
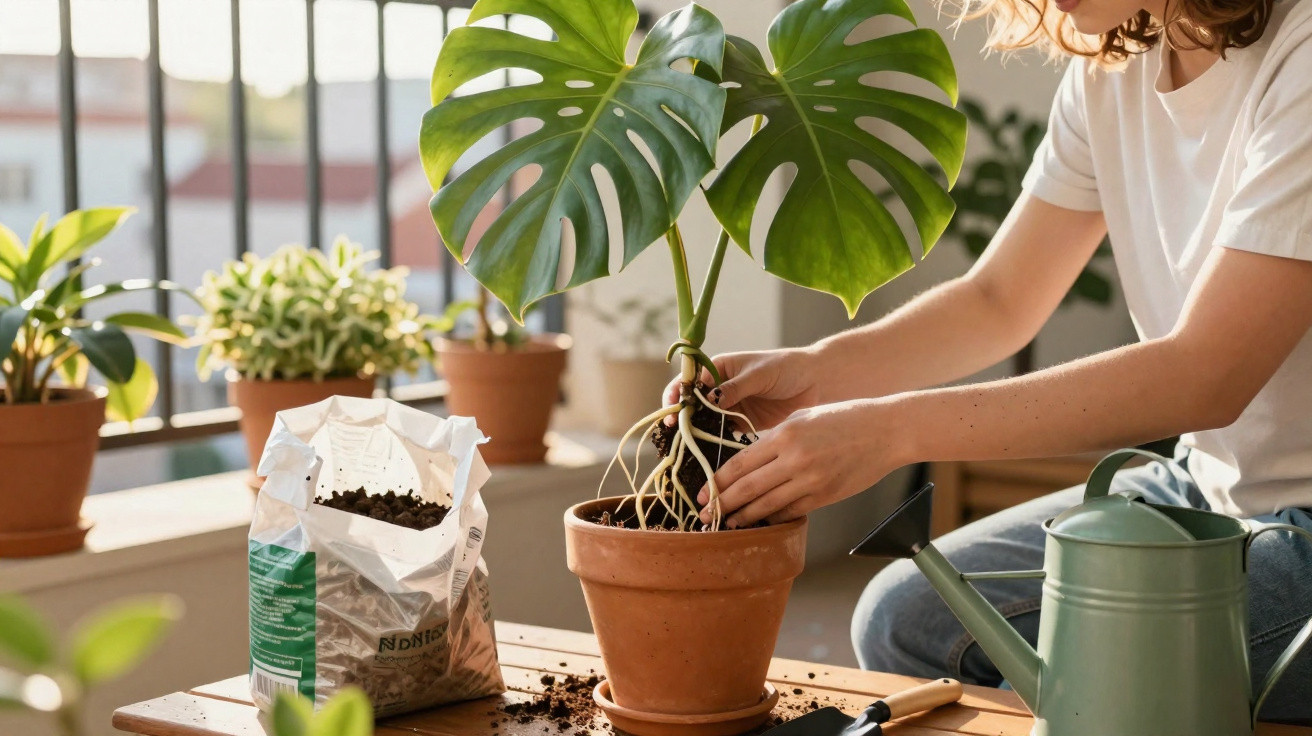
The much-loved houseplant with its distinctive, split leaves can put on growth at speed when conditions are right. The crucial catch: missing the right moment to repot costs a Monstera energy and looks-and, over time, even its health. If you learn to spot a few clear signals, it’s easy to avoid.
How to tell your Monstera needs a new pot
A Monstera makes it pretty obvious when it’s outgrown its container-you just need to know what to look for. Several signs reliably point to a pot that’s become too small.
Roots appearing at the bottom or the top
The clearest clue is underneath: if pale, firm roots are poking out of the drainage holes, your plant is already using every last millimetre of space. You may also notice, when you slip the plant out, that the roots are circling around the inside wall of the pot-another sign the Monstera has hit its limit.
A second giveaway is on the surface: the compost starts to dome upwards. It can look as though the root ball is trying to lift the “lid” off the pot. What’s happening is that roots are pushing up because there’s no room left lower down. At that point the entire root ball is tightly packed-an unmistakable cue to move up a size.
Watering suddenly behaves differently
How the pot drains can also reveal a space issue. If water runs straight out of the bottom almost immediately, without soaking into the compost, there’s often too much root mass compared with the amount of compost left in the pot. Put simply, there’s no structure remaining to hold moisture.
Another red flag is a sudden need to water far more often than before, even though the plant’s position and the room temperature haven’t changed. In that case, the plant is burning through water quickly-typically because the roots have displaced almost all the available compost.
“If water only rushes through or you constantly have to reach for the watering can, your Monstera is crying out for a bigger home.”
Leaves turn smaller, go yellow, or growth slows
A healthy Monstera regularly produces new, strong leaves with the characteristic splits. If new leaves suddenly emerge smaller, lack splits, or stop appearing altogether, the cause is often either a lack of space or exhausted compost.
- New leaves become noticeably smaller than older ones
- Leaf tips or whole leaves turn yellow despite correct watering
- The plant barely grows during the main growing season
These growth slowdowns suggest the plant is running short on nutrients and the roots no longer have room to expand. Yellow leaves can also come from incorrect watering, but when they show up alongside visible roots, repotting is a very likely culprit.
The best time of year to repot
Even when the signs are obvious, timing still matters. A Monstera is fairly forgiving, but some periods are much better suited to repotting than others.
Spring: the ideal window
Between March and May, the plant is in full growth mode. Days are getting longer, light levels rise, and the Monstera produces fresh roots and leaves. That makes spring the perfect moment to move it into a larger pot.
During this period, it also bounces back much faster from the unavoidable disturbance around the roots. Minor damage heals quickly, and the plant can anchor itself in the new compost without delay.
Early summer still works-avoid peak summer if you can
Up to around mid-June, repotting is usually still fine, particularly if the roots are already pressing hard for space. The days are long, temperatures are steady, and the plant is still actively growing.
July and August are different. Heat is already stressful for a Monstera, and adding transplant shock on top can lead to limp leaves, scorching, and longer recovery times. If you have the choice, wait for milder temperatures.
Autumn and winter: only in an emergency
From late summer onwards, a Monstera gradually slows down. New leaves appear less often and the plant needs less energy, so it’s best to leave the root ball as undisturbed as possible.
In winter, low light combines with drier air from central heating. In that mix, many plants become more sensitive to root disturbance. Only repot then if you truly have to-for instance, if roots are rotting or there’s severe mould in the compost.
“The season can decide between stress and a quick restart - spring is almost always the best repotting phase for a Monstera.”
How often a Monstera needs a new pot depending on age
Not every Monstera grows at the same pace. Even so, rough guidelines are useful for planning likely repotting intervals.
| Age of plant | Recommended frequency | Pot size compared | Main aim |
|---|---|---|---|
| 0–2 years | roughly once a year | diameter + 5–7 cm | allow strong root growth |
| 3–5 years | every 18–24 months | diameter + 5–10 cm | keep further growth stable |
| 5–10 years | every 2–3 years | usually + 5 cm or compost change only | safeguard health and stability |
| 10+ years | every 3–4 years | renew compost only | refresh nutrients |
What matters most is not making a huge jump in pot size, but stepping up sensibly. A proven rule of thumb is that the new pot should usually be only about two finger-widths wider in diameter than the old one.
If you choose an oversized container, too much compost stays wet for too long. The roots then sit in moisture like a sponge-ideal conditions for rot. A pot that’s too small, on the other hand, restricts growth and leaf production earlier than necessary.
Step by step: how to repot your Monstera properly
Preparation the day before
Water your Monstera well the day before you repot. This makes the root ball easier to slide out, and roots are less likely to snap. Get everything ready in advance:
- a new pot with drainage holes
- a loose, airy compost for houseplants or aroids
- clean scissors or a sharp knife
- optional: a climbing support or moss pole
Remove the plant from the old pot
Carefully tip the pot onto its side, support the plant by the lower stem, and tap the rim gently. If it won’t budge, press the pot wall inwards slightly all the way around to loosen the root ball. Don’t yank on the stems-damage happens quickly that way.
If the root ball is extremely tight, you can lightly score a few outer roots with several vertical cuts. This encourages fresh growth into the new compost.
Check the roots and remove problem areas
Inspect the roots closely. Healthy roots are pale, firm, and have no unpleasant smell. Cut away any soft, mushy, black, or foul-smelling sections generously. You should also remove roots that are completely dried out and hollow.
Doing this prevents rot or fungi from being carried straight into the new pot. Make sure you clean your tools beforehand, otherwise you can spread pathogens from one plant to another.
Place it into the new pot
Start with a layer of fresh compost in the bottom of the pot. Position the root ball so the previous soil line sits at roughly the same height as before. The Monstera’s stem should not end up deeper in the compost, otherwise the base can rot.
Fill around the sides with compost and press it in lightly, without compacting it too much. Roots need air pockets to stay active. Finally, level the surface gently so water can spread evenly when you water.
“Never ‘bury’ the stem: the Monstera sits just as high in the new pot as in the old - that protects against stem rot.”
Care in the weeks after repotting
The sensitive period starts after the move. In the first few weeks, a Monstera tends to react more strongly to water, light, and draughts.
Watering correctly after the move
Right after potting up, water thoroughly once so the compost settles and makes good contact with the roots. After that, let the top 1–2 cm of compost dry out before watering again. At this stage the plant processes water less efficiently because many fine roots have been disturbed.
Waterlogging is especially harmful now. It’s better to test with a finger in the compost than to follow a fixed watering schedule.
Light, temperature, and fertiliser
Keep the Monstera in a bright spot, but out of direct midday sun. Filtered light at a window, or a position slightly back from the glass, works well. Strong sun can scorch already-stressed leaves.
Try to keep temperatures steady; around 18 to 28 °C is ideal. Avoid cold draughts from open windows, and strong air currents from radiators or air conditioning.
Hold off on fertiliser for four to six weeks. When new leaves appear, it’s a sign the plant has settled into the new compost. At that point, you can begin with a weak dose of liquid feed.
Common repotting mistakes and how to avoid them
A few pitfalls catch almost every houseplant owner at some point. Knowing them helps keep your Monstera thriving long-term.
- Choosing a pot that’s too large: too much compost stays wet, and roots begin to rot.
- Using the wrong compost: pure garden soil or heavy potting compost without structure is too dense, so roots can’t “breathe”.
- Putting it in direct sun straight after repotting: newly stressed leaves dry out or scorch.
- Feeding too early: extra nutrients burden weakened roots and can damage them.
- Overwatering in the first few weeks: the most common reason a Monstera droops after being repotted.
Mixes that combine potting compost with chunky materials such as pine bark, broken expanded clay, or perlite tend to work particularly well. They hold moisture without staying soggy and maintain reliable air channels through the pot.
Anyone caring for several houseplants learns quickly that each species behaves a little differently. A Monstera will forgive small missteps, but it’s sensitive to persistent wetness and the wrong pot size. If you repot with a clear plan and keep a close eye on the plant afterwards, it responds with strong, deep-green leaves and steady growth.

Comments
No comments yet. Be the first to comment!
Leave a Comment