
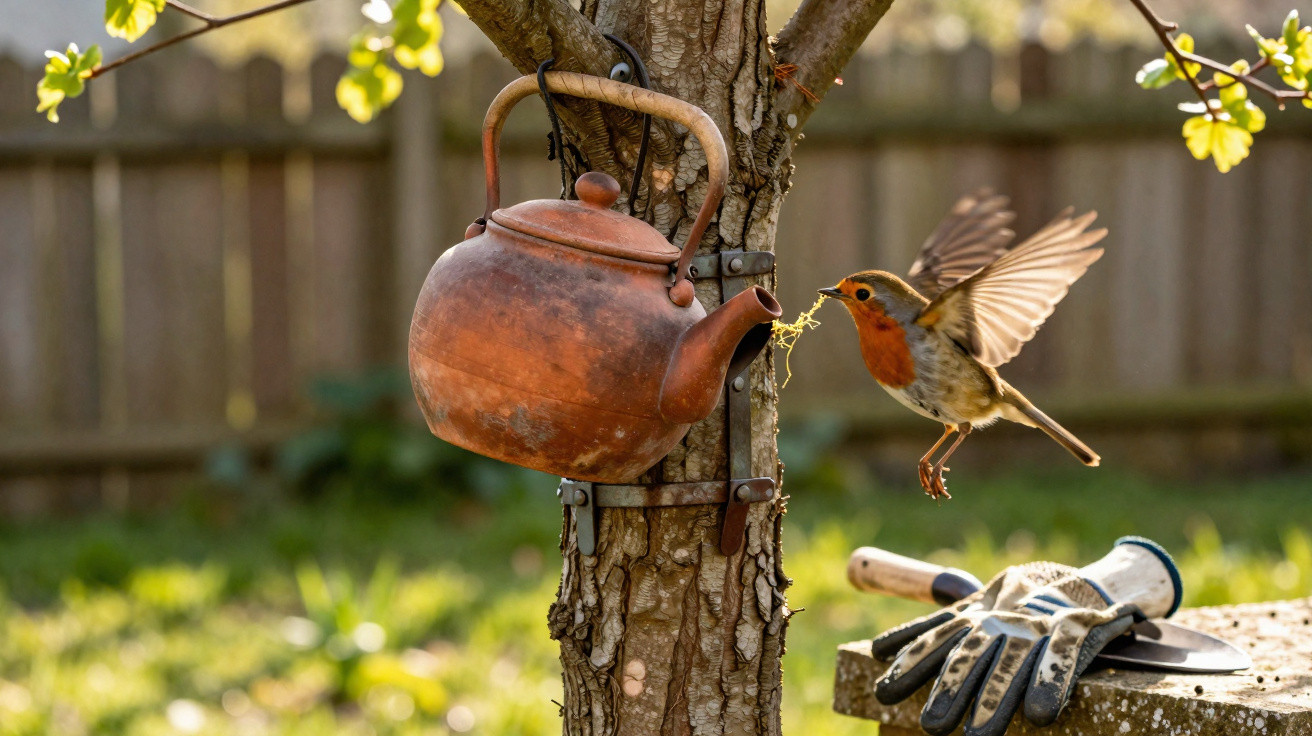
Robins are among the most likeable garden birds of all. Plenty of people are delighted whenever this small songbird drops in, yet struggle to persuade it to stay and nest in their own patch. The good news is you do not need pricey specialist nest boxes or fiddly construction plans. With an old clay teapot and a few straightforward rules, you can create a very natural-feeling shelter that robins will genuinely use.
Why robins are so choosy about nesting sites
In the wild, robins often breed in semi-open cavities: small, sheltered recesses in banks, among roots, or in walls. They want to feel concealed, while still being able to see out, keep watch, and bolt quickly if threatened.
"The ideal robin home is half-open, well camouflaged, but with a clear line of sight to the front and a quick escape route."
For an artificial nesting spot to be accepted, it needs to recreate exactly that sense of safety and visibility. Fully enclosed cavities such as classic tit boxes often feel too cramped and too dark for robins. They tend to favour:
- a half-open entrance rather than a small round hole
- a depth of roughly 20 cm
- enough outward visibility to spot predators early
- a quiet position within dense vegetation
Once you understand these preferences, it becomes obvious why not just any box will do - and why a clay teapot can be a surprisingly good fit.
The brilliant upcycling idea: an old teapot as a nest box
Many kitchen cupboards hide one that is no longer used: a chunky clay teapot or a sturdy ceramic pot. In just a few minutes, that very item can be turned into a working nesting place for robins.
The key is simple: laid on its side, the teapot becomes a half-open cavity whose shape closely resembles natural nesting niches. The thick material also helps keep the interior climate relatively stable. It buffers heat and cold, and copes with moisture in a more balanced way than thin plastic alternatives.
"A robust clay teapot feels like a small grotto - a familiar, protected structure for robins."
How to prepare the teapot properly
Before you put it up, give the old teapot a quick “wellness check”:
- Rinse thoroughly with clean water only - no washing-up liquid and no chemicals.
- Remove the lid so the top opening stays completely unobstructed.
- Check for sharp edges and smooth them if possible.
- Make sure the material is still sound and does not have deep cracks.
After that, the pot is ready for the garden - and the next crucial step is choosing the right location.
The perfect location: height, direction and surroundings
If you want the improvised nest box to be used, placement matters down to the metre. Robins prefer it neither high up nor directly on the ground.
- Height: about 1–2 m above ground is ideal.
- Surroundings: a dense hedge, ivy, untidy scrub, or a lush perennial bed.
- Peace and quiet: allow distance from paths, patios and heavily used areas.
The teapot should be “tucked into” vegetation rather than displayed like a decorative object on an exposed wall. An overgrown fence, an ivy-covered trunk, or thick shrubs usually work best.
The right orientation protects from heat and storms
Direction matters too. Ideally, face it east or south-east. That allows a little morning sun in, without the nest site overheating in midday heat. It is also typically more sheltered from prevailing wind than an exposed weather-facing side.
"An east or south-east position provides gentle morning light, but no oven-like heat in the afternoon."
Avoid spots with intense midday sun or directly on the weather front where wind and rain drive in at an angle. That puts stress on the adult birds and increases the risk to chicks.
Installation: how the teapot should sit
A teapot will appeal most to robins when it resembles a natural bank or root cavity. The angle and drainage are what count.
| Installation step | What to watch for |
|---|---|
| Lay the teapot on its side | The opening should point slightly downwards |
| Spout facing down | Rainwater can drain away; no “mini lake” inside |
| Set the tilt | About 15–20° downwards, for example using half a cork |
| Secure it | Tie firmly with galvanised wire; pad bark with cloth or rubber |
If the set-up wobbles, the bird’s confidence can disappear immediately. The teapot needs to feel like a stable part of the surroundings, not something that might fall at any moment.
The best time to put it up
Robins use these shelters not only for breeding but also as protected roosting spots, so it pays to act early.
The best time to hang the improvised nest box is in autumn. That way, the bird can get used to the shelter through the colder months. At the latest, the teapot should be in place by the end of February so it can be considered as a spring nesting site.
"If you wait until late winter, you increase the chance that the robin will use the teapot first as winter shelter and then as a nesting site."
Common mistakes that put robins off
Even a perfectly made nesting place will stay empty if a few basics are ignored. The most frequent issues include:
- Too much activity: placed right by paths, patios or children’s play areas.
- Too close to feeding stations: constant disruption from other birds, and sometimes birds of prey.
- Easy access for cats: positioned next to climbing trees or walls cats can jump onto.
- Constant noise: water pumps, loud air-conditioning units, or machinery running in the background.
Robins do not need a show-garden, but a reasonably calm, natural corner improves your chances dramatically. Leaf litter, a pile of deadwood, low scrub and a shallow water edge support foraging and make the birds feel safer.
Care and hygiene: once a year is enough
After the breeding season, the teapot nest site should be cleaned briefly. Remove old nests, brush the inside out with a stiff brush, and rinse with very hot water - that is entirely sufficient. Cleaning products or scented substances only disturb the birds and can do harm.
If you plan this quick service for late autumn, you reduce parasite problems and extend the life of the improvised nest box. The pot itself often lasts for many years in normal weather.
Practical additions for a robin-friendly garden
A single nesting spot is a strong start, but the surrounding habitat determines whether the bird stays. Useful additions include:
- a shallow water dish with a non-slip base, only a few centimetres deep
- small habitat features such as leaf piles, stacks of branches and slightly untidy corners for insects
- native shrubs that provide berries and cover
- avoiding chemical sprays so there is enough natural food
If you offer several semi-open nesting sites with some distance between them, you can limit disputes. Robins defend their territory very vigorously, so nesting places should not be hung right next to each other.
How to tell whether the teapot has been accepted
An early sign is a robin frequently singing nearby and repeatedly appearing at the teapot opening. Later, you may notice short, purposeful flights with moss, stems or leaves in its beak - that is when nest-building begins.
During breeding, keep your distance and observe only from afar. Constant checking can easily cause the adult birds to abandon the clutch. Binoculars from a safe distance and a bit of patience are the better approach. Especially with first-time users, it can take a while before the new nesting place is fully trusted.
If you develop a feel for position, peace and structure - and give the teapot the right “backdrop” - there is a good chance an old kitchen leftover will become a living feature, with a bright orange-red breast and soft song right outside your door.
Comments
No comments yet. Be the first to comment!
Leave a Comment