
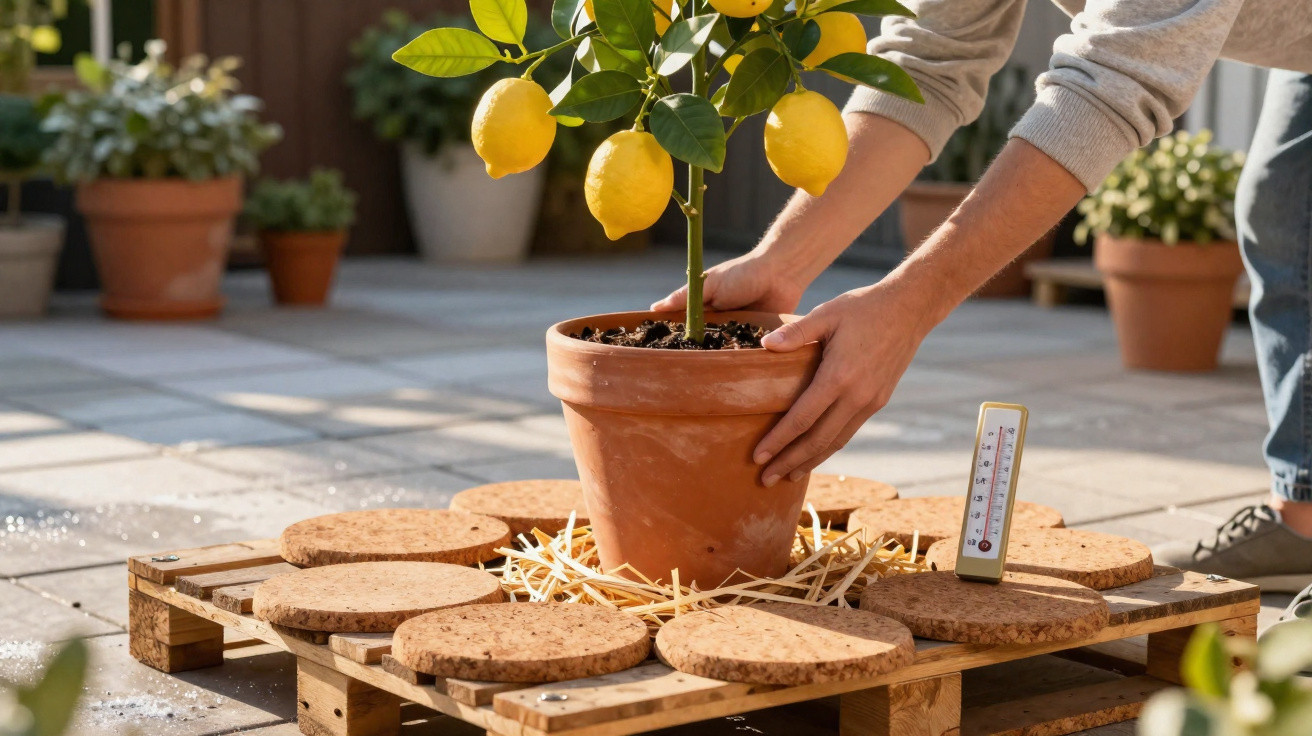
Many amateur gardeners breathe a sigh of relief once winter and February have passed. The lemon tree in a pot begins producing fresh growth, the first buds appear and everything seems safe. Yet this is precisely when danger strikes: late frost rising from below, invisibly travelling through the balcony or patio into the root ball. An inconspicuous item, easily improvised beneath the pot, can prevent this frost shock – and often determines whether the plant survives.
Why March becomes a trap for a lemon tree in a pot
The usual sequence is simple: days grow longer, temperatures rise and the lemon tree in a pot is already back outside. During the day, temperatures reach 12 to 15 degrees, and the balcony feels pleasantly warm. Then, on clear nights, the thermometer can suddenly fall to minus 1 or minus 2 degrees. That would not be a major issue for many plants, but it can be for a potted citrus tree.
The biggest misconception is that gardeners protect only what they can see: the canopy, leaves and flowers. A fleece cover, a partly sheltered position and slightly less watering – job done. However, the real point of attack lies elsewhere: around the roots, exactly where the pot stands on cold stone, tiles or concrete.
“The cold hammer does not come only from the air, but through the ground – straight through the pot and into the roots.”
Concrete, stone and tiled patios retain the night-time cold before gradually transferring it to the base of the pot. This chills the root ball from underneath, even when the air has already become mild again. The plant may look healthy one day, then two days later its leaves are limp, blackened or dropping off.
The inconspicuous item beneath the pot that stops the flow of frost
The answer is straightforward yet remarkably effective: place an insulating board beneath the pot. It acts as a stop sign for the cold, creating a simple thermal barrier between the container and an icy patio.
Which base actually provides protection
Materials that insulate effectively without becoming waterlogged are best suited:
- a thick polystyrene board, such as one from packaging
- solid cork or a thick cork mat
- a wooden board with an additional cork or foam layer
For the insulation to work properly, it should meet a few minimum requirements:
| Criterion | Recommendation |
|---|---|
| Board thickness | 2 to 5 centimetres |
| Extension beyond the pot | at least 1 to 2 centimetres on every side |
| Period of use | from late winter until around mid-May |
This small plinth breaks the direct connection between the pot base and the cold surface. Specialists describe this as interrupting the “thermal bridge effect”: cold can no longer penetrate the root zone as severely or as quickly.
Keep drainage clear so water can still escape
One common mistake is allowing the base to cover the pot’s drainage hole. Water then collects in the container, the compost remains wet, and frost causes twice as much damage. A simple trick makes it possible to combine insulation with unobstructed drainage.
A practical DIY option:
- Cut three corks in half lengthways.
- Arrange the halves evenly beneath the base of the pot.
- Put the pot, resting on the cork halves, onto the insulating board.
This creates a slim air gap between the pot and the board. The container remains steady, water can drain freely, and the air layer provides an additional insulating effect.
“Five minutes of DIY work, almost no cost – but a huge increase in frost protection for the lemon tree.”
How a “cold balcony” damages the root ball
Agricultural researchers have highlighted this for years: container-grown plants react far more sensitively to cold coming from below than plants growing in the ground. A pot offers no protective soil layer, no deep root system and very little thermal storage.
A typical situation is a south-facing balcony that becomes very warm in daylight. At night, the heated surface initially releases warmth, until it eventually becomes very cold itself. The base of the pot sits directly on it, while the pot’s interior responds much faster than garden soil would. The consequences are:
- fine root tips freeze
- water uptake collapses
- leaves appear to dry out even though the compost looks moist
- parts of the canopy die back
A lemon tree can briefly withstand temperatures of around minus 6 to minus 7 degrees if it is otherwise positioned with good protection. An insulating base combined with a light fleece cover can quickly provide a buffer of around three degrees. This enables the plant to get through many typical March nights when temperatures dip only slightly below zero.
Layered protection until after the Ice Saints
The insulating board beneath the pot forms the foundation. It should remain in place for as long as late frosts remain possible – traditionally until after the Ice Saints in mid-May. On particularly risky nights, this basic protection can be strengthened further.
How to combine several protective layers
A few simple steps allow you to layer protection around the lemon tree:
- Place the pot on an insulating board with an air gap.
- Move the pot close to a sheltered, south-facing house wall.
- When frost is forecast, drape winter fleece over loose canes or plant supports without pressing it against the leaves.
- Wrap the pot itself in bubble wrap, then cover it with hessian or a decorative fabric.
This combination keeps temperatures around the roots more stable and protects delicate new shoots. One important point: do not water excessively “out of sympathy” before very cold nights. Saturated compost cools more strongly than a lightly moist, airy root ball.
Typical mistakes that cost potted lemon trees their spring
Many cases of damage in March and April can be traced back to a handful of recurring errors. Once you know them, they are easy to avoid:
- Pot directly on stone or tiles: no insulation and full transfer of cold.
- Fleece over the canopy only: the root zone remains unprotected, despite being the most vulnerable part.
- Too much water before frosty nights: wetness intensifies the cold effect and encourages root rot.
- Putting plants outside early in sunny but draughty spots: day-to-night fluctuations become extreme.
- A saucer filled to the brim with water: a cold “lake” directly beneath the roots.
Once you understand that the critical area is not the foliage above but the bottom of the pot, your protection priorities naturally change.
How to recognise frost damage – and what may still be saved
Sometimes an unexpected frosty night catches the plant before protection is in place. In that case, look carefully for these signs:
- leaves turn grey-green, then later brown and brittle
- young shoots become limp and snap easily
- the bark on the lower trunk may develop small cracks
If only the leaves and very young shoots have been damaged, the lemon tree may recover with patience. After a few days, prune back dead, blackened shoot tips on a dry day. If the bark on the lower trunk is extensively split or black, the damage is often permanent.
Why the effort is worthwhile – even on a small balcony
Lemon trees need time before they fruit heavily. Every spring setback means losing a year of growth. Combining an insulating board, a little clearance from the ground and targeted light protection in March and April costs almost nothing, yet can save years of establishment.
Anyone who has seen an otherwise healthy tree collapse completely after one frosty night will no longer underestimate late frost. Temperature changes are especially severe on balconies and roof terraces compared with garden soil. A small, unobtrusive insulating mat beneath the pot is something of a life insurance policy for a lemon tree.
The same method can be used for several containers of Mediterranean plants, including olives, oleanders and kumquats. Nearly all these woody plants are sensitive when cold slabs chill their root area. Several insulated boards, or one continuous insulated base, can protect an entire group of plants at once and significantly extend their outdoor season.

Comments
No comments yet. Be the first to comment!
Leave a Comment