
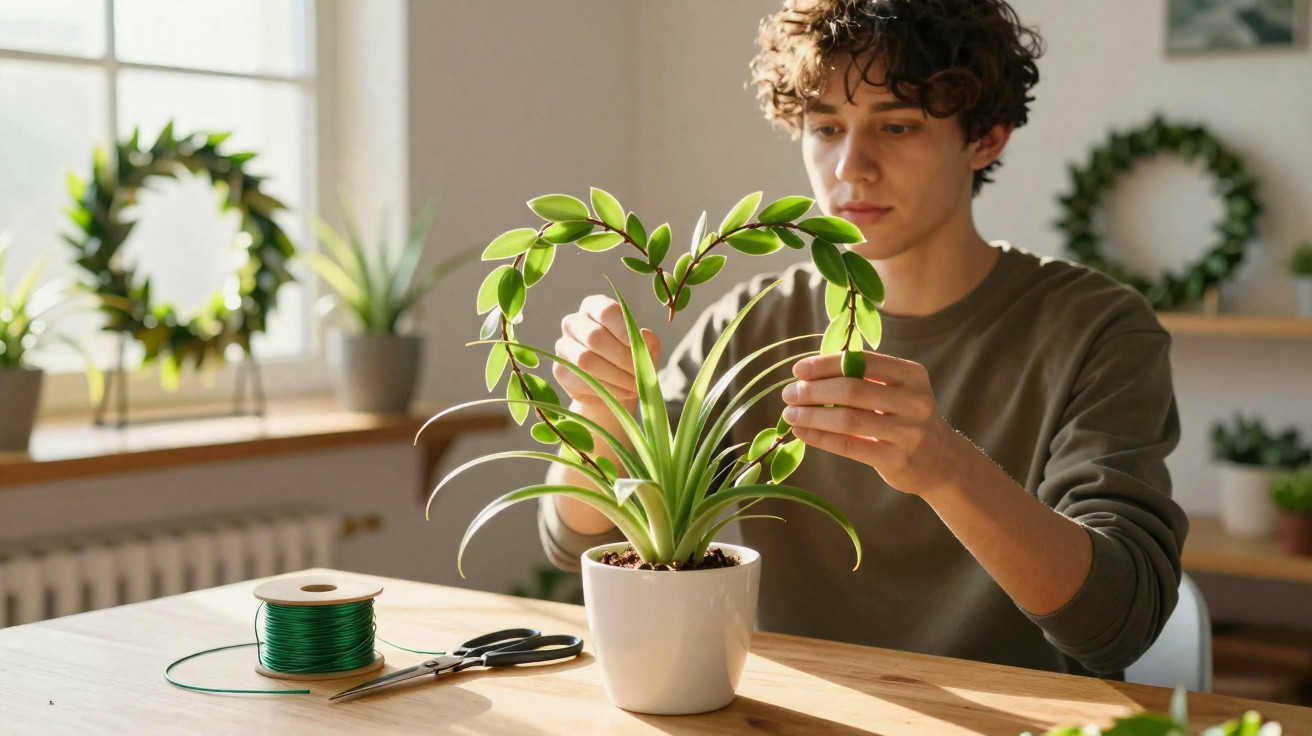
Plenty of households have one, and hardly anyone gives it much respect: the spider plant. It’s seen as an easy-going housemate rather than a design statement. Yet with a simple, almost playful technique, this everyday houseplant can be shaped to look like a small green sculpture - perfect for a sideboard, dining table or bedside table.
Why the spider plant has so much untapped potential
The classic spider plant (botanical name Chlorophytum comosum) originates from South Africa and has become a go-to resilient indoor plant around the world. It copes with dry spells, manages in low light, and is non-toxic for pets. That’s exactly why it often ends up tucked away in a corner where you just want “something green” - and it sits there, quietly decorative.
Its real charm, though, lies in the long flowering stems with small rosettes at their tips - the familiar plantlets. Usually these simply spill over the rim of the pot, almost like leafy garlands. If you guide them deliberately, you can build striking shapes from them.
"The flexible shoots of the spider plant can be guided like soft wires - which makes it an ideal candidate for living sculptures."
The shoots don’t snap straight away, as long as you work slowly and carefully. That makes the plant well suited to graphic forms that add structure to a room while still feeling alive.
From trailing plant to sculpture: the basic idea
The concept is straightforward: instead of letting the long stems with plantlets fall where they may, you steer them into a planned shape. You’ll need a simple frame and a little patience. This is how you create circles, hearts, or vertical columns that feel a bit like small totems.
It’s also a smart approach for smaller spaces: you gather the greenery upwards rather than letting it spread out. The result is an eye-catching feature that takes up very little surface area.
The foundation: light wire as a frame
Aluminium wire works well for many shapes. It’s firm enough to hold its form, but still lightweight and resistant to rust. Craft wire that can be bent by hand (without tools) is ideal.
- Shapes that work well: circle, heart, oval, wave
- Material: aluminium wire - not too thin, not too rigid
- Fastening: soft plant ties, string, or small clips
Shape the wire first outside the pot, then gently anchor it in the compost or secure it at the side of the pot. Only once it’s stable do you start positioning the stems.
Creating hearts, wreaths and graphic rings
Start by assessing the plant. Choose the strongest stems first - ideally those carrying several plantlets. These become your “building material” for the shape you want.
In broad strokes, the process looks like this:
- Prepare your wire shape (for example, a heart or ring).
- Anchor it securely in the pot, without roughly damaging the roots.
- Lay the longest stems carefully along the shape - don’t pull them tight.
- Fix them in place loosely using soft ties.
- Trim any excess plantlets and use them for new pots.
"Over time, the small rosettes grow closer together and close gaps - the design becomes clearer month by month."
If you’ve got more plantlets than you need, simply pot them into fresh compost. That can thicken up the original pot - or give you a second plant altogether. The cut mini spider plants usually root without much fuss.
The braided column technique
Alongside wire-framed shapes, there’s another method that looks especially dramatic: braiding. Several long stems are worked into a kind of plait that grows upwards.
You’ll need:
- at least three long stems
- a sturdy wooden cane for support
- tie material that won’t cut into the stems
Plait the stems loosely, much like braiding hair. The wooden cane in the centre keeps everything upright. Over time the stems become a little more woody and help stabilise the column. The finished look is like a slim green totem that can make a strong impression even in a corner.
Where these new plant sculptures look best
The shape you choose will determine where the spider plant has the most impact. Circles and hearts read as more horizontal, while the braided column emphasises height.
- Circle or wreath: ideal as a centrepiece on the dining table, on a sideboard or a chest of drawers. The plantlets can hang slightly outwards without getting in the way.
- Heart shape: works nicely on a hallway console, on a windowsill, or as an eye-catcher for a celebration.
- Braided column: looks great beside an armchair, at the end of a low TV unit, or next to a bookcase where floor space is limited.
- Mini column: suits a bedside table or small side table in a compact home when there’s hardly room for larger plants.
"The same plant that previously hung inconspicuously over the rim of the pot can look like a carefully planned decorative object once it’s been shaped."
Care after shaping: keeping your spider plant in top condition
After bending, braiding and tying, the plant will be a little stressed. A gentle care boost helps it recover and encourages the new structure to hold.
A liquid feed with a few clear primary components, added to the watering can every two to four weeks during the growing season, has proved effective. This gives the plantlets enough energy to thicken up and become more robust.
Also important:
- Bright position, but out of harsh midday sun.
- Keep the compost slightly moist and avoid waterlogging.
- Only adjust stems occasionally, so they’re not repeatedly damaged.
In very mild regions comparable to climate zones 10 or 11, you can even put a spider plant outside during the warm season. However, temperatures should stay consistently above about 13 °C. A sheltered spot on a balcony or terrace supports growth and often encourages even more plantlets.
Tips, tricks and small risks when shaping
Even though the plant is forgiving, it pays to handle it gently. Bending too much at once can kink stems. It’s better to shape it in stages: bend a section, wait a few days, then guide it further. That way the tissue can adapt more easily.
Your tying materials should be soft and flexible. Plastic ties that bite in can restrict sap flow. Fabric ties, dedicated plant clips or rubber rings that aren’t too tight are better choices. Check occasionally that the fixings are still loose enough, as stems can thicken over time.
If you live with children or pets, this method has a double benefit. The spider plant is considered well tolerated, and with the stems gathered up, fewer leaves dangle at grabbing or sniffing height.
Why this creative houseplant trend is taking off
Many people want a more personal home without constantly buying new furniture or expensive décor. Shapeable houseplants fit that wish perfectly. Instead of purchasing yet another plant, you transform the one you already have - and end up with something that feels individual.
It’s also a technique that suits people without a “green thumb”. The spider plant is among the most tolerant houseplants there is. Even if you forget to water now and then, it doesn’t punish you immediately. Combined with the playful shaping process, it becomes a low-cost hobby with a visible effect.
It gets particularly interesting when you combine several plants: a braided column beside a heart-shaped frame, complemented by a flat wreath on a chest of drawers. The result is almost a small gallery of living objects - all based on a plant that used to be overlooked.

Comments
No comments yet. Be the first to comment!
Leave a Comment