
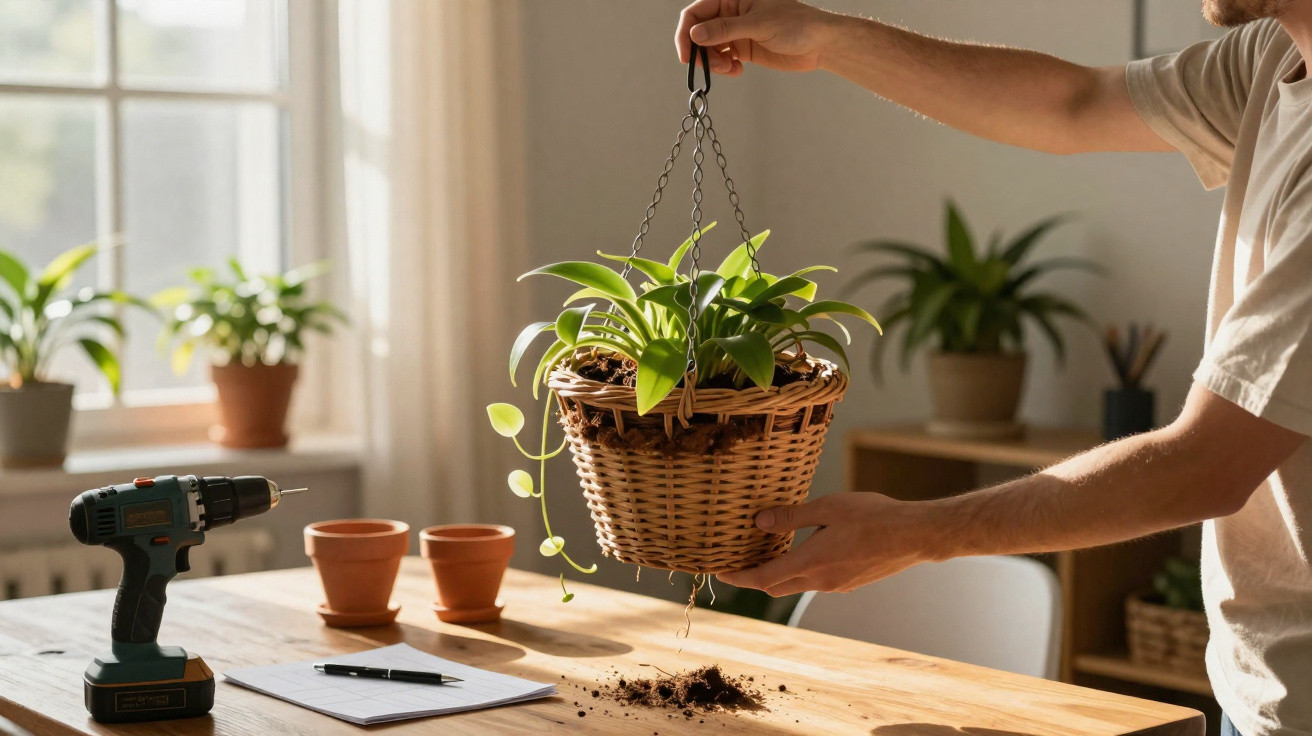
Tucked away at the very back of a cupboard there’s often an old wooden or metal fruit basket, lightly dusty and somehow too good to throw out. Rather than letting it sit there unused, plenty of interior enthusiasts are turning these finds into stylish hanging baskets for houseplants - creating a new focal point without using up a single square metre of floor space.
From flea-market find to a space-saving feature
A fruit basket already has a lot going for it when it comes to plants: open sides for airflow, sturdy handles, and enough room for several pots. Those same qualities make it perfect for an upcycling project. If you like browsing second-hand shops, you can often pick up baskets like these for just a few euros - and avoid paying for an expensive designer plant hanger from a furniture store.
The biggest win is arguably the clear floor. No more tripping hazard, the vacuum cleaner can glide through without snagging, and the room instantly feels more open. In small flats or studio apartments in particular, a hanging plant basket can be the key to fitting in more greenery without making the space feel cramped.
"A simple fruit basket up in the air often changes the feel of a corner more than a new shelf on the floor."
Checking and preparing an old basket
Before the basket rises up above the sofa or the kitchen worktop, it’s worth taking a careful look at its condition. The base needs to be solid; otherwise, the project becomes a risk rather than a decorative idea.
Checklist for a safe start
- Check the material: Is the wood rotten or soft? Are metal parts badly rusted or bent?
- Inspect the structure: No deep cracks, no loose slats, and no sharp edges.
- Cleanliness: No signs of mould, no musty smell, and no old damp.
Once the visual check is done, give it a proper clean. Warm water with a little washing-up liquid, a brush, and an old cloth are usually enough. Afterwards, both wood and metal should dry completely - ideally for several hours, or overnight if needed.
If you feel like updating the look, you can then refresh the basket visually: a thin coat of wood varnish, a coloured stain, or a metal paint can significantly change the finish while also protecting it from splashes when you water the plants. For a more natural feel, a clear protective varnish is enough to keep the patina while sealing the surface.
What you actually need for a hanging plant basket
This project stays surprisingly straightforward. A lot of what you need is already at home, and anything missing can be picked up cheaply from a DIY shop.
| Component | Purpose |
|---|---|
| Old fruit basket | Main body for the hanging garden |
| Strong cord or chain | Supports the weight of the planted basket |
| Hooks or rings | Connection between ceiling/beam and basket |
| Coconut fibre, felt or jute | Inner lining to keep soil in place |
| Lightweight compost & expanded clay pellets | Helps root health and improves drainage |
| Houseplants | The heart of the project and the main style factor |
If you’d rather not plant directly into the basket, you can also use it simply as a “frame” and place several small pots inside. That makes swapping plants later much easier and keeps watering a bit more relaxed.
How to turn a fruit basket into a safe hanging basket
The conversion starts with lining the inside. A layer of coconut fibre, plant fleece, or coarse jute stops compost from falling out, while still letting water pass through. The lining should fit the basket closely and come slightly up and over the sides so it doesn’t slip.
For hanging, many baskets can use their existing bars or handles as attachment points. If there aren’t any suitable fixing points, you can drill small holes to thread through cords or chains. Three or four hanging points distribute the weight more evenly than using just two.
"Before adding soil and plants, hang the basket up for a test - going all-in with an empty basket avoids nasty surprises."
Gently press down by hand, give it a small wobble, and check for any weak spots. That way you’ll spot early on whether a knot needs tightening or a stronger hook is required.
Drilling or clamping - which fixing is right?
- Without drilling: Hooks that sit over a curtain pole, a wall beam, or a shelf. Ideal for rented homes.
- Into the ceiling: Wall plugs and hooks matched to the surface (concrete, plasterboard, wood). Roughly estimate the total weight of the planted basket beforehand.
- On the wall: A side fixing with angled hooks, so the basket floats slightly away from the wall. Felt pads or cork on the back prevent scuff marks.
The right plants for an airy display
The real magic comes from planting it up. Trailing and climbing plants add movement and make full use of the room’s height. This is what creates that “green waterfall” effect that suits the basket perfectly.
Reliable choices for hanging fruit-basket gardens
- Pothos (Epipremnum): Undemanding, fast-growing, and tolerant of different light levels.
- Ivy: Tough, with dense foliage, and particularly suitable for cooler corners.
- Tradescantia: Colourful leaves that often shimmer violet, adding visual energy.
- Climbing philodendron: Long tendrils and heart-shaped leaves for a lush look.
- Compact indoor strawberry varieties: Great for kitchen baskets, combining decoration with a quick snack.
Combining different species lets you play with contrast: fine, delicate trails alongside bolder, larger leaves; light patterns next to deep, rich green. In rooms with low ceilings, the basket shouldn’t hang too low so nobody walks into it. In high-ceilinged period rooms, the “green cloud” can extend more generously into the space.
Watering, care and checks: keeping the hanging basket safe
Compared with classic plant pots on a windowsill, the biggest difference with a hanging basket is watering. If water rushes straight through, it can end up on the wooden floor or the sofa.
A few simple rules help:
- Pour slowly and in small amounts; top up if needed rather than overdoing it.
- A layer of expanded clay pellets at the bottom keeps air around the roots and reduces waterlogging.
- Check the compost moisture with a finger instead of watering by the calendar.
It’s also worth doing regular safety checks: Is the ceiling hook still secure? Are the knots still tight? Is rust appearing anywhere? A quick look every few weeks helps prevent the basket from eventually coming down unchecked.
Why the effort is genuinely worth it
A hanging basket like this is more than decoration. It creates its own small microclimate. The plants filter the air, locally increase humidity, and add life to corners that would otherwise look flat. Above desks, in darker hallways, or over a kitchen island, it can quickly create a completely different atmosphere.
Sustainability matters here too: an old basket that might otherwise end up as bulky waste gets a second life. If you visit second-hand shops regularly, you can even build a whole series - for example, three smaller baskets hung at different heights in one corner of the room.
If you’re still unsure, start with a lightweight basket and only a small amount of compost. Later you can add larger versions with several plants. The key rule remains the same: it’s better to weigh, test, and check one more time than to force the absolute maximum.
With a bit of confidence, a used fruit basket, and a few easy-going houseplants, you can create a real eye-catcher in no time - a hanging mini garden that visitors notice immediately and that adds a touch of personality to your home.
Comments
No comments yet. Be the first to comment!
Leave a Comment