
With three well-timed actions in March, the picture changes.
Many amateur gardeners reach for chemicals the moment a green lawn starts to look more like a mossy carpet. Professionals advise the opposite: don’t spray-get the soil working again. If you plan a few straightforward jobs in March, you give your lawn air, nutrients and light, helping it form a dense, hard-wearing sward with far less moss-without any specialist products.
Why moss in the lawn is the soil’s cry for help
In many gardens, moss is treated as the enemy, yet it usually pinpoints what’s going wrong beneath the surface. More often than not, it isn’t “bad luck”, but a mix of three underlying issues:
- poor drainage in the soil
- persistent compaction from foot traffic, play and rainfall
- heavy shade and damp, cool positions
Grass thrives in soil that’s loosened and free-draining. If puddles form and the ground feels “rock hard”, the roots are starved of air. Moss takes full advantage of that weakness and spreads into the gaps in the sward.
"Moss isn’t an opponent but a symptom: it indicates that the soil is compacted, wet or permanently shaded."
That’s exactly where the right March routine comes in. Rather than masking the symptom with anti-moss treatments, the aim is to restore the soil’s structure. Three tasks are enough-provided you do them properly.
Task 1: Deeply aerate the lawn in March and open up the soil
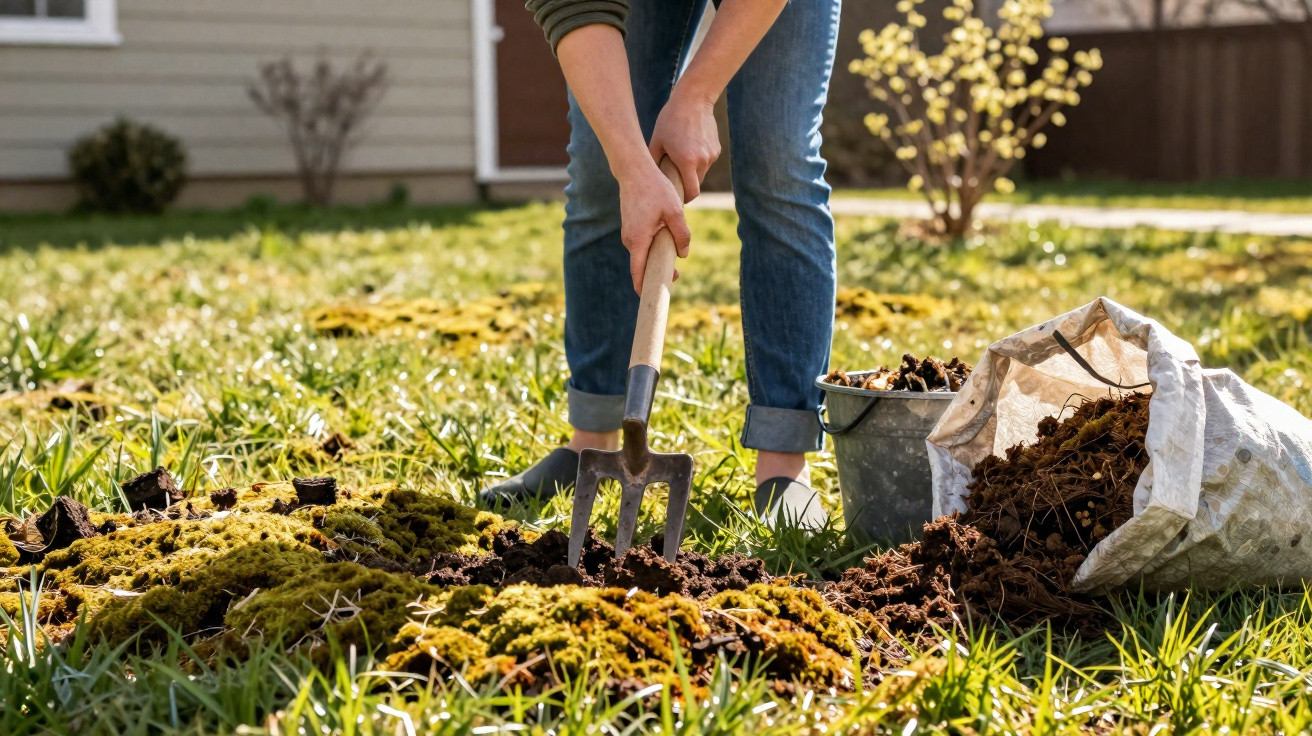
Aeration is the key step. On smaller areas, a sturdy garden fork is all you need. It can replace costly machines and also gives you immediate feedback on how the soil actually feels.
How to aerate with a garden fork
Pick a day in March that’s dry, but when the ground isn’t baked hard. The soil should be neither frozen nor waterlogged. Then proceed as follows:
- Push the fork straight down; the tines should go about 8–10 cm deep.
- Gently pull the handle back so the soil lifts slightly and small cracks open up.
- Remove the fork, step forward (around 15 cm), and repeat.
Pay extra attention to areas where puddles repeatedly formed over winter, or where the ground sounds dull and feels hard underfoot. These spots are heavily compacted, so it’s fine to place the holes closer together there.
"Each hole acts like a small air shaft in the soil, allowing excess water to drain away and oxygen to reach the roots."
If you have a larger lawn, you can hire an aerator from a DIY store. The principle is the same: perforate the soil, break up the surface, improve infiltration, and help the grass roots breathe again.
Task 2: After aerating, feed the lawn with a thin top layer
Once the soil is opened up, the lawn benefits from a “treatment from above”. Garden professionals call this topdressing. It isn’t anything mystical-just a simple, loose mix that works into the holes and brings fresh structure and nutrients to the root zone.
The ideal topdressing mix
To get the most from your lawn, combine the following components in equal parts:
- finely sieved garden soil or topsoil
- coarse sand (building sand or river sand, not play sand)
- leaf mould or well-rotted, sieved compost
This blend improves aeration (thanks to the sand) while adding nutrients (from the compost). On very heavy, clay-rich soils, you can increase the sand proportion slightly. If you don’t have compost available, you can topdress with sand first and fertilise later.
How to apply the material correctly
- Sprinkle the mix loosely over the aerated lawn-about one small shovel per square metre.
- Work it in lengthways and crossways using a stiff outdoor broom or a rake, ensuring the holes are properly filled.
- Spread any excess thinly; you should still be able to see the grass blades.
"The thin layer improves soil structure over the long term and helps the lawn hold its own against moss, dry spells and wear from foot traffic."
After a few bouts of rain, the topdressing is barely visible. The benefits, however, last for months: the soil stays looser, waterlogging decreases, and the turf thickens noticeably.
Task 3: Remove the moss, mow higher-and accept a brief “bald phase”
With the soil prepared, it’s time for the visually awkward part: the moss and old debris need to come out. This is the step many people avoid because the lawn can look worse before it looks better.
Rake out moss and thatch thoroughly
Before the first cut of the year, use a strong leaf rake or spring-tine rake. If you prefer, use a scarifier on a low setting. The effort matters more than the tool:
- Rake the lawn thoroughly in one direction, pulling out moss and brown material.
- Then rake at right angles to the first pass to catch as much thatch as possible.
- Collect everything you’ve pulled out and compost it-provided it isn’t dominated by weed seeds.
At this stage, the lawn often looks patchy, with visible gaps. Those are exactly the areas where new, stronger shoots will appear over the coming weeks. If you like, you can overseed bare patches immediately and lightly roll them in.
First mow: don’t go too short-be cautious
Raking is followed by the first mow. The rule of thumb is to start higher, especially early in the season. A cutting height of 4 to 5 cm is ideal at the beginning. This leaves enough leaf area for photosynthesis and helps the grass recover quickly.
"After raking, the lawn often looks ruined, but within a few days it grows back denser and fresher-this is part of the treatment."
In milder regions, you can begin this programme as early as late February. In cooler areas, wait until the soil is noticeably warmer-then mid to late March is usually right. Avoid working on frozen or soaking-wet ground, otherwise you’ll worsen compaction.
How you can boost the results even further
If you still have energy after the three main tasks, two simple measures can take your lawn a step further:
- Spring fertilising: Applying an organic lawn feed after the work supports growth and closes nutrient gaps.
- Overseeding: Dedicated overseeding mixes quickly fill thin areas and help prevent moss moving back in.
On heavily used lawns, it’s also worth considering your grass type. A hard-wearing play and sports lawn stands up better to children, dogs and garden parties than a purely ornamental lawn.
Common March-care mistakes-and how to avoid them
Many problems aren’t caused by doing too little, but by starting too early or going too hard. Three typical pitfalls are:
| Mistake | Result | Better solution |
|---|---|---|
| Scarifying on wet ground | deep grooves, smeared soil, even more compaction | wait for a dry day when the surface has lightly dried |
| mowing too short for the first cut | scorched grass, slow recovery, more weeds | set the height to 4–5 cm, then lower it gradually later |
| using only anti-moss treatments | moss disappears briefly, then returns quickly | improve soil structure: aerate and apply a light topdressing |
Why the effort in March is genuinely worth it
These three tasks can sound like a full day in the garden. In practice, a single dry afternoon is often enough to get aeration, topdressing, raking and the first mow done. The benefits then carry through the whole year: the lawn copes better with hot spells, takes up fertiliser more efficiently, and shows fewer bare patches after heavy rain or a kickabout with the kids.
Repeat this routine each spring and you gradually transform the soil. Compacted layers loosen, rainwater drains away faster, and the grass develops a denser root network. In those conditions, moss finds it far harder to take hold. That’s the point-not forcing a miracle in one weekend, but building a robust green space with simple, repeatable steps that stays attractive without chemicals.

Comments
No comments yet. Be the first to comment!
Leave a Comment