
Many people dream of having their own bonsai, but the perceived effort and long waiting times put them off. In reality, the answer is often already sitting in your living room: with the right presentation, the much-loved spider plant can become a living mini sculpture that looks like a bonsai - with no specialist knowledge and without years of patience.
The underestimated contender: why the spider plant?
The spider plant, botanically Chlorophytum comosum, is widely seen as a classic beginner houseplant. It tolerates the odd care mistake, grows quickly, and produces plenty of offshoots. Those very traits make it perfect for a small-scale bonsai-style project.
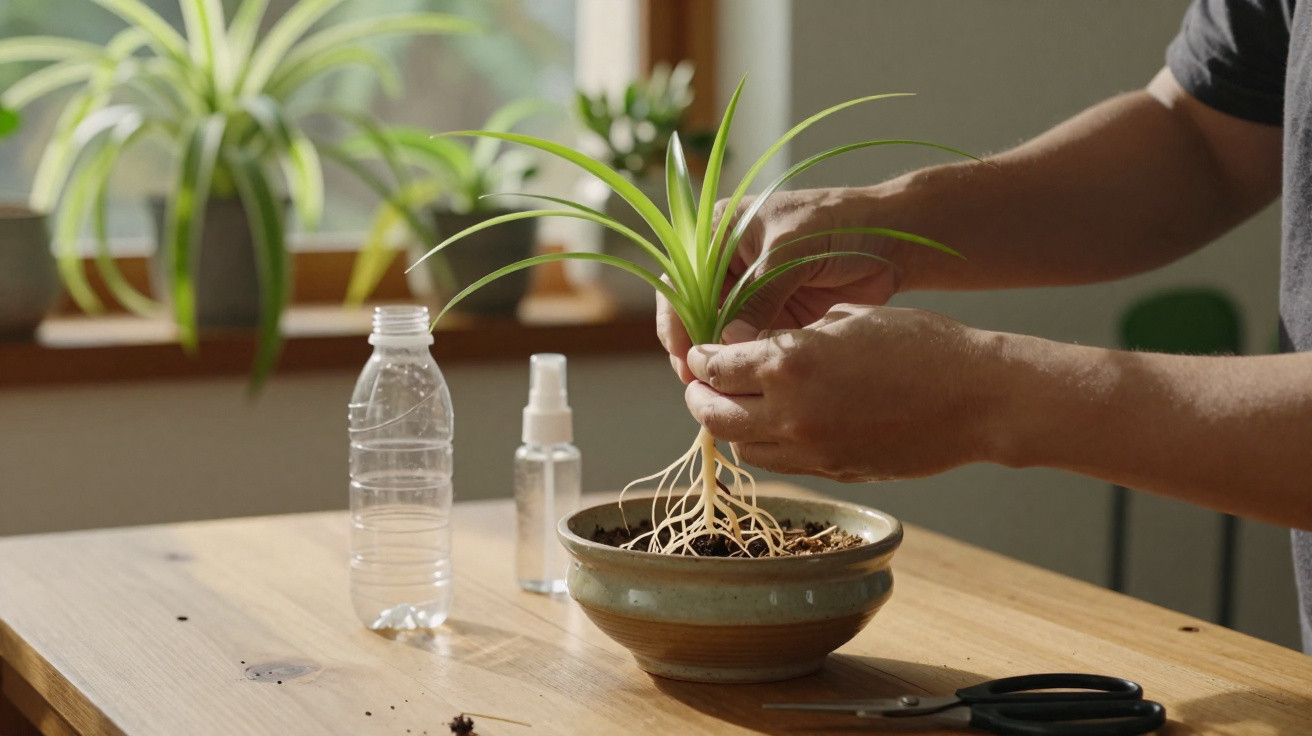
The spider plant’s thick, white root tubers can resemble a mini trunk - while the long leaves form the tree’s canopy.
Another advantage: the plant is considered non-toxic to cats and dogs. So if you want a decorative piece at eye level in the living room or home office, you generally have far less to worry about with curious pets.
The right spot for the “bonsai effect”
Before you start shaping anything, the plant needs solid conditions to begin with. A weak or struggling spider plant is a poor choice, because it will cope less well with root work.
- A bright position, but not in direct sun (a north- or east-facing window)
- Avoid harsh midday sunshine - the leaves scorch easily
- Normal room temperature, ideally away from strong heat from radiators or cold draughts
Use a loose, nutrient-rich compost for leafy houseplants. A drainage layer of clay pebbles or gravel at the bottom helps prevent waterlogging. In summer, watering is roughly once a week; in winter, less often. A reliable guide: the top 2 cm of compost feels dry, while the younger inner leaves still look firm.
Making roots visible: how the bonsai look is created
The key to the trick is this: you gradually “lift” the spider plant’s thick roots up out of the compost until they sit visibly above the surface and read as a small trunk.
Shape the root trunk while repotting
When roots start poking out of the drainage holes or the compost surface looks noticeably pushed up, it’s time to repot. That’s when the transformation begins.
- Carefully remove the plant from its old pot.
- Take away a little of the old compost from the top, without roughly damaging the roots.
- Position the plant a few centimetres higher in the new pot so that part of the roots remains above the compost line.
- Add fresh, loose compost and cover only the lower section of the roots.
Those exposed root sections now meet air and light directly. Over time they thicken, develop texture, and look increasingly like a woody trunk - even though, biologically, the tissue remains root growth.
The right pot and the right presentation
The container matters a great deal for this project. A tall, standard plant pot tends to hide the effect, whereas a shallow, wide container makes it much more dramatic.
- A shallow, wide pot with large drainage holes
- Visually similar to traditional bonsai trays
- Top-dress the surface with fine gravel or dark stones
A mineral top dressing automatically draws the eye to the root “trunk” and the compact tuft of leaves. The compost visually recedes, and the whole arrangement looks like a small tree set into a miniature landscape.
If you leave lots of long, trailing runners with plantlets, attention is pulled back downwards again. That’s why it helps to trim some of these runners regularly. The plant then channels more energy into its roots and leaf base - exactly where your “bonsai” needs to develop.
Vertical root column: the clever bottle method
If you want an even more striking result, you can shape the root trunk on purpose. A simple plastic bottle works well as a tool for this.
How the bottle method works, step by step
- Clean a transparent plastic bottle thoroughly.
- Cut off the top and bottom so you’re left with an open cylinder.
- Stand the cylinder in the centre of a slightly larger pot.
- Fill only the inside of the cylinder with loose, moist compost.
- Plant a strong spider plant offshoot into that compost.
The roots are effectively forced to grow downwards, because that is where moisture remains consistently available. Over time, a dense, largely vertical root column forms.
After around a month, you can carefully cut the bottle open - behind it you’ll find a solid, white root column that looks like a mini tree trunk.
If the column still seems too thin, simply keep the plastic sleeve in place for longer. Later, you can remove it in stages and gradually reveal the now-stable root column.
Caring for a mini bonsai: less compost, more attention
In a shallow container or with exposed roots, the spider plant has far less compost available. For that reason, it reacts more quickly to drought and to a lack of nutrients.
Keep an eye on watering, light and nutrients
- Water as soon as the top 2 cm of compost is dry
- Always let excess water drain away fully; don’t leave standing water in a saucer
- A bright spot with indirect light, ideally between 15 and 24 °C
- From spring to late summer, feed lightly every three to four weeks
A lightly diluted liquid feed for leafy houseplants is enough. Overfeeding leads to soft, elongated leaves and takes away the compact, bonsai-like appearance.
Shape the leaves rather than letting them grow unchecked
To keep the bonsai impression, pay attention to the silhouette. Very long, drooping leaves can be shortened gradually. This helps the “canopy” stay denser and close around the root trunk, rather than splaying out in every direction.
If you like, you can also experiment with two or three plants in the same tray. That can make the whole display look like a small group of trees or a miniature hedge. The key is to monitor the container even more closely, because competition for water and feed increases.
Risks, limits and creative variations
The technique is relatively safe, but mistakes can still happen. If you tug at the roots too roughly, or water too heavily immediately after exposing them, you risk rot or leaf loss. A sudden move into strong, direct sun can also quickly cause stunting and scorch marks.
If you’re unsure, it’s best to start with an offshoot rather than your only large mother plant. Spider plants usually produce plenty of young plants - so a loss is less painful, and you can try several styling ideas in parallel.
The core idea - deliberately exposing roots - can also be applied to other robust houseplants. Suitable candidates are species with strong, thickened roots or tubers, such as certain dragon trees or smaller ficus varieties. Even so, the spider plant remains particularly straightforward because it responds quickly and tends to tolerate mistakes reasonably well.
For many people, a project like this is the gateway into more detailed plant styling - without having to dive straight into the complex rules of traditional bonsai art. A shelf, a shallow pot, a bit of patience and an ordinary spider plant are enough to create a piece of living décor within a few months that will definitely stand out in the living room.
Comments
No comments yet. Be the first to comment!
Leave a Comment