
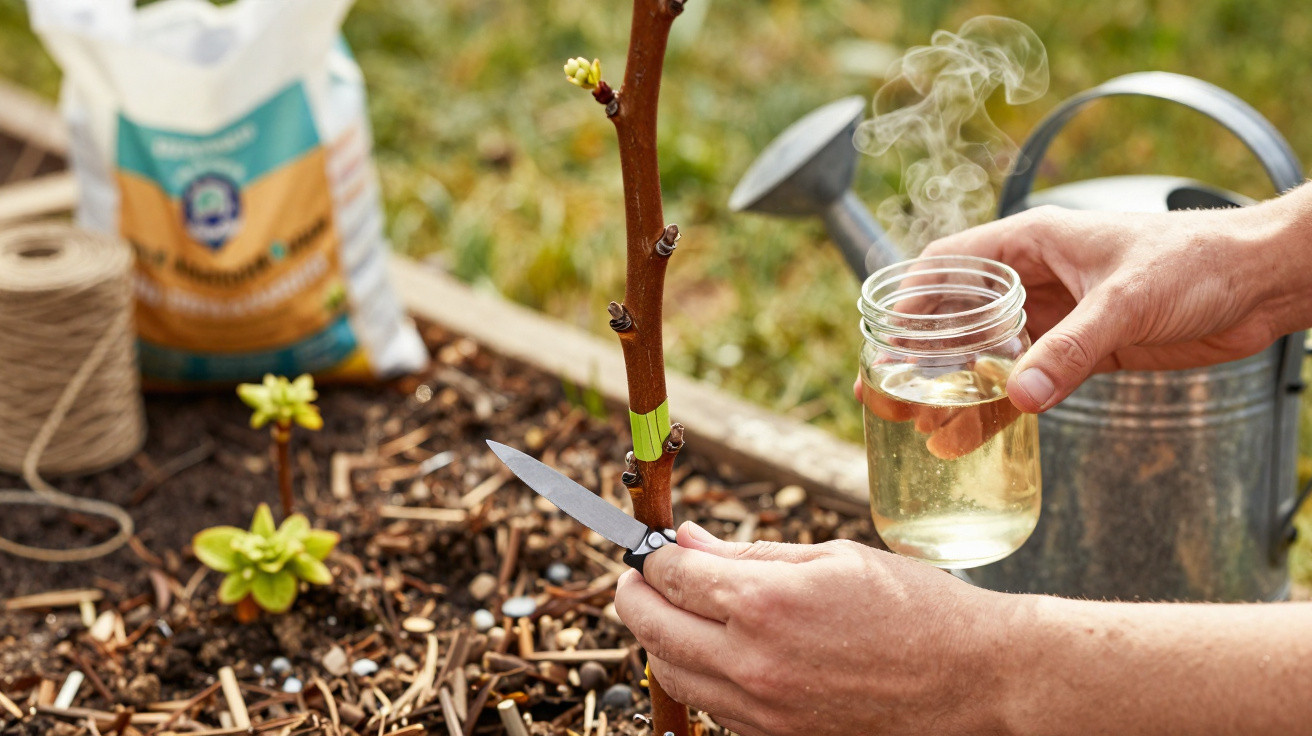
Walk past a hydrangea in early spring and, at first glance, those bare, brown stems can look like a lost cause. In reality, plenty of plants that seem “dead” are simply dormant or a bit battered, rather than beyond saving. Gardeners in both the United States and the UK have been comparing notes on a straightforward, surprisingly gentle approach: use the classic scratch test to find live wood, then give the roots a warm sugar water drench to help borderline plants rally.
Why hydrangeas look dead after winter
Hydrangeas are not fond of extremes. Deep freezes, abrupt thaws, cold winds and saturated ground can all take a toll on the stems. By late winter into early spring, you may notice:
- dry, brown stems that snap with little effort
- no obvious buds on last year’s growth
- bark that peels away or looks shrivelled
- canes that have faded to grey, sometimes with hollow centres
Even so, the roots can still be very much alive. It’s common for the top growth to die back while dormant buds below ground wait for soil temperature and moisture to become steadier.
Most “dead” hydrangeas in March are undecided, not gone. The trick is learning which stems still have a pulse.
That’s exactly what the scratch test is for: it helps you judge what’s happening inside the plant, rather than relying on a bleak outer appearance.
The scratch test: your hydrangea triage tool
How to do the scratch test correctly
The scratch test is almost laughably simple, but it can stop you binning a shrub that still has life in it. To do it in a way that doesn’t further stress the plant:
- Choose a section around the middle of a stem (avoid the base and the wispy tip).
- With a fingernail or a small knife, carefully scrape off a thin strip of the outer bark, just a few millimetres long.
- Examine the layer underneath.
| Scratch test result | What you see | What it means |
|---|---|---|
| Alive and viable | Fresh green or pale creamy tissue, slightly moist | Stem is living; keep it for now |
| Stressed but hopeful | Greenish-brown, firm, not crisp | Stem is weakened but may resprout |
| Dead | Dry brown or grey, fibrous or hollow | Cut back to the next point of green, or to the base |
Check more than one stem on the same plant-near the base, midway, and close to the tip. Many hydrangeas retreat from the top down, so it’s very normal after a tough winter to find dead upper growth with greener tissue lower down.
If you find even a narrow collar of green at the base, that hydrangea is still in the game and worth rescuing.
The “warm sugar water” rescue protocol
After you’ve confirmed there’s living wood, the next move is about supporting the roots so they can drive fresh shoots. This is the so-called “warm sugar water” rescue-more a bit of kitchen-style experimentation than a formal horticultural doctrine, but broadly consistent with how stressed plants and soil biology behave.
Why sugar water can help a battered shrub
Hydrangeas create their own sugars through photosynthesis. However, when a plant has lost buds and foliage, it loses much of its normal “energy-making” capacity. If the roots are weakened too, the plant can struggle to fund new growth. A weak sugar solution applied to the root zone may offer a short-lived lift by feeding soil microbes and helping to bridge that immediate energy gap.
Think of warm sugar water as a recovery drink for a hydrangea that just staggered out of winter.
Step-by-step: how to use the protocol safely
Gardeners who get the best results tend to follow a measured routine-rather than simply pouring something sweet on the soil. A practical home-garden version looks like this:
- Prune only what’s clearly dead. With bypass secateurs, remove stems that fail the scratch test, cutting back until you reach green tissue.
- Tidy the crown area. Clear away old leaves, weeds and compacted mulch so air and water can reach the soil surface.
- Mix the solution. Dissolve 1 tablespoon of ordinary white sugar into 1 litre (roughly 1 quart) of warm-not hot-water, stirring until there are no grains left.
- Assess moisture before you start. If the ground is already waterlogged, hold off. This works best when soil is cool and slightly moist, not saturated.
- Pour around the drip line. Apply the sugar water slowly in a broad ring around the plant, rather than against the stems.
- Rinse through with plain water. Follow with a light watering of fresh, lukewarm water to move the solution downwards without leaving a sticky surface.
Most people keep this to a single application at the start of spring, with an optional second, weaker dose 1–2 weeks later if the plant is still sluggish. Hydrangeas don’t benefit from sweetened soil over the long term; this is intended as a mild, temporary nudge, not an ongoing routine.
Timing your rescue: when patience beats pruning
When hydrangeas have been burned by winter weather, the bigger danger isn’t sugar water-it’s rushing in with the secateurs. Many types wake later than roses or herbaceous perennials, particularly in cooler areas. If you cut hard too early, you can remove perfectly viable buds that would have flowered on old wood.
- In colder US hardiness zones (4–6), it can be wise to wait until late April or even May before making severe cuts.
- In milder parts of the UK and in coastal gardens, mid to late April is often when things begin to turn.
- Macrophylla and serrata varieties frequently show leaf buds later than paniculata and arborescens types.
If a stem shows any green in the scratch test, give it at least two to three more weeks before you decide its fate.
While you’re waiting, aim for steady moisture: damp but never sodden. Plants that have suffered windburn often sit in beds that flip from winter-wet to unexpectedly dry once spring arrives.
Supporting recovery: conditions that matter more than sugar
Soil, mulch and microclimate
Any rescue effort works better if the plant’s growing conditions move back in its favour. A handful of small tweaks can make a noticeable difference:
- Mulch lightly. Spread a 2–3 cm layer of composted bark or leaf mould around the base to moderate soil temperature.
- Shelter from strong winds. A temporary screen-hessian, netting, or even a strategically placed garden chair-can prevent further drying.
- Look at drainage. If water sits around the crown for days, that’s a warning sign; raising the bed slightly or adding organic matter may help.
Hydrangeas that have endured repeated freeze–thaw cycles can respond well to a mid-spring top-up of slow-release fertiliser, but only after they’re clearly growing again. Feeding a plant that hasn’t properly woken up-especially with high nitrogen-mainly increases the risk of nutrients washing away in spring rain.
When to give up, and when to hang on
Some plants won’t recover, and a few signs strongly suggest the damage is irreversible:
- no green tissue anywhere on stems or around the crown after repeated scratch tests
- a soft, rotting base that gives way with gentle pressure
- a pronounced fungal odour and roots that are blackened and mushy
If those symptoms are present, the shrub is probably past saving. That said, hydrangeas that resemble nothing more than brown sticks can still send up fresh shoots from the base as late as early summer. Some gardeners set a firm deadline-such as the first week of June-and won’t dig anything up before then.
Why this protocol fascinates gardeners right now
Unpredictable winters are increasingly common: mild spells followed by sharp freezes, then seemingly endless rain. Hydrangeas-older mophead varieties in particular-can suffer badly in those swings, which helps explain why social feeds fill every spring with photos of “dead” shrubs and worried questions.
The scratch test and warm sugar water ritual has become a seasonal habit: a way to push back, gently, against unpredictable winters.
It also matches a broader move towards low-cost, low-chemical gardening. A tablespoon of sugar from the cupboard, a jug of warm water and a few minutes doing a scratch test are far cheaper than replacing mature shrubs-and it cuts waste at the same time.
Going further: winter-proofing hydrangeas for next year
Reviving a plant is one thing; reducing the annual drama is another. Gardeners who are fed up with spring surprises often adjust their habits in small but meaningful ways:
- leaving spent flower heads in place as natural “caps” that help protect buds
- mulching the crown in late autumn, particularly in exposed gardens
- growing tender types in large containers so they can be moved as needed
- selecting cultivars bred for stronger bud hardiness in colder zones
Together, these choices can have a cumulative effect. A hydrangea going into winter well watered, properly mulched and not pushed with late-season nitrogen generally copes with cold far better than one encouraged into soft, sappy growth in October.
To gauge your own risk, try a simple check: keep a note of your lowest overnight winter temperatures for a couple of years, then compare them with the hardiness ratings on your hydrangea labels. If your garden routinely dips a zone colder than the plant is suited to, extra protection or container growing is usually the sensible option.
If you enjoy testing ideas, you can also run a small “trial”: treat half of a struggling group with the warm sugar water rescue and leave the other half with your usual care. Note bud-break timing, leaf size and flowering. That sort of personal record turns a viral tip into something you can judge in your own soil and your own weather.

Comments
No comments yet. Be the first to comment!
Leave a Comment