
Many people have one sitting unobtrusively on a shelf, barely noticed and regarded as little more than “some green plant”. Yet the spider plant, botanically known as Chlorophytum comosum, has a remarkable quality: with patience and a deliberate adjustment around its roots, it can become a striking living feature strongly reminiscent of a bonsai – without years of waiting or complicated pruning methods.
Why a spider plant is ideal for a bonsai look
The spider plant is widely considered a beginner-friendly houseplant: it is inexpensive, tough, forgiving of watering mistakes and happy in most locations. Those same traits make it an excellent choice for a bonsai-style project that delivers visible results relatively quickly.
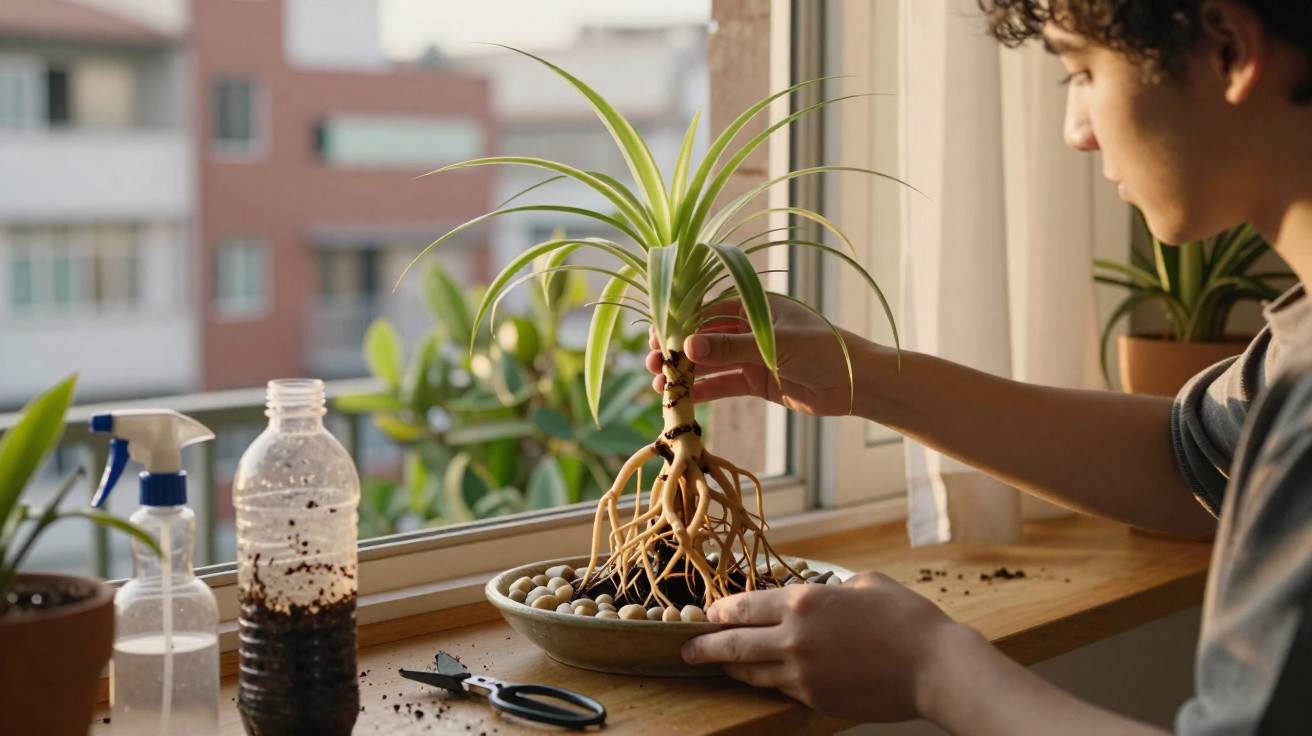
Its thick, white water-storing roots are the key feature. Growing in a compact cluster beneath the plant, they can be displayed to resemble a short, sturdy trunk. Above them, the long arching foliage creates a full canopy, giving an appearance very close to that of a miniature tree.
By exposing its roots and using a shallow pot, an ordinary spider plant becomes a small living sculpture – almost like a bonsai, but far easier to manage.
Another benefit matters in many homes: spider plants are considered non-toxic to cats and dogs. For pet owners who still want an eye-catching plant feature in the living room or on a desk, this species is a safe option.
Preparing your spider plant for bonsai styling
Before shaping begins, the plant needs favourable growing conditions so that it can develop strongly. The bonsai effect depends on having stable, healthy roots.
Position and essential care
These are the main conditions for producing a robust starter plant:
- Light: a bright position away from harsh sun, such as a north- or east-facing window
- Compost: loose, free-draining houseplant compost, with a layer of expanded clay pellets or gravel at the base of the pot
- Watering: around once a week in summer and less often in winter; water only once the top few centimetres have dried out
- Checking: as long as the fresh inner leaves remain upright, the plant is generally not thirsty
Caring for a spider plant this way for several months will produce a strong base with plenty of storage roots, ready to be transformed into a miniature tree-like feature.
The key to the bonsai effect: exposing the roots
The crucial stage is to reveal the thick roots while avoiding harm to the plant. This should not be done all at once, but gradually over several repotting sessions.
Gradual exposure during repotting
It is time to repot when roots start emerging through the drainage holes or when the root ball visibly pushes up the compost in the pot. The method differs slightly from standard repotting:
- Carefully ease the plant out of its pot and remove loose compost from around the sides.
- Choose a new container that is preferably wide and shallow, with several drainage holes, much like a traditional bonsai pot.
- Position the plant slightly higher in its new pot so that the upper roots are no longer completely covered by compost.
- Add only enough compost to hold the plant securely, while leaving the thick upper roots visible.
At each subsequent repotting, a little more of the storage roots can be uncovered. Gradually, they form a sculptural base that resembles a small trunk and appears to support the plant.
Using decorative materials to guide the eye
To reinforce the bonsai appearance, the visible compost can be discreetly covered with decorative materials:
- fine gravel or decorative chippings
- dark, flat stones
- understated mineral gravel in grey or brown shades
This directs attention towards the revealed roots and leafy crown, just as the trunk and structure take centre stage in a genuine bonsai.
The bottle method: creating a straight root “trunk”
For a more dramatic result, the roots can be trained into an almost upright column. This uses a simple everyday item: a plastic bottle.
How the plastic-bottle technique works
The process is straightforward:
- Cut away the top and bottom of a clear plastic bottle to create a cylinder.
- Place this cylinder in the centre of a pot and fill only its interior with light, loose compost.
- Plant a spider plant offset, or “baby”, in this compost without setting it too deeply.
- Water regularly so that moisture is particularly attractive in the lower section.
The young roots are then compelled to grow downwards towards the moisture. Over time, this produces a dense, vertical column of roots.
After around one month, carefully cut open the bottle to check whether the root column already looks firm and substantial enough. If the roots remain too thin, simply leave the cylinder in place for a few more months.
Caring for a finished spider plant bonsai
Once the desired form has been achieved, transfer the plant to its final shallow pot. From then on, the priority is maintaining the appearance and keeping the miniature plant healthy and compact.
Watering, light and temperature
| Aspect | Recommendation |
|---|---|
| Watering | Water thoroughly once the upper 2 cm are dry, then allow excess water to drain away |
| Light | Bright conditions without direct midday sun; bright, indirect light is ideal |
| Temperature | Around 15 to 24 degrees, away from radiators and draughts |
| Feeding | Use weakly diluted houseplant feed at wider intervals during spring and summer |
Because a shallow pot holds less compost, it dries out more quickly. Regular finger checks are essential. The plant still does not tolerate waterlogging, even though it is otherwise regarded as highly forgiving.
Pruning for a compact outline
To retain the bonsai impression, the spider plant must not be allowed to grow freely in every direction. Longer leaves and excessive runners should be trimmed regularly.
- Remove very long leaves just above the base with sharp scissors.
- Keep only a small number of runners, or “babies”, or remove them deliberately.
- If wanted, use the removed offsets straight away for the next bonsai project.
This restrained pruning encourages the plant to focus on a strong root area and a low, rounded canopy – precisely the features expected from a miniature tree.
Common mistakes and how to avoid them
Although spider plants are robust, several pitfalls can cause a bonsai attempt to fail:
- Too much direct sun: leaves develop brown, scorched patches.
- Persistent waterlogging: the thick storage roots start to rot and the “trunk” can literally collapse.
- Exposing roots too quickly: uncovering too many roots at once can cause the plant to dry out or become unstable.
- The wrong pot: a tall, narrow pot removes the sculptural effect and makes the plant look like an ordinary houseplant.
By working gradually, revealing roots slowly and monitoring watering carefully, you have a very good chance of achieving an interesting result.
What “bonsai” means in this context
Strictly speaking, a spider plant is not a classic bonsai in the traditional Japanese sense. No tree is being miniaturised, and there are no elaborate wiring techniques or years of formative pruning involved.
Instead, this approach uses the natural characteristics of a houseplant to create a similar overall impression: a visible “trunk”, a compact crown, a shallow pot and an emphasised root structure. For many people living in flats, it offers a practical way to bring bonsai flair to a desk or shelf without specialist knowledge or a high failure rate.
Why this experiment suits city flats especially well
Anyone without a balcony or garden, and with little available space, can use a spider plant bonsai as a living sculpture that needs hardly any surface area yet immediately catches the eye. Care remains manageable, materials are inexpensive and mistakes can quickly be corrected with new offsets.
There is also a playful side to the process: over several months, you can watch a simple offset develop into a small plant with an almost tree-like presence. Anyone who already has an older spider plant can begin immediately – often, a single repotting session is enough to take the first step towards a miniature tree.
Comments
No comments yet. Be the first to comment!
Leave a Comment