
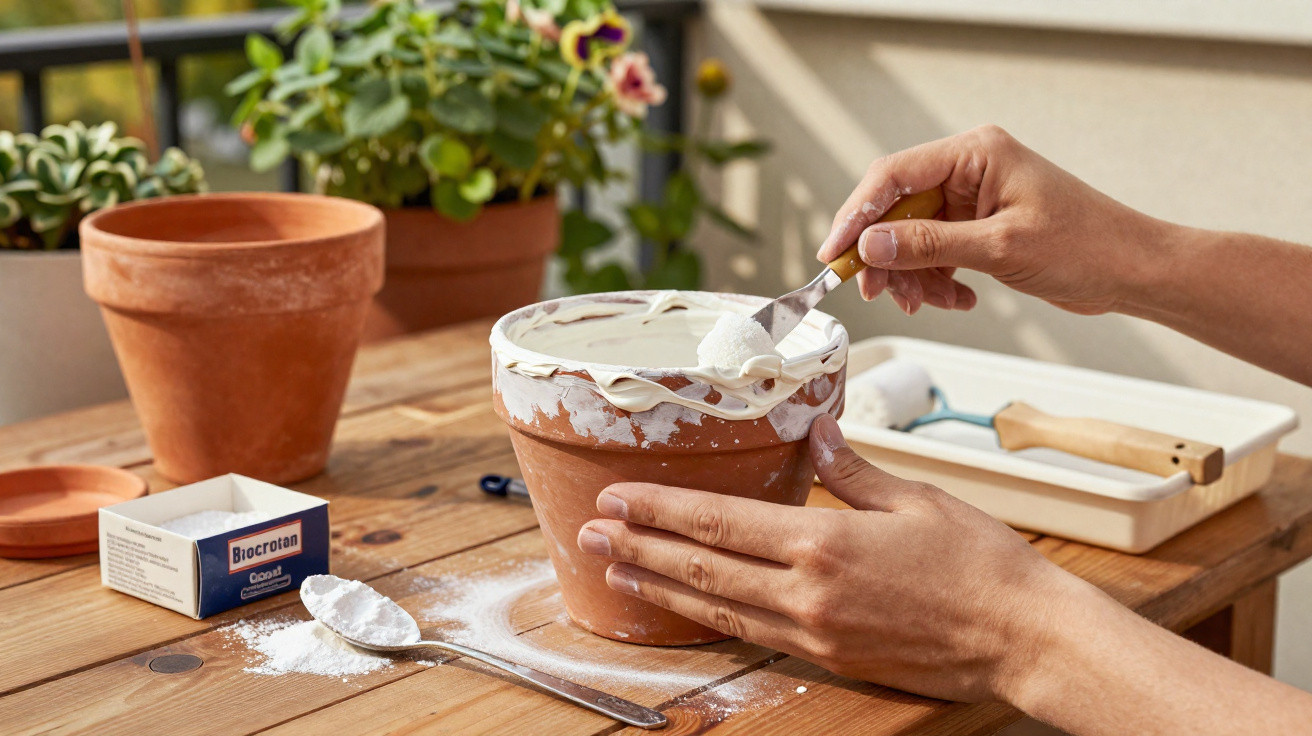
Plenty of hobby gardeners know the frustration: after one or two winters, beloved terracotta pots can look truly sorry for themselves. A white, crusty rim appears, the outside goes green, and any paint you apply later starts to peel. With a smart mix of low-cost paint, everyday household helpers and one trade-style technique, you can give them a completely fresh look on a small budget-surprisingly close to real ceramic.
Why terracotta pots outdoors become unsightly so quickly
Terracotta pots look natural, cost little and are kind to plants. Outdoors, though, those same benefits create problems: terracotta is porous, so it absorbs water and releases it again. That’s why you end up with white salt deposits around the rim, dark patches, and green build-up.
"The tiny pores in terracotta draw in moisture-and that’s exactly where many standard paint finishes fail."
If you simply paint the outside, moisture from within can’t escape properly. The result is familiar: the paint peels, blisters, or flakes away in scales. That’s why many people repaint every year-only to be irritated again by next spring.
The crucial trick: seal the inside first, then finish the outside
The practical insight is this: the real trouble spot isn’t the exterior-it’s the inside of the pot. Once you seal the interior, you stop the film of moisture that migrates through the clay and pushes outwards.
Step 1: Thoroughly clean old terracotta pots
Before you think about paint or effects, the pot needs a proper “reset”.
- Use a stiff brush to remove dirt, soil and any loose deposits.
- Apply a mix of lukewarm water and plain household vinegar, then scrub firmly-this helps lift moss, algae and limescale marks.
- Rinse with clean water and let the pot dry completely.
- Lightly sand the outside with fine sandpaper so the next layers grip better.
If the pots are very old and heavily soiled, soaking them in water for around 10 to 20 minutes can help. After that, dry them well-ideally in the shade-so they don’t dry too quickly and develop stress cracks or marks.
Step 2: Seal the inside with a waterproofing layer
Now for the key step that prevents peeling: make the inside of the pot water-repellent.
Two common building products work well for this:
- clear marine varnish (“boat varnish”) for wood and exterior use
- liquid waterproofing paint used for foundations and cellar walls
Both options create a thin, hard barrier that stops water soaking into the terracotta. Apply with a brush or roller in one to two thin coats on the inside. Between coats, follow the drying time stated on the tin-otherwise the surface can remain tacky.
"If you seal the inside, you stop moisture at the source-so the later paintwork on the outside lasts far longer."
Keep the drainage hole in the base clear so excess watering can still escape.
Preparing the outside: primer to prevent stains and patchiness
To make the final effect coat look even, a light primer layer is worth it. A basic acrylic primer for mineral surfaces-liquid or spray-is sufficient. It reduces how much the terracotta drinks in and helps stop stains bleeding through.
Once it’s dry, the outside already feels smoother and is ready for the real “ceramic trick”.
The mixing formula: paint plus bicarbonate of soda for a matte ceramic look
The convincing finish comes from combining exterior paint with bicarbonate of soda. This makes the paint thicker, flatter in sheen and subtly textured-so small chips and scratches look much less obvious.
| Ingredient | Amount | Purpose |
|---|---|---|
| Exterior acrylic paint (or vinyl paint) | approx. 100 ml | Colour & weather protection |
| Bicarbonate of soda | 1 heaped tablespoon | Texture, matte ceramic-style finish |
Colours that work especially well are shades that resemble ceramic or stone:
- soft terracotta variations
- sage green
- ochre and sand tones
- beige to “nude” shades
Use the mixture promptly, as it thickens a little. A wide brush helps you lay it on evenly with a confident, hand-finished look.
How to apply the effect coat correctly
Start by brushing on a solid coat on the outside-avoid making it too thin. Perfect brushwork isn’t the goal here; slight brush marks actually add to the handmade character.
Let this first layer dry for at least two hours. Then apply a second coat to even out the colour. For very light shades or badly damaged pots, a third coat can be worthwhile. Always allow enough drying time between coats, otherwise the surface will smear.
"After 24 to 48 hours of drying, the pot looks like unglazed ceramic from a small studio-just much cheaper."
Important: leave the inside unpainted. The earlier sealant layer is enough, and plant roots generally prefer the interior without lacquer.
A protective topcoat against rain, sun and scratches
To keep the finish looking good for longer, add a final, thin protective coat. A matte, acrylic-based exterior varnish is the best match because it preserves the chalky ceramic look rather than turning glossy.
One to two fine coats are enough-let each coat dry thoroughly. This makes the surface wipeable, helps dirt adhere less, and slows fading from sunlight.
If your pots sit on a balcony or terrace, make sure water can drain properly: keep the hole clear, empty saucers regularly, and avoid leaving the pots standing in water. Even well-treated terracotta will suffer over time if it’s permanently wet at the base.
What does the “ceramic trick” actually cost?
The neat part is that these products usually cover several pots, so the cost per pot stays low.
- a small tin of exterior paint
- a tin of interior sealant
- a tin of matte acrylic exterior varnish
- a packet of bicarbonate of soda from the supermarket
Spread across multiple containers, you’ll usually stay well under ten euros per pot. Compared with new designer ceramic or concrete planters, it’s a fraction of the price-and it gives old favourites a second life.
Tips for design, style and care
If you place several pots together, try graduated shades-for example, three variations of a sand colour, or a mix of warm terracotta, light beige and a soft grey-green. It quickly creates an interior-magazine feel.
For contemporary gardens, clean, calm colours tend to suit better than bright patterns. If you prefer something more playful, once the base colour is dry you can use a thin brush to add lines, dots or geometric shapes in a second colour-those details can also be given a slight texture with a little bicarbonate of soda.
Looking after the “new” pots is straightforward: a soft cloth and lukewarm water are enough to remove dust or splashes. Avoid scouring pads and harsh cleaners, as they can dull or scratch the surface unnecessarily.
What to watch for with frost, large tubs and edible plants
On unheated balconies with hard frost, even sealed terracotta can suffer if water inside freezes. If you want to be extra cautious, keep particularly delicate pots sheltered against the house wall over winter, or store them empty in a cellar.
It’s best to place very large tubs in their final position before painting. The dried coating is tough, but knocks and scrapes during moving can still mark the edges.
For herbs or vegetables, treated pots are fine provided the interior sealant has fully cured and isn’t in direct contact with the soil surface. Adding a layer of fleece or a thin base of expanded clay pellets creates extra separation.
Anyone who refurbishes one old, crusted pot this way often keeps going: cachepots, old bowls, cheap garden-centre containers-suddenly what looked like tat becomes a small, coordinated ceramic-style set that makes a balcony or terrace look far more premium without draining your budget.
Comments
No comments yet. Be the first to comment!
Leave a Comment