
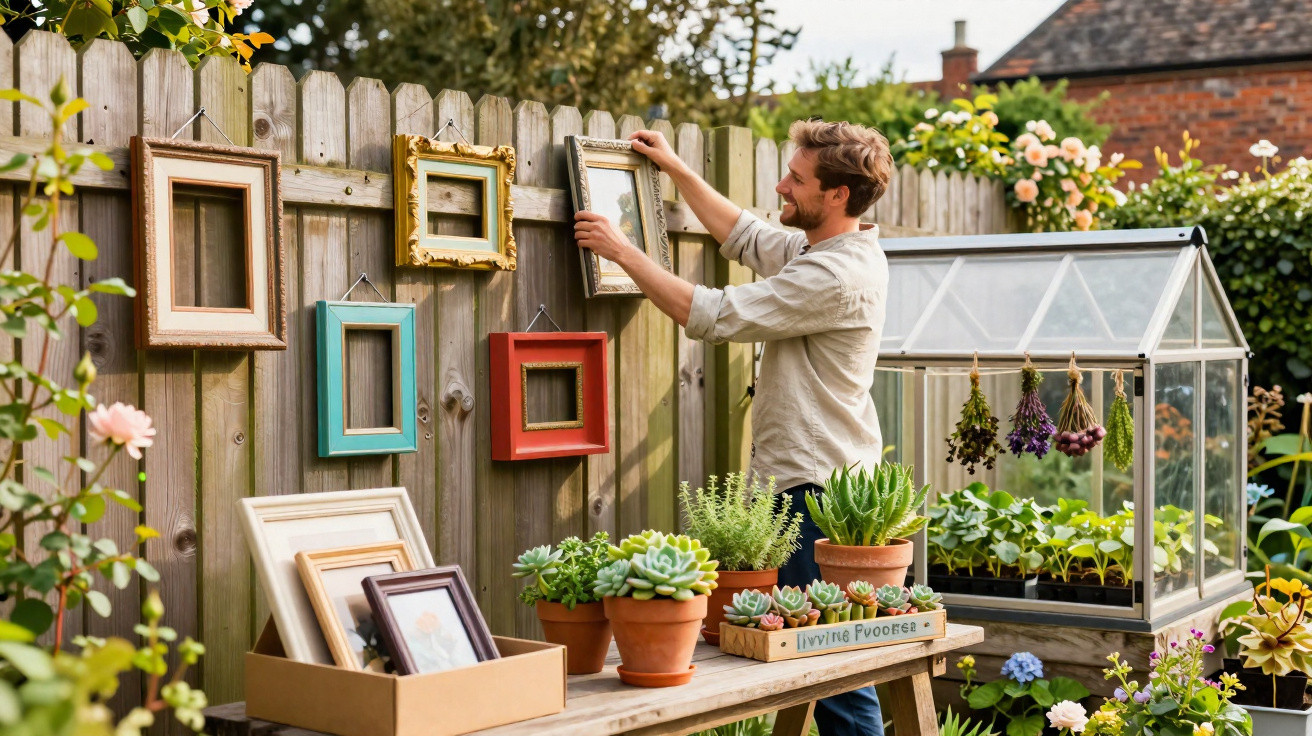
Anyone who loves plants can find charming, free building materials in them.
Old picture frames are the material in question. Many homes have them lying about, often with scratched glass and yellowed mounts. British gardeners are turning precisely these items into sturdy miniature shelves, planters and even small greenhouses. The idea suits narrow gardens, balconies and patios, while reducing both costs and waste.
Why old picture frames are useful in the garden
A wooden frame already has square corners, solid battens and, often, a pane of glass or acrylic. This gives you an immediately useful structure for plants. Usually, you will need little more than adhesive, hinges and some sealant. What was once clutter can become a practical answer to light, organisation and protection.
“A single frame provides angles, surface area and often glass – three resources that would otherwise be expensive to buy for a build.”
- Check the material: Solid wood can be screwed and sanded. MDF absorbs moisture, so it must be sealed thoroughly.
- Inspect the glass: Reduce the risk of splinters. If it is cracked, replace it with acrylic sheet.
- Paint: Old coatings may contain lead. Wear gloves, keep dust down and, rather than sanding, strip the finish while wet.
- Positioning: Wind and rain take their toll. Seal every edge and secure hooks with wall plugs.
- Plant contact: For edible herbs, use only food-safe oils or certified exterior paints.
Picture frames become shelves and containers
Hanging shelf for a favourite pot
This 20-minute project raises a plant to eye level and makes clever use of the glass already in the frame.
- Cut a thin plywood back panel to size and glue it in place.
- Screw two eye screws into the upper left and right corners, then attach cord or chain.
- Leave the glass in the frame and stick soft non-slip pads onto all four corners.
- Use lightweight pots only (max. 1 kg); a plastic cachepot is preferable.
“When you suspend weight overhead, redundancy matters: double the hooks, secure the knots and test the load.”
Picture-frame window box made from four frames
Four identical picture frames can form the sides of a rectangular planter.
- Align the inner edges of the frames flush, then join the edges with waterproof wood glue and screw in 4 corner brackets.
- Cut a base from weatherproof phenolic plywood and screw it on from underneath.
- Drill 2–4 drainage holes, add landscape fabric and, if desired, staple in pond liner.
- Coat the outside with garden paint; use only oil or boiled linseed oil inside.
- Fill with a sandy potting mix and plant herbs or balcony flowers.
Living succulent picture
A deep frame can be turned into a shallow succulent display with little compost but plenty of visual impact.
- Glue landscape fabric to the back, then fit 3 cm-high battens around the inside edge.
- Add a free-draining compost mix, stretch bird wire across the front and staple it to the back.
- Insert cuttings through the mesh, let them root flat for 3–4 weeks, then hang the frame upright.
- Water only with a spray bottle and avoid waterlogging.
| Project | Tools | Materials | Approximate cost | Level |
|---|---|---|---|---|
| Hanging shelf | Drill, eye screws | Plywood, cord | 10–20 € | Beginner |
| Window box | Saw, square, cordless drill/driver | 4 frames, base panel, landscape fabric | 25–45 € | Intermediate |
| Succulent picture | Staple gun, pliers | Landscape fabric, wire, compost | 15–30 € | Beginner |
Small greenhouses, propagation and herb drying
Mini greenhouse made from six frames
The panes provide the light, while the wooden battens create the edges. It is ideal for young plants on a table.
- Prepare six frames of the same size, remove the fittings and sand the edges flat.
- Connect them into a box using small hinges, with one frame serving as the lid.
- Fill joints with wood filler and apply weatherproof paint to the exterior.
- Refit the glass with silicone sealant and include a ventilation eyelet in the lid.
- Secure it with a bungee cord in windy conditions and choose a sheltered position.
Propagation station in a picture frame
Cuttings can root visibly and neatly here – ideal for a kitchen window.
- Remove the glass and glue in a thin back panel.
- Drill two holes, thread wire through them and wrap it firmly around a small jar.
- Hang up the frame, fill the jar with water and add one drop of charcoal powder.
- Place the cuttings in the jar and change the water every 3–4 days.
Hanging herb dryer
Two wooden frames and some mesh are enough to dry sage and mint without dust settling on them.
- Stretch insect mesh over the backs and staple it securely in place.
- Suspend the frames one above the other using four lengths of ribbon, leaving 20–25 cm between them.
- Spread the herbs loosely, keep them out of direct sun and allow airflow.
“For edible plants, use only stainless-steel staples, untreated mesh and coatings approved for food contact.”
Picture frames as colourful garden decoration
Rustic sign on the fence
- Paint the frame with chalk paint and sand it lightly to create a weathered patina.
- Stretch a small garland of jute twine and cardboard letters across it.
- Glue on artificial flowers or dried grasses.
Gallery wall of brightly coloured frames
- Paint several glass-free frames in bold shades.
- Fix them to a fence, pergola or gate with wire or cable ties.
- Thread in fairy lights and let ivy or nasturtiums grow between them.
Mistakes many people make – and how to avoid them
- Too much weight: Allow a maximum of 1–1.5 kg per hanging frame, otherwise it may tip.
- No drainage: Without holes, every plant will rot. Always include landscape fabric and an outlet for water.
- Incorrect fittings: Outdoors, use only stainless-steel or galvanised screws.
- Direct contact with the ground: Wood absorbs water. Raise it on feet, wedges or bricks.
- Unsealed MDF: It takes up moisture. Seal the edges with polyurethane varnish.
Weatherproofing: how to make your picture frame last longer
I apply two coats of acrylic weatherproof paint to the outside, sanding lightly between coats. One application of oil is sufficient inside. Exposed end grain is especially absorbent, so I saturate these areas with diluted linseed oil or a shellac-based primer. Silicone in the joints keeps water out while remaining flexible. After one winter, I inspect screws, hinges and seals, repairing any paint damage immediately.
Which plants suit each project?
- Hanging shelf: Devil’s ivy, Philodendron micans, Pilea – light in weight and attractive when trailing.
- Window box: Thyme, chives, strawberries – shallow-rooted and aromatic.
- Succulent picture: Sedum, Echeveria, Haworthia – all prefer little water.
- Mini greenhouse: Young tomato plants, chilli, basil – they enjoy warmth.
- Propagation station: Coleus, sweet potato vine, Tradescantia – quick to root in water.
- Herb dryer: Mint, sage, oregano – thick-leaved and strongly aromatic.
“Start small: a single frame will show you within one weekend how your materials respond to weather, weight and moisture.”
Safety and legal considerations
Old paint from before 1990 may contain lead. In that case, I work outdoors only, avoid sanding dust, wear gloves and dispose of waste separately. Glass can shatter unpredictably. In areas used by children and dogs, I use acrylic sheet or provide mechanical protection. I secure hanging projects twice, using chains and screw hooks. I fit items to balcony railings only where the building rules permit it.
If you do not have a spare frame, ask neighbours, look in second-hand shops or visit a recycling centre. You can often find different sizes there for just a few euros. Two matching formats are enough for a shelf or dryer. With three to six pieces, you can make boxes and mini greenhouses. A mixed collection can create colourful walls that brighten even grey fences.


Comments
No comments yet. Be the first to comment!
Leave a Comment