
A small change to the way you water it can transform the situation completely.
In countless living rooms, a lush green peace lily is thriving, yet its characteristic white bracts fail to appear. This plant is regarded as easy to care for and forgives the occasional mistake – but it may still rarely flower. The key is usually not fertiliser or repotting, but an inconspicuous everyday routine: watering.
Why your peace lily is not producing flowers
Known botanically as Spathiphyllum, the peace lily originates in the shaded, humid forests of the tropics. There, it grows in loose soil that remains gently moist at all times. Recreating these conditions in a pot is only possible to a limited extent – and that is where problems often begin.
Many owners water either too infrequently or too generously. Both extremes inhibit flowering:
- Too little water: The plant switches into survival mode, directing all its energy towards staying alive rather than producing flowers.
- Too much water: The roots receive insufficient oxygen, start to rot and the peace lily becomes weakened. Flowers will fail to develop in this case too.
What matters is not “a lot” or “a little”, but a consistently lightly moist root zone with a top layer of soil that is allowed to dry slightly.
The compost should remain soft and damp below the surface, while the top one to two centimetres dries out. Achieving this balance encourages abundant flowering rather than simply producing more leaves.
How the peace lily “communicates” with you
One useful advantage of this houseplant is that it makes its condition very clear. A quick look can provide a good indication of how much water it needs.
- Leaves droop limply downwards: The peace lily is thirsty. Once watered, its leaves usually stand upright again within a few hours.
- Leaf edges turn brown: Either the dry period lasted too long, or tap water containing high levels of limescale and salts is stressing the plant.
- Leaves turn yellow across their surface: This is often a sign of waterlogging or compost that has remained too wet for too long.
Even so, looking at the leaves does not replace the most important check of all: feeling the compost.
The “finger test”: how to identify the right time to water
Professionals rarely follow fixed watering schedules, relying instead on a very straightforward test. It takes less than three seconds and is far more dependable than any calendar-based rule.
The finger test is the safest way to find the perfect time to water – without any measuring device.
Here is how to do it:
- Push your index finger two to three centimetres into the compost.
- Check how it feels: is the surface dry while the compost underneath is still slightly damp?
- If so, this is the right time to water moderately.
If the compost is dry deeper down as well, give the plant a more thorough drink. If everything still feels distinctly damp, it is better to wait. This lets you respond flexibly to room temperature, the season and pot size, instead of reaching for the watering can rigidly every week.
Water like a professional: bottom watering instead of watering from above
A common mistake is pouring water directly onto the compost from above until it runs out at the bottom. This can flood certain parts of the root system while leaving other areas dry. It becomes even more problematic if water is left standing in the decorative outer pot, as this can lead to root rot.
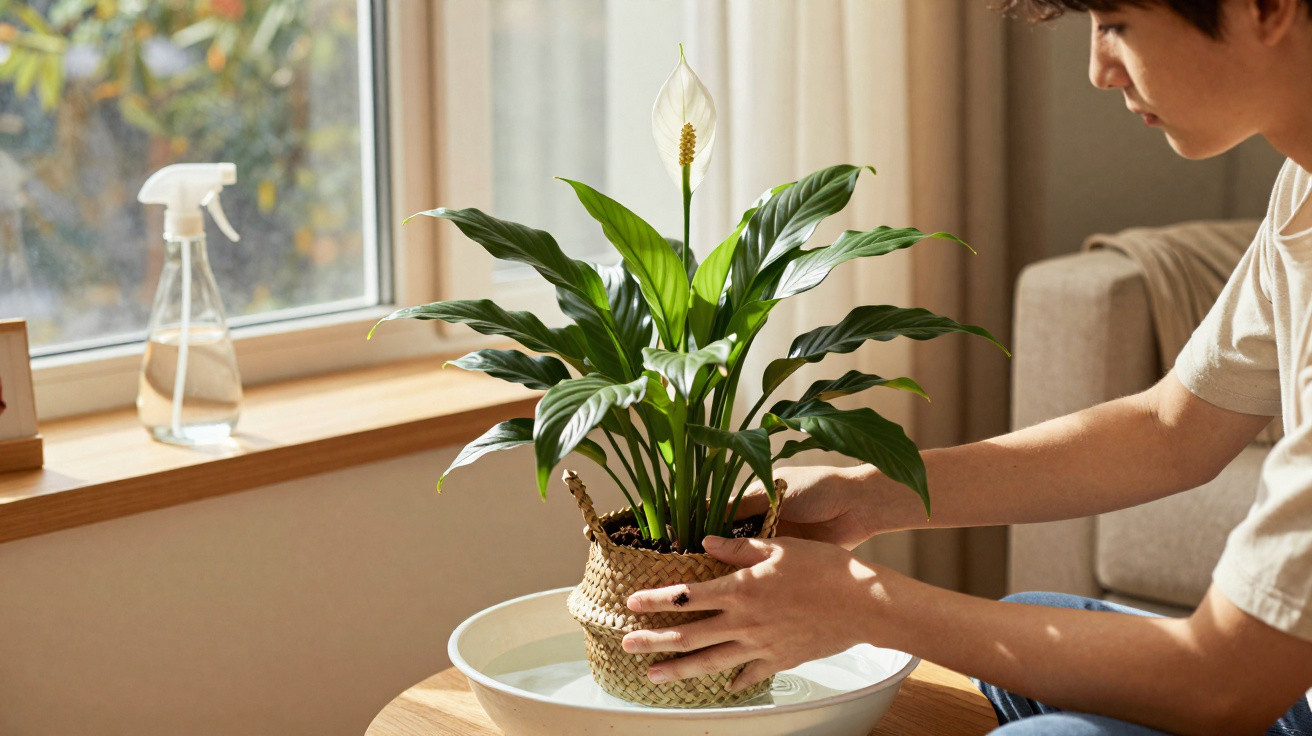
The much gentler approach is known as bottom watering.
Step by step: bottom watering
Use the following method to provide your peace lily with water according to its needs:
- Place the pot in a bowl, bucket or the kitchen sink.
- Fill the container with water so that the base of the pot is standing in it, without submerging the entire pot.
- Wait 10 to 15 minutes for the compost to absorb water.
- Remove the pot and allow it to drain thoroughly.
- Pour away any remaining water in the container to prevent waterlogging.
With bottom watering, the peace lily draws up exactly as much water as it needs – any excess simply remains in the bowl.
This technique is a real lifeline, particularly for plants that already appear weakened or for anyone who tends to overwater. It significantly lowers the risk of root rot and prevents the compost surface from staying soaking wet all the time.
How often does a peace lily need water?
There is no fixed answer, but broad guidelines can help to ensure no one is left entirely unsure. Temperature, light levels and pot size are the determining factors.
| Season | Typical frequency | Note |
|---|---|---|
| Spring | 1–2 watering sessions per week | The growing period begins, so carry out the finger test more often. |
| Summer | 2–3 watering sessions per week | Warm rooms cause compost to dry more quickly. |
| Autumn | every 7–14 days | Less light means growth slows down. |
| Winter | every 10–20 days | Cooler rooms often result in considerably longer intervals. |
These figures do not replace checking with your finger; they merely offer a general sense of timing. Anyone relying on calendar dates alone can quickly end up with waterlogging or drought stress.
Light and humidity: hidden factors for success
Even the best watering routine will achieve little if the location and indoor climate are unsuitable. The peace lily prefers bright, indirect light. Direct sunlight scorches its leaves, while very dark corners restrict flower production.
An ideal position is:
- close to a window, but away from direct midday sun,
- at temperatures between 18 and 24 degrees,
- free from draughts and away from continuously warm radiators.
The plant appreciates slightly elevated humidity. In very dry homes, there is a simple solution: place the pot on a saucer containing damp clay pebbles, ensuring that the root ball is not sitting in water while the rising moisture improves the air around the peace lily.
Should you mist the leaves?
Many people advocate misting the leaves with low-limescale water, particularly on hot days. This can genuinely be beneficial if the water is sprayed as a fine mist and the leaves dry again quickly. If droplets remain on the foliage for long periods, spots can easily form.
Common mistakes and how to avoid them
Following the simple watering method already addresses the biggest issue. A few further pitfalls can also be avoided with little effort:
- The wrong compost: Very dense, heavy potting compost retains water. Loose, structurally stable substrates that hold moisture while allowing air to reach the roots are a better choice.
- No drainage hole in the pot: A decorative outer pot without drainage invites waterlogging. A pot with a hole and a saucer is safer.
- A cold location: Below 16 degrees, the peace lily becomes sluggish. Cold draughts directly by a window are also harmful.
- A permanently wet saucer: Water left in the saucer for hours causes roots to rot – always empty it.
Adding a lightly diluted green-plant fertiliser to the watering water every few weeks can further support flower production. Patience is still required: even in ideal conditions, a peace lily needs time to build up strength and form new flowers.
Why this method is also ideal for beginners
Combining the finger test with bottom watering removes the greatest uncertainty from plant care. There is no need to measure exact millilitres or use an app that sends watering reminders. The plant and its compost provide the signal themselves.
This routine is particularly worth trying for people who have had little success with houseplants in the past. A peace lily remains more forgiving than many more delicate species, yet it responds clearly once water and light conditions are right. Anyone who has seen the difference – from foliage that is simply green to recurring white bracts – will usually stick with this straightforward method.

Comments
No comments yet. Be the first to comment!
Leave a Comment