
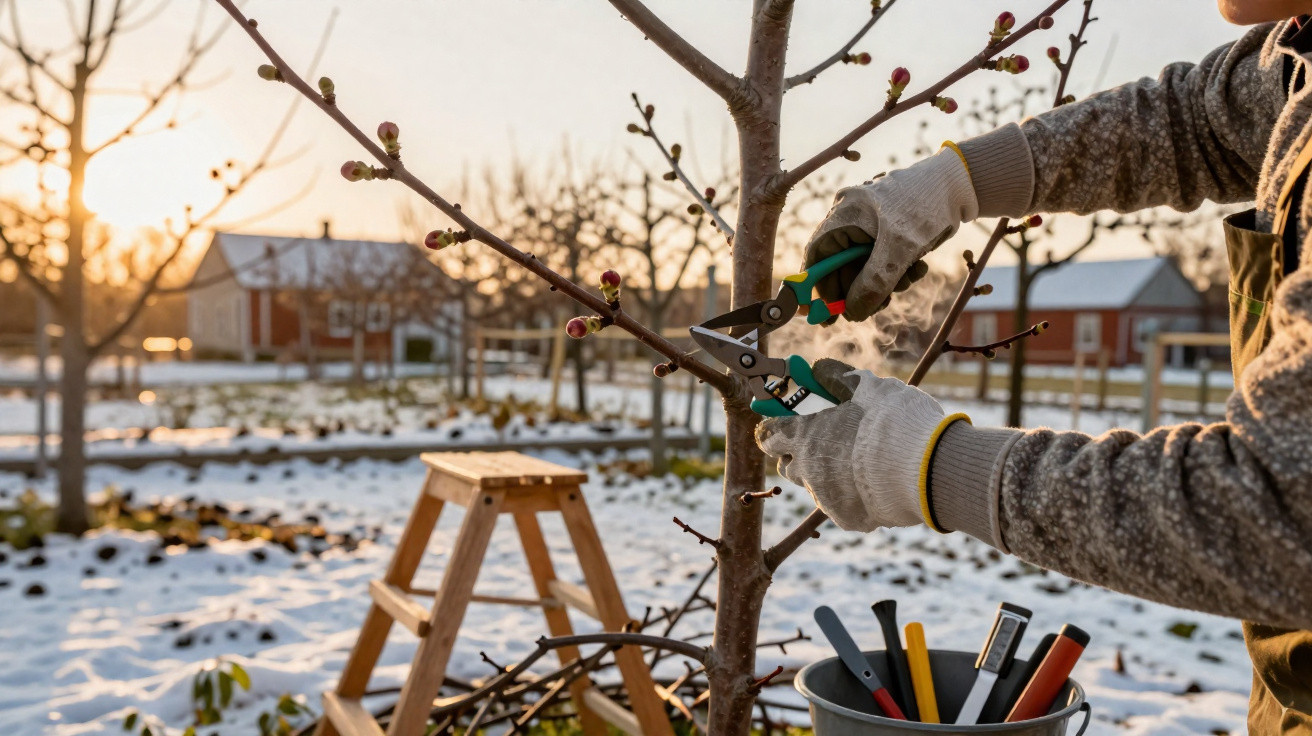
Cold, grey, and seemingly lifeless, the February garden can feel like somewhere you simply wait rather than do.
That impression is quietly mistaken.
Even when apple trees are stark and leafless and the lawn seems set like ice, the groundwork for the next crop is already being laid. The gardeners who make one careful, deliberate move now are often the very same people later displaying brimming baskets of flawless apples in late summer and autumn.
Why February secretly decides your apple harvest
In February, most apple trees in temperate climates sit in deep dormancy. Sap has withdrawn towards the roots, growth has slowed to a halt, and from a few metres away it can look as though nothing is going on at all. That stillness is precisely what makes this window so useful.
If you prune an apple tree during this resting phase, you are not working against strong sap flow. Cuts are less prone to bleeding, buds remain settled, and the tree has time to rebalance its resources before spring warmth sets everything moving again.
"What you do with your secateurs in late winter often decides how many flowers and fruits appear months later."
Garden centres tend to spotlight cultivars and fertiliser, yet one technique often has a bigger impact than either: fruiting pruning. This is not a light tidy-up to make the tree look neat. It is a purposeful method for directing where sap and energy will be sent once growth restarts.
Without that guidance, many garden apple trees channel their vigour into long leafy extension growth and thickening branches. The outcome is predictable: heavy shade, few flowers, and small, underwhelming apples.
Fruiting pruning: what it actually does
Fruiting pruning steers the tree’s energy away from producing unnecessary wood and towards developing flower buds. Those buds become blossom, then tiny fruits, and ultimately the crisp apples you want to harvest.
An apple tree has finite resources and must “choose” where to invest them. Left to itself, a strongly growing tree often prioritises building wood. A well-judged winter prune encourages it to prioritise fruit instead.
"The goal is simple: fewer but better-placed branches, more light, more air, and more fruit buds."
This is not about cutting the tree down to a stump. The point is to keep a robust framework, remove congestion, and shorten the shoots and branches that will carry fruit so the tree remains balanced and productive.
Tools you genuinely need before making the first cut
Before thinking about technique, sort your tools. A clean slice closes over far better than a crushed, torn wound, which can invite rot and disease.
- Sharp bypass secateurs for thin branches and one-year shoots
- Strong loppers for older, thicker wood higher up
- Rubbing alcohol or disinfectant for wiping blades between trees
- A pruning saw (optional) for large or awkward limbs
Dull blades rip bark, leave ragged fibres, and add stress. Spend five minutes sharpening and cleaning before you head out to the orchard.
First step: read the tree before you cut
Begin by stepping back and walking all the way around the apple tree. At this stage you are assessing the overall shape rather than individual twigs.
Ask yourself three things:
- Which branches cross and scrape against each other?
- Which branches point into the centre and block light?
- What forms the main structure, and what is simply clutter?
Productive fruiting trees are often trained into an open, goblet-like shape. Light needs to reach the middle so apples colour and ripen evenly, and foliage can dry quickly after rain.
"Any branch that shades the centre, traps moisture, or rubs another branch is a candidate for removal."
The “three-bud rule” that home gardeners can actually use
After you have identified (and protected) the tree’s main framework, turn to the side shoots that will bear fruit. A practical rule of thumb for home gardens is the three-bud-or “three-eye”-cut.
How to make a three-bud cut
Choose a lateral shoot growing from a main branch. Starting at the base of that shoot, count three buds along it, then cut just above the third bud.
Two points are crucial:
- The third bud should point outwards, away from the centre of the tree.
- Make the cut at a slight angle, sloping away from the bud.
"By leaving only a few buds, you focus sap on them, raising the odds they become flower buds rather than just leaf growth."
Selecting an outward-facing bud pushes new growth away from the trunk, helping the crown stay open and well ventilated. Repeating this approach over several seasons creates a neat, fruitful structure that is straightforward to harvest and simple to maintain.
Common pruning mistakes that quietly ruin apple crops
In home orchards, two opposite mistakes appear repeatedly: leaving the tree unpruned, or pruning far too aggressively.
If you miss winter pruning year after year, the tree thickens and crowds itself. Shade becomes dense, branches tangle, and you end up with lots of small leaves rather than fruit. The tree’s energy goes into wood that offers you little in return.
At the other extreme, a harsh cut-back can jolt the tree into a defensive response. It often produces a mass of upright, non-fruiting shoots known as water sprouts or “gourmands”. These shoots grow fast, demand plenty of resources, and commonly take several years before they bear apples.
Angle and position of the cut
Your cutting technique can either support or undermine all your work. A good cut is:
- Made just above a bud, not several cm beyond it
- Cut at a slant so rainwater runs off
- Angled on the opposite side from the bud so the bud is not left sitting in water
"A flat cut above a bud holds water, and constant dampness around that bud encourages rot and fungal disease."
Do not leave stubs-small dead projections above a bud. They seldom heal neatly and can become a magnet for pests and infection.
Helping cuts heal: why aftercare matters more than you think
When pruning is finished, the tree begins repairing itself gradually. Bigger cuts-particularly those wider than a couple of cm-may remain open for years if you leave them unprotected.
Many traditional growers still apply a wound sealant or pruning balm. Contemporary versions are often made with pine tar, clay, or plant-based resins. They provide a breathable barrier while new tissue forms beneath.
"Think of wound dressing as a weatherproof jacket for a fresh scar, buying the tree time to seal itself from the inside."
What happens under the tree matters too. Diseased branches left on the ground nearby can act as winter accommodation for fungi and insect pests. Clean, healthy prunings can be chipped for mulch or added to compost. Anything suspect is best removed from the area, or burned where local regulations permit.
What happens if you do nothing this year?
Missing winter pruning rarely kills an apple tree outright. Instead, it alters how the tree uses its energy and how it develops over time.
| With late-winter pruning | Without late-winter pruning |
|---|---|
| More light and air in the canopy | Dense shade and trapped moisture |
| Higher proportion of flower buds | Abundant wood, fewer blossoms |
| Larger, better-coloured fruit | Smaller, often misshapen apples |
| Lower disease pressure on leaves and fruit | Higher risk of scab, mildew, and canker |
| Tree remains manageable in size | Tree becomes tall, hard to harvest |
For the first year or two, the difference can be subtle. Then the ladder gets taller, harvesting becomes more awkward, and fruit quality gradually drops.
Extra tips for different types of apple trees
Apple trees do not all respond identically. The core principles stay the same, but the details change depending on training and age.
Cordons and espaliers along a wall
In smaller gardens, apples are often trained flat along a fence or wall. In that situation, accuracy matters even more. Each winter you cut side shoots back firmly, leaving only a few buds, and keep the main stems secured to their supports.
Fruit typically forms close to those main arms. Consistent, disciplined winter pruning preserves that productive habit while keeping the outline controlled.
Old neglected trees
A large apple tree left unpruned for a decade can be daunting. Trying to rescue it in one severe session tends to cause problems. A safer approach is phased rejuvenation spread over two to four winters.
Each winter, take out some of the worst crossing branches and a share of the highest, least useful limbs. As light re-enters the centre, new shoots develop at more workable heights. Over time, you can shape those into a renewed fruiting framework.
A few helpful terms gardeners often hear
Pruning advice can sound more complicated than it really is because of the terminology. This quick glossary helps:
- Bud (or “eye”): the small bump on a shoot that may develop into a leaf, flower, or new branch.
- Lateral shoot: a side shoot growing from a main branch, and commonly where fruit forms.
- Leader: the main upright stem that provides height and structure.
- Water sprout / gourmand: a vigorous, fast, usually vertical shoot that rarely fruits early.
- Canopy: the overall crown of leaves and branches that captures light in summer.
Scenarios: what a good February session looks like
Imagine a Saturday in late February. You sharpen your secateurs at the kitchen table, wipe the blades with alcohol, pull on gloves, and head outside to a tree that seems to have stood still for months.
You start by removing a dead, brittle branch and one clearly diseased limb, then you seal the largest wound. After that, you take out two crossing branches that have been scraping each other and stripping bark. Immediately, the centre opens up and light can pass through.
Next comes the fruiting wood: you shorten side shoots using the three-bud rule, always finishing with an angled cut just above an outward-facing bud. The prunings go into a separate pile, and when you step back the tree’s outline looks cleaner, brighter, and more intentional.
"The whole session might take less than an hour, yet its effect will be visible every time you walk past the tree for the next year."
When spring arrives, the selected buds begin to swell. Rather than a dense thicket of weak growth, you get well-positioned shoots and clusters of blossom where light is plentiful and air can move. By autumn, the contrast between a pruned tree and an untouched one is hard to miss.
If your aim is dependable, attractive apples without relying on heavy chemical treatments or constant feeding, that small, quiet February act with sharp secateurs is about as close to a hidden switch as you are likely to find.

Comments
No comments yet. Be the first to comment!
Leave a Comment