
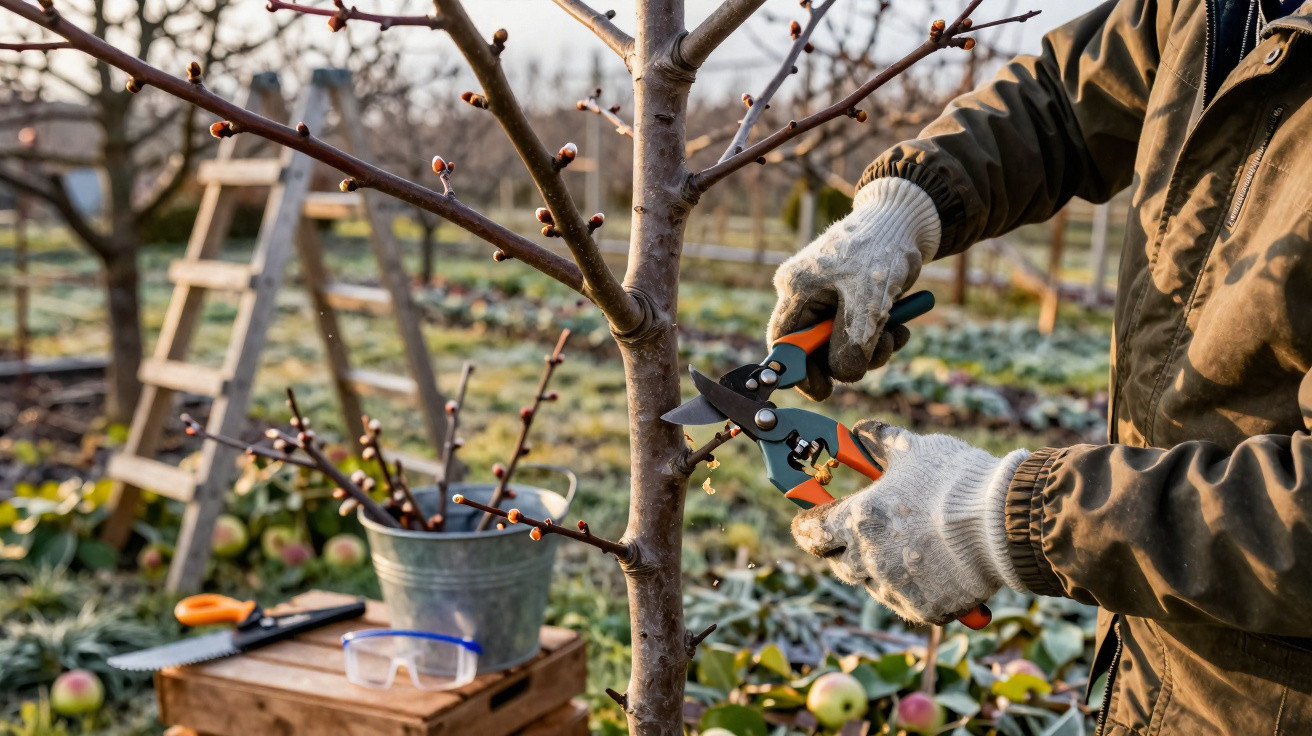
The orchard may still look as though it is asleep for winter, but it is precisely now that you determine whether your apple harvest in autumn will be meagre or truly impressive.
Plenty of hobby gardeners leave their apple trees alone in February - which is understandable, because everything looks grey and lifeless. Yet if you do nothing during these weeks, you miss one of the most effective levers for full baskets, juicy fruit and robust trees. The key job is neither complicated nor particularly strenuous, but it is often avoided entirely - or done completely wrong - simply through uncertainty.
Why February is the hidden key month for apple trees
In late winter the tree appears to be resting. Most of the sap sits down in the roots, buds are still closed, and growth has paused. That apparent standstill is exactly what makes this period so valuable: the tree copes far better with pruning now than it does in spring or summer.
If you intervene at this point, you can direct the coming season’s growth towards blossom and fruit rather than unproductive wood. The apple tree then wastes less energy on long, thin shoots that rarely crop well, and puts more strength into sturdy fruit buds - the ones that become large, flavoursome apples in autumn.
“In February it is decided whether the apple tree puts its energy into wood or into fruit.”
Gardeners often refer to this as the so‑called fruiting cut line: it doesn’t just shape the crown, it also influences sap flow throughout the whole tree. When this pruning is done regularly and thoughtfully, you can see a clear difference in yield, fruit size and quality after one or two seasons.
Without good tools, every cut becomes a risk
Before you touch a single branch, it pays to check what you have in the shed. Dull, rusty or dirty tools tear the wood instead of making a clean cut. Those injuries heal more slowly and are more quickly colonised by fungi and bacteria.
For a safe winter prune on apple trees, you usually only need a few dependable basics:
- Bypass secateurs for thinner twigs and accurate cuts.
- Loppers for thicker branches where you need both hands.
- Disinfectant such as alcohol to clean blades between trees.
- For older trees, a sharp pruning saw for deadwood or very thick limbs.
Clean the blades thoroughly before the first cut and make sure the mechanisms move freely. A drop of oil on the joint can make a big difference. Care at the tool stage alone significantly reduces disease pressure across the orchard.
Look closely: what the tree reveals about its condition
Before you start cutting, walk around the tree calmly once. Stand back far enough to see the whole crown at a glance. Typical trouble spots then become obvious quite quickly:
- Branches that cross and rub against one another
- Shoots that rocket straight upwards like spears
- Growth heading inwards, shading the middle of the crown
- Old, dead wood without buds or with splits in the bark
The aim is a loose, light-filled crown where sunshine and air can reach in from all sides. Light is essential for ripening fruit, and it also helps keep many fungal diseases under control.
The core technique: a few cuts that steer the tree towards more fruit
The principle behind winter pruning is straightforward: the tree should grow in a stable, open and fruit-friendly way. The goal is not to remove as much as possible, but to remove with purpose.
Shorten side shoots properly
Pay particular attention to lateral branches coming off the main framework limbs. Most of the later crop sits here. If these side shoots are allowed to run on for too long, apples end up right at the outer edges and the sap is spread too thinly. A sensible reduction brings fruiting closer to the supporting wood.
A practical guide is the so-called “three-bud rule”:
- Pick a lateral shoot you want to keep.
- Starting from the base of that shoot, count three buds outwards.
- Make your cut just above the third bud.
Make sure that third bud points outwards, away from the centre of the crown. That way the new shoot later grows into open space and does not unnecessarily thicken the middle of the tree.
“Short, well-placed shoots with strong buds produce more and better apples than lots of long, thin twigs.”
The right cut profile: angled rather than flat
Each cut should be made at a slight angle, sloping away from the bud you are leaving. This allows rainwater to run off instead of sitting on the bud. That lowers the risk of buds and cut surfaces rotting in persistent damp or becoming infected by fungi.
Common mistakes that weaken apple trees for years
Two extremes are particularly harmful: never pruning at all, or cutting back radically. Both have an immediate effect on yield and overall vigour.
If a tree goes unpruned for years, the crown becomes dense and unruly: lots of branches, little light, small fruit that is often scabby. The tree pours its energy into wood rather than apples. The opposite mistake is taking off too much in one go. In response, the tree goes into emergency mode and produces masses of upright water shoots that barely carry fruit and create new shaded areas.
Large, smooth wound surfaces right at the trunk are also troublesome. Rather than shaving thick limbs off flush to the trunk, cut to the branch collar - just outside the slight swelling where the branch joins. That area contains more healing tissue and closes the wound faster.
Wound care: helping cuts heal quickly and neatly
For small cuts, it is usually enough that you have cut cleanly and at an angle. Larger wounds several centimetres across should be protected more deliberately, especially on older or already weakened trees.
This is where specialist wound sealants are used, often based on resin or clay minerals. They form a protective layer over the cut surface, blocking pathogens and preventing moisture from penetrating continually. Apply the product only to dry, clean wounds and do not lay it on too thickly, so the tree can still “breathe” beneath it.
After pruning, take a moment to check the ground: do not simply leave prunings where they fall. Diseased material - for example with dark spots, dead patches or heavy moss growth - should be disposed of. Healthy branches can be chipped for mulch or added to the compost.
How long it takes for the tree to “thank” you
If you tackle your apple tree properly for the first time in winter, you should notice changes as early as the following year. The crown looks more open, and many new short shoots with thick buds appear. After two to three years of consistent pruning, a stable balance usually develops: enough new wood, plenty of fruiting branches, and a more even crop.
With old, neglected trees, patience is especially worthwhile. In that case it is better to spread the correction over several years - making progress each season rather than removing half the crown in one hit. This avoids stress reactions and gives the tree time to adapt to the new structure.
Practical tips for beginners with no pruning experience
Many garden owners approach their first prune with hesitation. That is completely normal. A few simple rules make it far less daunting:
- Remove all deadwood first - it is hard to go wrong with that.
- Next, choose crossing or rubbing branches and remove one of them.
- Strongly shorten steep, upright water shoots, or remove them entirely.
- Only take off enough that, in theory, rays of light could reach the centre of the crown.
If you are unsure, start conservatively and refine a little each year. Over time you will develop a feel for how the tree responds and which branches genuinely carry fruit.
Risks people often underestimate - and how to avoid them
A common risk is choosing the wrong moment: do not prune during prolonged severe frost, when temperatures are well below freezing. The wood becomes brittle and cuts can split. Dry days a few degrees above freezing - or with only a light overnight frost - are ideal.
Wet conditions are just as awkward: rainy spells increase the chance that fungal spores enter fresh wounds. A calm, dry winter day is far better than a damp, foggy one.
If you have several varieties in the garden, think about the order: prune perfectly healthy trees first, and only then trees showing signs of disease. In between, disinfect the blades carefully so you do not carry pathogens from one tree to the next.
Why this one February task is genuinely worth it
A well-planned winter prune usually takes about an hour per tree - sometimes less. The benefits, however, last for years: stronger limbs, crowns that can bear weight, more aromatic fruit and fewer disease problems. Using this small February window can turn an average apple tree into a dependable source of juice, cake topping, purée and crisp snacks.
The orchard may look quiet right now. But with every deliberate cut, you are laying the groundwork for those autumn moments when you bite into a perfectly ripe apple and realise: that winter effort was exactly what made it possible.
Comments
No comments yet. Be the first to comment!
Leave a Comment