
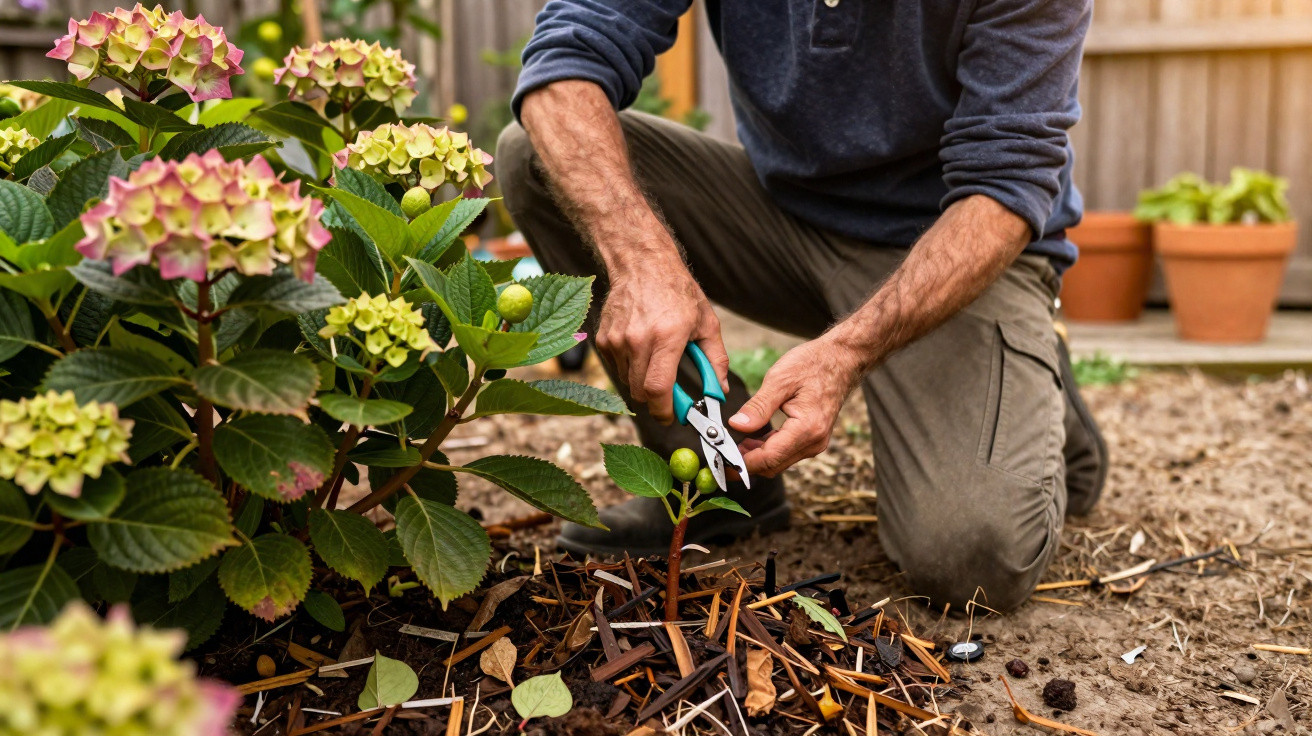
On British television, Monty Don can look almost offhand as he walks his beds in early spring and snips away a few dried hydrangea flower heads. Yet that modest bit of timing is exactly why his shrubs can seem to buckle under the weight of flowers in summer. Copy the garden expert in March and you can get far more from your own hydrangea - without chemicals, without pricey fertilisers, just a pair of secateurs and a little mulch.
Why March in particular decides how well your hydrangeas flower
Hydrangeas have a reputation for being easy-going: they tolerate shade, ask mainly for regular watering, and will bloom in most reasonably suitable spots. Even so, many home gardeners are puzzled when a plant that looks healthy produces fewer and fewer flowers each year.
The key lies in the biology of the much-loved mophead/bigleaf hydrangeas (Hydrangea macrophylla). These varieties flower mainly on what gardeners call “old wood” - last year’s growth. In other words, next summer’s flower buds are formed the previous summer and sit through winter as tiny, delicate bumps along the stems.
If you “tidy up” in autumn or right in the middle of winter by cutting back all the old flower heads, you can accidentally remove those buds. The shrub will still leaf out in spring and look fresh and green, but the flowers either won’t appear or will be noticeably weaker than the year before.
"The most common mistake with hydrangeas isn’t what gets cut, but when and where you put the secateurs."
That’s why Monty Don - and garden legend Alan Titchmarsh - follow a clear rhythm: leave everything in place over winter, however messy it looks. Only in late winter or early spring, when the harshest frosts have passed and the buds are visibly swelling, do you start cutting - and even then, with a very precise approach.
How Monty Don prunes hydrangeas in March - step by step
The line between “neatening” and “ruining” is thin but crucial. Professionals talk about removing spent flower heads (deadheading) rather than doing a traditional hard prune.
Small, careful cuts instead of a drastic prune
Monty Don’s advice is to assess each dried flower head on its own. Just beneath the faded mophead you’ll usually find one or two pairs of strong buds on the stem. That is the point you’re aiming for.
"Remove the old flower with a clean cut just above the top healthy pair of buds - nothing more."
Do it like this:
- Wait for a mild, frost-free day in late February or March.
- Follow each stem down from the top until you spot the first robust pair of buds.
- Snip off the dried flower head a few millimetres above that point.
- Remove only dead, damaged or very spindly stems right down at the base.
- Leave strong, green stems entirely intact - they’ll carry most of the flowers later.
This way, you keep the majority of the pre-formed flower buds. At the same time, you’re removing frost-damaged tips that wouldn’t have grown strongly anyway.
Save any shaping until after flowering
A common error is trying to “shape” hydrangeas in spring. Monty Don advises against that - at least with varieties that bloom on old wood. Cut too confidently here and you can remove the entire summer display.
If you want to improve the shape more noticeably or rejuvenate the plant, late summer is a better moment: straight after flowering, you can take out a few of the oldest, woody stems at the base. That keeps the shrub compact without sacrificing flowers the following year.
The second secret: Monty Don’s mulching trick for more buds
Pruning alone doesn’t guarantee a bumper show. Monty Don also relies on a second, almost unremarkable step: applying a generous layer of mulch around the base of the hydrangea in winter or very early spring.
He uses well-rotted organic matter, for example:
- mature garden compost,
- spent mushroom compost,
- bark mulch, often pine bark if you want a slightly more acidic soil.
"Around five to ten centimetres of mulch protects buds, holds moisture and feeds the soil - a quiet turbo-boost for flowering."
Two details matter most:
- The soil should be cold, but not frozen solid and not completely waterlogged.
- Keep the mulch layer slightly away from the stems, so the plant’s base isn’t wrapped up.
Piling too much mulch right against the shoots can encourage rot at the crown or smother buds. Spread correctly, mulch works like a warming blanket and a slow-release feed at the same time. It evens out soil moisture, helps young roots avoid severe freezing, and boosts soil life - which in turn improves nutrient availability.
Why many gardeners fail on these two points
In day-to-day life - work, children, chores - it’s tempting to garden “when there’s a moment”, which often means autumn or around the turn of the year. Beds look neat, but the hydrangea pays the price in summer with a thin display.
Typical mistakes include:
- Cutting back hard in autumn or winter.
- Doing a full shaping prune in early spring on old-wood varieties.
- Putting mulch right up against the stems, applying it too thinly, or using fresh material that’s still heating up.
- Not mulching at all, so the soil bakes hard and dries out faster.
Adopting Monty Don’s rhythm doesn’t require a whole new garden plan - it mainly changes your timing and how fine your cuts are. That’s what makes the method realistic even for small gardens or narrow terraced-house front gardens.
Which hydrangeas benefit from Monty Don’s method - and which don’t
Not all hydrangeas respond in the same way. So it helps to distinguish the common types:
| Hydrangea type | Flowers on | Suitable approach |
|---|---|---|
| Mophead/bigleaf hydrangea (macrophylla) | last year’s wood | Monty Don’s March deadheading + light shaping after flowering |
| Lacecap hydrangea | mostly last year’s wood | treat like mophead; prune cautiously |
| Panicle hydrangea (paniculata) | this year’s wood | can be cut back harder in late winter |
| Smooth hydrangea (arborescens) | this year’s wood | stronger late-winter cutback is possible; flowering remains |
The gentle March approach described here is aimed above all at varieties that flower on old wood - because that’s where the risk of cutting away next season’s buds is greatest.
Practical tips for a balcony, an allotment, and time-poor gardeners
Not everyone has a cottage-garden paradise like on British television. The good news is that the same trick works in a pot on a balcony or in a tiny front garden.
A few everyday examples:
- Potted hydrangea on a balcony: in winter, move the pot close to the house wall, leave the old flower heads in place, then in March trim briefly and top-dress with fresh compost as mulch.
- Shady front door area: mulch the hydrangea in the ground with five to ten centimetres of bark to stabilise soil moisture and soil temperature.
- Very little time: on one mild morning in March, snip off all old flower heads, remove dead stems and spread mulch - that alone is often enough to make a clear difference.
Risks of ignoring the advice - and what the plant is telling you
If flowering becomes sparser year after year while the foliage remains vigorous, it’s rarely a simple nutrient deficiency. More often it’s a pruning or frost issue. Buds left exposed at the tips can be killed quickly by winter cold. Old flower heads, by contrast, act like a small insulating cap - one reason Monty Don leaves them in place until spring.
Another risk is using fresh, still-warm compost or heaping thick mulch directly against the main stems. In those conditions, shoots can go mouldy or the bark can soften. If you notice rot or an unpleasant smell near the base after mulching, pull the material back a little and improve airflow.
Why this simple trick matters more as the climate changes
Recent years have made one thing clear: winters are less predictable. Mild spells can be followed by sudden sharp cold snaps. In these stop-start years, unprotected hydrangea buds are particularly vulnerable. A later, gentle cut combined with a protective mulch layer softens many of these extremes.
In essence, the method relies on three natural effects: shielding against late frosts, improving water retention in the soil, and deliberately preserving flower buds. Once you understand that, you don’t need a complicated care calendar - two fixed tasks in winter/early spring are enough: mulching and pruning correctly in March.
A final, very practical motivation test is to take a photo of your hydrangea in summer before switching to the Monty Don method - and another one a year later. Once you’ve seen how a handful of scattered blooms can become a dense sea of flowers, you won’t forget that March day with secateurs and mulch in a hurry.

Comments
No comments yet. Be the first to comment!
Leave a Comment