
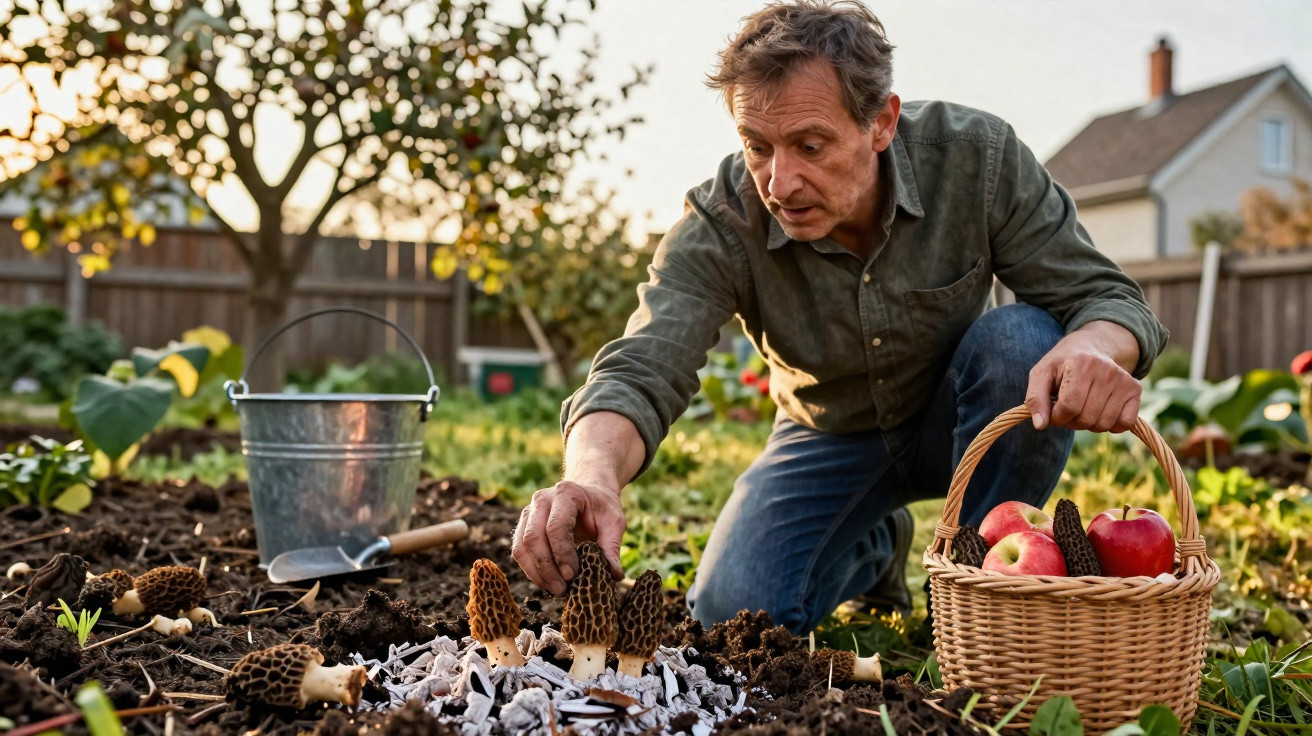
Morels are treated as a luxury ingredient: scarce in the wild and pricey to buy. Every spring, plenty of mushroom enthusiasts spend hours combing woodland only to head home with empty baskets. That is exactly where a surprisingly straightforward garden approach comes in: using fireplace ash and apple leftovers, you can create a spot where this elusive gourmet mushroom has far better odds.
Why morels are so sought-after - and so hard to find
Morels are among Europe’s most aromatic edible mushrooms. Their rich, nutty flavour makes them a standout in the kitchen. At markets, prices can quickly climb to well over €80 per kilogram depending on the year, and dried morels are often higher still.
In nature, morels appear mainly in spring, often on lime-rich, relatively open ground - commonly near ash trees, fruit trees, or old fire sites. Finding them takes knowledge, good timing, and, above all, luck. Even experienced foragers can struggle to turn up meaningful quantities in many seasons.
Morels are not “impossible to cultivate” - they simply have extremely precise requirements for soil, climate and nutrients.
Those requirements can be reproduced deliberately in a garden. The essentials are: alkaline soil, steady moisture, partial shade - plus a particular type of organic waste that many households already have.
The unexpected leading ingredients: apple leftovers and fireplace ash
You do not need any high-tech set-up to get morels established outdoors. What matters is a kind of purpose-made patch, often called a “morel bed”. Here, a pairing that has been discussed in agricultural mycology in recent years comes into play: wood/fireplace ash combined with apple press residues.
In practice, this means two very simple materials:
- Wood ash from a stove or fireplace, completely cold, with no firelighters or varnished/paint residues
- Apple leftovers from juicing or cider making - the pulp without the juice
The apple leftovers provide sugars and pectins that the morel mycelium can use to form its reserve structures. The ash pushes the pH up noticeably and mimics the natural “burn sites” where morels often show up.
Location, soil, timing: how to make your garden morel-friendly
Choosing the right spot in the garden
A partially shaded area is best, for example:
- beneath an established apple tree or another deciduous canopy
- not in a hollow where water sits for a long time
- with loose, humus-rich soil and some lime content
Beds in full sun dry out too quickly, while deep shade under dense conifers is usually too acidic and too cool. A lighter edge of an orchard often suits morels very well.
The best time of year to set it up
Start preparation in autumn, typically between October and November. At that point the soil is not yet frozen, rainfall helps distribute nutrients, and the fungal network can settle in before winter.
Step by step: how to create a morel bed
For a typical morel bed, an area of around 1 to 2 square metres is sufficient. You can go bigger, but what matters more is sticking to the method carefully.
- Loosen the soil: Lightly dig over the top layer or use a garden fork to open it up; remove thick roots and stones.
- Add the organic layer: Spread a layer several centimetres thick made from apple leftovers mixed with leaves. If you do not have your own apple leftovers, ask at a local cider mill or juice press.
- Apply the ash layer: Sprinkle 2–3 centimetres of cold, clean wood ash evenly across the surface - thin, but without gaps.
- Inoculate with morel spores: Either crumble overripe morels and work them in, or make “spore water” (rinse morels in water and pour that liquid over the bed). Ready-made mycelium kits can also be used.
- Mulch lightly: Add a thin layer of leaves. It helps prevent the mycelium drying out and protects against cold, without smothering the soil.
Ash plus apple leftovers create a kind of “garden burn site” that morels interpret as a signal to grow.
From this point on, disturb the area as little as possible. Do not hoe it, do not dig it deeply - only gently loosen the surface if an overly tight crust develops.
Water, temperature, “cold shock”: getting morels into spring mode
After you set the bed up in autumn, winter does its work below the surface. The mycelium forms reserve structures that later produce fruiting bodies. Over winter, the bed needs:
- consistent, light moisture
- no waterlogging and no long-lasting standing rainwater
- protection from severe ground frost using leaves or a thin mulch
In late winter or very early spring - around March - many hobby gardeners try a deliberate “snowmelt effect”. On a mild day, they water the bed generously with very cold water. That temperature cue imitates melting snow cover, which morels often respond to in the wild.
Depending on your region, the first mushrooms may appear between March and May. In cooler locations it can be much later; in very mild winters, sometimes earlier.
How long does it take for the first morels to appear?
If you establish a morel bed, patience is essential. Even when the conditions are right, there is still an element of unpredictability. Some gardeners see nothing in year one, then suddenly get several flushes the following spring.
Morels can be temperamental - a well-made bed only improves the chances; it cannot promise results.
Typical timeline after setting up the bed in autumn:
- First spring: First fruiting bodies are possible, but there is no guarantee.
- Second spring: Reports of success are more common if the bed has remained stable.
- Further years: With regular care, morel beds can produce for several seasons.
When harvesting, cut the mushrooms just above the soil. That keeps the substrate undisturbed so the mycelium can continue working.
Long-term care: turning waste into a lasting delicacy
To stop the bed tailing off after one season, it needs a small top-up each year. In autumn, the following mini-routine works well:
- spread a thin layer of apple leftovers over the existing bed
- sift a fine layer of wood ash on top
- cover again with leaves
This creates a recurring cycle: apple waste and stove ash do not go in the bin, but into a bed that can, ideally, yield high-quality edible mushrooms. If you already heat with wood and have fruit trees, it is an almost elegant way to close the loop in your own garden.
Health, safety, sources of error: what to watch out for
As exciting as the idea is, a few points deserve serious attention.
Ash is not all the same
Only ash from untreated, natural wood belongs in a morel bed. Painted furniture, treated building timber, paper briquettes, or coal briquettes can contain heavy metals and chemicals. Those substances have no place in a vegetable or mushroom patch.
If you are unsure, it is better to use very small amounts of ash and mix it in thoroughly. An overly high pH can harm other garden plants if the bed is too close to standard borders.
Risk of confusion when harvesting
Morels have poisonous lookalikes, such as the false morel (Gyromitra). If you are harvesting mushrooms for the first time, you should study the identification features carefully or ask a qualified mushroom expert. Even in your own morel bed, a different fungus can settle in.
Common mistakes with a morel bed
- Bed too sunny and dry - the mycelium retreats.
- Too much water - waterlogging causes the fungal network to rot.
- Ash applied too thickly - the soil becomes almost sterile and unattractive for the mycelium.
- Constant digging - destroys the delicate fungal threads.
What makes morels so special - and what they go with
When you finally hold your first home-grown morels, it becomes obvious why they have such a reputation. Their flavour is so intense that small amounts go a long way. Classic pairings include:
- in a cream sauce with pasta or poultry
- in a hearty creamy soup
- as a topping for risotto or polenta
- finely chopped in scrambled eggs or an omelette
Before cooking, fresh morels should always be cooked through, as they are not tolerable raw. Dried morels should be soaked before cooking; the soaking liquid can add extra depth to many sauces.
If you enjoy the process, you can try related methods with other mushrooms - for instance, growing oyster mushrooms on logs or shiitake on hardwood blocks. Morels remain the diva of the mushroom world: demanding, unreliable, but with a flavour that can make the effort feel worthwhile.
Comments
No comments yet. Be the first to comment!
Leave a Comment