
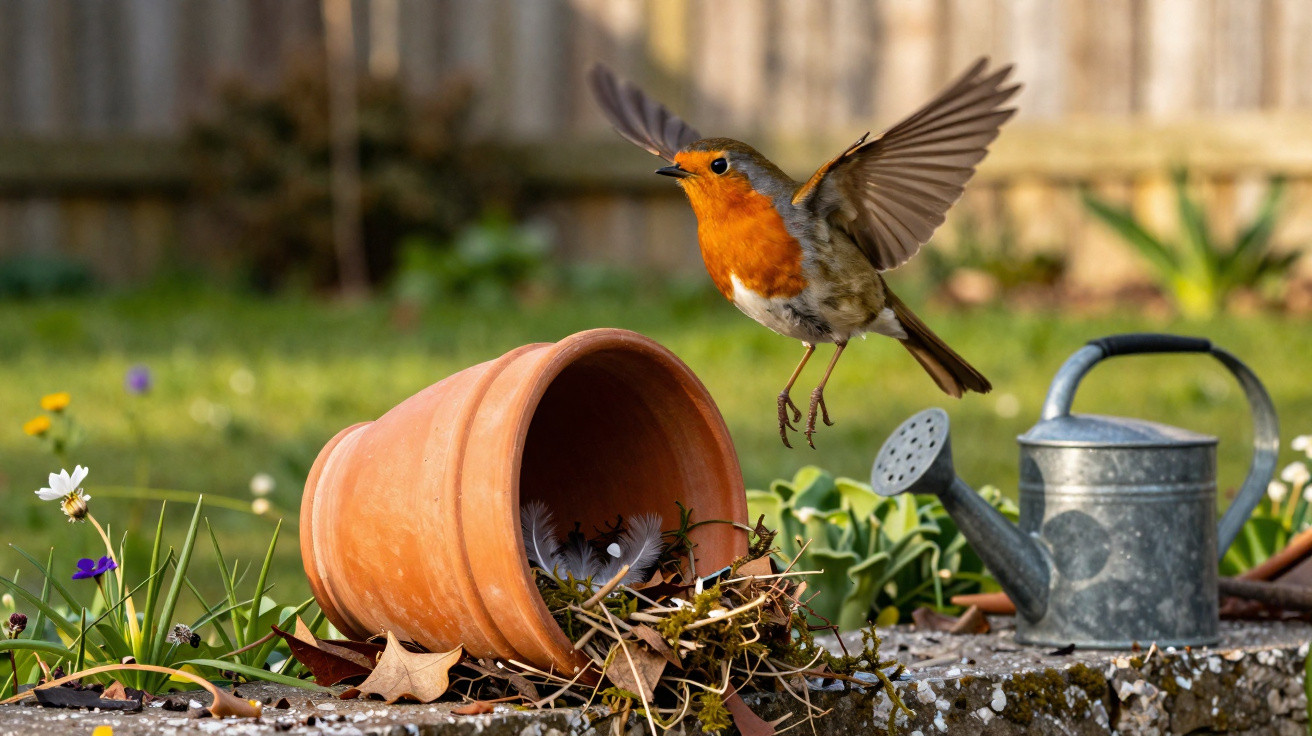
If a robin turns up in your garden time and again, it’s natural to wonder why it keeps passing over those pricey wooden nest boxes on the trees. The explanation is not what most people expect. It isn’t the cost that matters, but the type of nesting space on offer. A basic terracotta flowerpot, placed correctly, fits this bird’s requirements far better - and costs next to nothing.
Robins behave differently: what they actually look for when nesting
The robin (scientific name: Erithacus rubecula) is a familiar sight in many UK gardens. It hops between borders, follows the spade while you dig, and can seem almost tame. When it comes to nesting, however, it is far more particular than many gardeners assume.
Conservation organisations classify robins as “semi-cavity nesters”. In practice, that means they are not drawn to fully enclosed boxes with a small entrance hole - the style that suits tits so well. Instead, robins tend to choose places with:
- wide, clearly visible openings
- sheltered nooks that are protected but not completely sealed off
- hidden spots close to the ground
- dense shrubs, ivy, or wood piles near ground level
Robins do not usually nest 3 metres up on a smooth trunk. They favour the boundary between shrub cover and low vegetation, so many standardised nest boxes are simply the wrong design for them.
"If you want to encourage robins, you don’t need a designer nest box - you need an open, well-sheltered hiding place just above the ground."
Why wooden boxes often stay empty
A traditional, closed wooden nest box works brilliantly for cavity nesters such as great tits and blue tits. For robins, though, that same format is typically a compromise - and one they frequently reject.
Height and construction don’t suit them
A lot of wooden nest boxes are mounted:
- too high (2–3 metres or more)
- in full view on trunks or house walls
- with a narrow entrance hole that feels like a tunnel
Those are exactly the features that put robins off. They are looking for a refuge that resembles a half-open cavity or a concealed hollow around roots - not a fully sealed wooden box.
The internal climate matters a great deal
There’s also the issue of microclimate. Wood does provide insulation, but it responds strongly to sun and moisture. In some boxes, water can condense inside, humidity rises, and mould becomes a risk. For vulnerable chicks, that can be disastrous.
This is where a different material excels: plain, unglazed terracotta from the garden.
The terracotta-pot trick: turning a flowerpot into a first-class nesting site
With a few simple steps, an ordinary terracotta flowerpot can be converted into an excellent nesting place for robins. What matters most is the material, the size, the position, and the timing.
Why terracotta works so well
An unglazed terracotta pot offers practical advantages for nesting:
- Its porous surface absorbs moisture and releases it gradually.
- Condensation inside is reduced, so the nest can dry more easily.
- During the day it stores warmth, then gives it back gently in the evening.
"The terracotta pot acts like a small, natural climate regulator - exactly what delicate chicks need."
Important: use only natural, unglazed pots - no glaze, varnish, or bright paint. The less conspicuous it is, the better.
Choosing the right size
Pots around 15–20 centimetres in diameter are ideal. That keeps the entrance sufficiently open and leaves enough room inside without making the space feel exposed. If the pot is too small, flying in and turning becomes awkward; if it’s too large, it can feel insufficiently sheltered.
Step by step: how to set up a terracotta-pot nesting place
This straightforward plan can be completed in a single afternoon.
- Prepare the pot: Choose a simple, unglazed terracotta pot, rinse it thoroughly with clean water, and let it air-dry. Avoid any cleaning products.
- Remove labels: Take off all stickers, labels, and plastic remnants so nothing can off-gas, snag, or get in the way.
- Position the pot: Lay the pot on its side or set it with a slight downward tilt so rainwater cannot pool inside.
- Secure it firmly: Wedge it in place with wire, branches, stones, or pieces of wood so it doesn’t wobble - and won’t roll in the wind.
- Add a light base layer: Put in a thin layer of dry leaves and a little moss. This is only a starter base; the robin will do the actual nest building.
The aim is for the pot to look like a natural cavity that already exists, not a fully finished, artificial structure.
The perfect spot in the garden
Where you put the pot will largely determine whether it stays a “secret tip” or is occupied in the very first season.
The right height and placement
Robins prefer to breed low down. A height of roughly 1 to 1.5 metres above the ground is ideal. If it’s placed directly on the ground, the risk from cats and other predators increases; too high, and it no longer matches the species’ natural preferences.
Suitable locations include:
- dense hedges made from native shrubs
- ivy on walls or trees with thick leaf cover
- established banks, small embankments, or the edges of slopes
- gaps and recesses in older, slightly overgrown wood piles
The pot should sit half-hidden: easy to access from the front, but well screened from the sides and above.
Orientation and peace and quiet
A south-easterly aspect works well. It lets gentle morning sun reach the entrance, while wind and rain from the prevailing weather side are more likely to be kept out. Direct midday sun shining into the opening can overheat the interior.
"The quieter the area, the greater the chance the robin will accept the spot long-term."
So it’s better to avoid placing it:
- right next to the patio
- beside heavily used paths
- in the middle of a highly decorated garden feature
A pot that blends in is an advantage for robins, not a drawback.
Timing: when the terracotta pot should be in place
Robins start breeding early in the year. The best window for putting the pot out is broadly from late February to mid-March. That’s when birds are actively exploring territories and searching for suitable nesting sites.
If you only act later in spring, you often miss the season. Ideally, the pot should be installed and ready several weeks before egg-laying, so the bird has time to get used to it.
What if no robin moves in?
Sometimes the pot remains unused in the first year. That doesn’t mean the approach doesn’t work. Small, targeted tweaks often help:
- move the pot into a denser part of the hedge
- create more structure close to the ground (dead wood, leaf piles)
- plant additional dense native shrubs
- reduce disturbance from pets or children in that area
Many birds are wary of any change. If you avoid constant relocation and only refine the setup deliberately, your chances usually improve noticeably in the following years.
More benefits for the whole garden
Providing a well-chosen nesting place for robins offers more than pleasant watching. Robins consume large numbers of insects, larvae, and spiders. In a vegetable garden, that can incidentally reduce certain pests.
If you make the area around the pot more wildlife-friendly - with leaves, wood, slightly untidy corners, and native shrubs - you create a small refuge that supports many species. The terracotta pot can then become the centrepiece of a lively, low-maintenance garden habitat.
This flowerpot approach makes one thing clear: expensive specialist solutions aren’t always necessary. By paying attention to animal behaviour, understanding a little about materials, and using some judgement on placement and timing, you can turn a simple garden item into what may be the most sought-after nesting spot on the entire property.

Comments
No comments yet. Be the first to comment!
Leave a Comment