
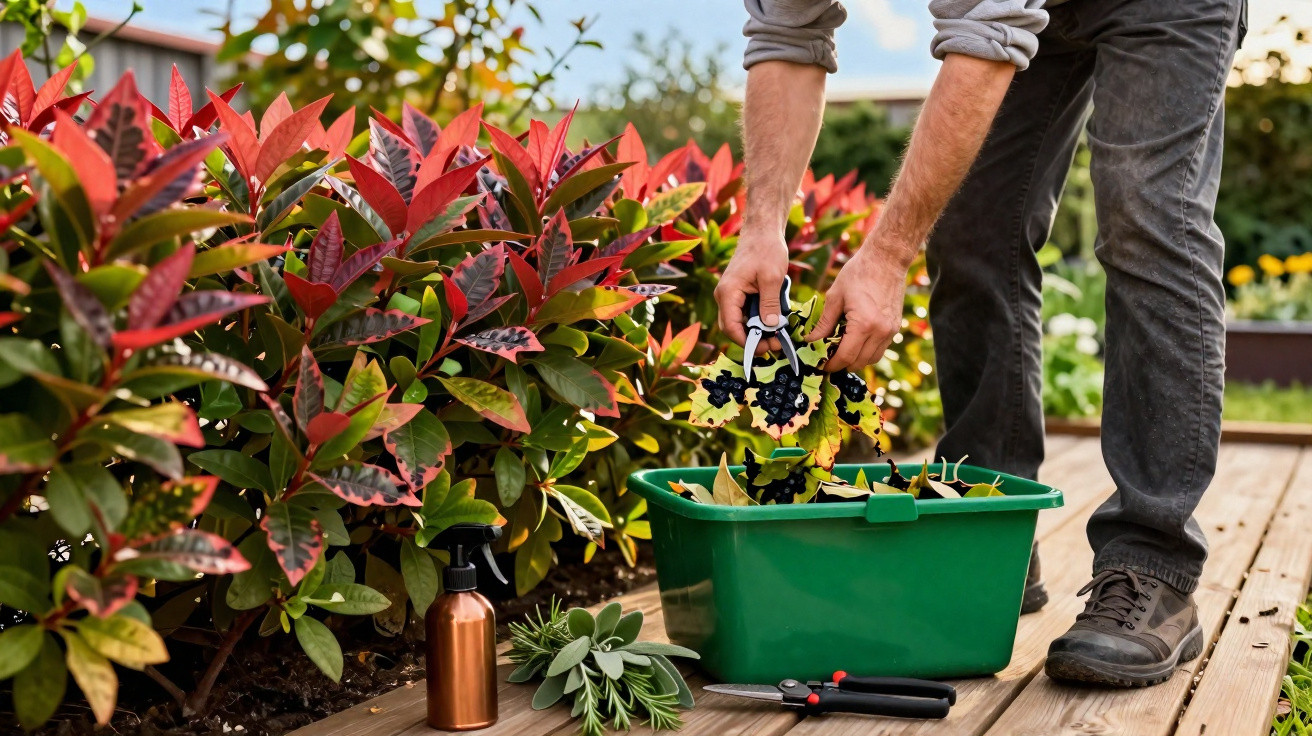
Anyone who grows evergreen Photinia in the garden knows the pattern: in winter the young shoots glow red, in spring everything turns a fresh green - and then, seemingly overnight, black-brown spots appear on the leaves. The immediate worry is obvious: has the hedge had it? The reassuring news is that, in most cases, you can reduce the problem markedly with one very simple, completely natural action - as long as you do it in good time.
What’s behind the black spots on Photinia
Photinia, most commonly planted as Photinia × fraseri ‘Red Robin’, is hugely popular in residential areas. It puts on growth quickly, holds its leaves all year, and those red new shoots add colour when the weather is bleak. Yet the very qualities that make for a dense, evergreen hedge also increase the risk of a fungal disease: the so-called Entomosporium leaf spot of Photinia (often referred to as Entomosporiosis).
This disease typically shows up as small, round marks on the leaves. At first they look brownish to blackish, often with a faint reddish edge. The spot then expands, the centre later appears more grey, and the surrounding leaf tissue starts to yellow. Eventually the affected leaf drops. You usually notice it most clearly low down on the hedge.
"If whole clumps of speckled, yellow leaves are lying under the hedge, that’s the clear alarm call: Entomosporiosis is active."
Normal leaf turnover looks different: leaves yellow more evenly, without sharply defined circles and without a grey centre. Thick, almost crust-like black coatings, on the other hand, tend to point to other fungal issues, such as a more general leaf-spot disease or sooty mould. If you’re unsure, focus on two signs: neat, round spots and noticeable leaf drop in the lower section of the hedge strongly indicate the typical Photinia fungal infection.
Why the spots explode in spring
The real trigger is often hiding in plain sight - right underneath the hedge. Through autumn and winter, countless infected leaves fall to the ground and simply remain there. Visually it becomes a dull brown layer; biologically it’s an ideal breeding ground for fungal spores.
Experts estimate that a large proportion of the spores survive the winter in this dead foliage. As soon as the first heavy spring rain arrives, droplets hit the leaf layer, bounce back up, and in the process fling tiny spore particles on to the new, tender leaves at the base of the hedge.
"The disease doesn’t rise from the soil - raindrops catapult it upwards, like a trampoline made of old leaves."
The risk is highest with dense hedges on heavier, damp soils. There, moisture lingers for longer, and just a few spring showers are enough to kick off the next wave of infection. Many gardeners underestimate how leaf litter, waterlogging and tightly packed plants combine to fuel the problem.
The natural key: the big leaf reset before spring
The most effective response to the black spots is also the simplest: remove every infected leaf thoroughly, before spring properly gets going. Once the leaf layer is gone, the fungus loses its main launchpad.
The ideal timing and how to prepare
The best window is from late February to early March, on a dry day, before the buds really break. At that point the spores are still in the fallen leaves, but they haven’t yet spread in large numbers.
- Wait for a dry spell lasting several hours
- Put on gardening gloves
- Have a rake or fan rake ready
- Allow for one or two sturdy refuse sacks for the leaves
Work carefully: rake from the base of the hedge outwards, and collect not only the obvious leaves but also those wedged between the lower branches. If you like, use a small hand rake or claw tool to reach into the dense sections.
Where the leaves should go - and what you must not do
All collected leaves should be sealed airtight in sacks and then taken for council disposal. They do not belong on your own compost heap, because the spores can survive there easily and may return to the garden later when you spread compost.
"Never leave infected Photinia leaves along the hedge line or compost them - otherwise the infection spiral starts all over again next year."
Another common mistake is watering from above with a fine rose when the hedge looks thirsty in spring. A light spray over the lower leaves redistributes spores and keeps the leaf layer wet for longer than necessary. Instead, water directly at the root area, without soaking the foliage.
Natural allies: copper, herbal brews and air
After meticulous leaf collection, you can support the hedge further. Many gardeners apply a copper treatment in late winter, typically using a ready-made copper spray sold for this purpose. At a low dose (around 10 to 20 grams per litre of water - follow the manufacturer’s instructions), it forms a kind of protective film on the leaves and inhibits the spores from germinating.
If you prefer a more nature-friendly approach, you can pair the mechanical clean-up with home remedies such as:
- Horsetail tea: helps toughen the leaf surface thanks to its high silica content.
- Nettle feed: boosts overall plant vitality so infections are easier to withstand.
- Targeted watering at the roots: keeps leaves drier and makes it harder for the fungus to spread.
Just as valuable is gently thinning the base of the hedge: remove a few older shoots that cross, crowd, or grow inwards. It’s only a handful of cuts with the secateurs, but the effect can be surprisingly strong. More airflow and more light in the lower section mean leaves dry more quickly after rain. Persistently damp leaf surfaces are ideal conditions for fungal diseases.
When you really need to worry
A few isolated spots on older leaves are almost routine with Photinia, especially after very wet winters. It becomes a genuine concern when several of the following occur together:
- Large quantities of spotted, yellow leaves collect beneath the hedge.
- The lower branches look almost bare in spring.
- New growth shows spots soon after shooting.
- The hedge appears thin overall and loses its screening effect.
If you carry out the leaf reset consistently, you can often halt this progression. In very severe cases, it’s worth considering a gradual rejuvenation: cut some heavily weakened shoots back harder so that fresh, vigorous growth can develop from within the plant.
Keeping Photinia balanced: preventative care through the year
For long-term resilience, the hedge needs more than leaf hygiene - it also benefits from steady, sensible care. Too much nitrogen pushes very soft, vulnerable growth that fungal diseases can attack easily. Better results come from moderate feeding in spring, ideally with organic slow-release fertilisers or well-rotted compost worked into the soil around the plant (not piled directly against the stems).
Plant spacing matters as well. Many Photinia hedges are set almost stem to stem because people want quick, dense privacy. The downside is poor ventilation and leaves that stay wet. If you replace dead or weak plants within an existing hedge, it’s better to allow a little more breathing space between shrubs.
In particularly rainy years, a second check in late spring can pay off: if infected leaves are again building up on the ground, another round of collection can slow the infection. Over time, this helps create a much healthier microclimate in the lower part of the hedge.
Why the effort is worthwhile for garden owners
Photinia hedges have a reputation for being tough and low-maintenance, so Entomosporiosis can feel like an unwelcome contradiction - and understandably frustrating. However, once you recognise that the fungus mainly survives in fallen leaves and spreads via splashing water, a few small, targeted actions can make a big difference.
"Invest one hour a year in clearing leaves - and Photinia stays the colourful, dense privacy screen many people want."
In closely built-up neighbourhoods, where hedges are expected to soften noise and block views at the same time, that small bit of maintenance becomes even more valuable. Healthy Photinia shrubs provide structure year-round, deliver strong colour contrast in spring and autumn, and their flowers also attract insects. If you keep an eye on your hedge, don’t ignore infected leaves, and avoid overhead splash watering, you lay the groundwork for black spots not becoming an annual test of patience.
Comments
No comments yet. Be the first to comment!
Leave a Comment